
Hello! Welcome back to our course on Audio AI.
In our last lesson, we meticulously prepared a custom dataset for voice cloning. We went through the entire pipeline: from sourcing raw audio to cleaning, segmenting with forced alignment, and structuring it into the training-ready LJSpeech format. This dataset of clean audio clips and their corresponding transcripts is the essential ingredient for our next step.
Today, we'll put that hard work into practice. Our learning outcome is to configure and launch a fine-tuning job for a multi-speaker TTS model (e.g., VITS) using Coqui TTS. We'll take the dataset we prepared and use it to adapt a powerful, pre-trained VITS model to generate speech in our target voices. This session is designed to be a practical, hands-on guide that will bridge the gap between data preparation and model training.
1. The Power of Fine-tuning
Before we dive into the "how," let's briefly touch on the "why." While we could train a TTS model from scratch, this requires massive amounts of data (often 100+ hours) and significant computational resources. Fine-tuning offers a much more efficient path.
Fine-tuning a TTS model - TTS 0.22.0 documentation
The Coqui TTS documentation provides a concise explanation of the advantages of fine-tuning. It's the standard approach when working with custom datasets.
Please read the introductory section on 'Fine-tuning'. Focus on the two main benefits: faster learning and achieving better results with smaller datasets.
As the documentation states, by starting with a model that already understands the general structure of speech, we can adapt it to a new voice or style with just a couple of hours, or even minutes, of high-quality data. We are not teaching the model to speak; we are teaching it to speak like someone new.
2. The Coqui TTS Fine-tuning Workflow
We will use a Google Colab notebook as our environment, a common practice for tasks like this. The process can be broken down into five main stages:
- Setup & Preparation: Install Coqui TTS and dependencies, connect to Google Drive, and ensure our dataset is in place.
- Model Selection: Choose and download a pre-trained base model to fine-tune.
- Configuration: This is the most critical step. We will edit a configuration file or script to point to our data, set up multi-speaker training, and adjust hyperparameters like the learning rate.
- Launch & Monitor: Start the training process and use TensorBoard to monitor its progress.
- Inference: Use the newly fine-tuned model to synthesize speech.
The following videos provide an excellent, in-depth walkthrough of this entire process. We will be referencing the concepts they demonstrate throughout this lesson.
Training or Fine Tuning a Hindi Language VITS TTS Voice Model with Coqui TTS on Google Colab
This first video from NanoNomad shows how to fine-tune a VITS model for Hindi. While the language is different, the process and configuration steps are universal for any multi-speaker project.
You don't need to watch this entire video now, but keep it in mind as a reference. It clearly shows the Colab setup, parameter definitions, model download, configuration, and launch process. We will be breaking down these same steps in detail.
Train or Fine Tune VITS on (theoretically) Any Language | Train Multi-Speaker Model | Train YourTTS
This second video, also from NanoNomad, offers further insights and practical tips for training VITS models, particularly for multiple speakers and different languages.
Similarly, treat this as a companion resource. It reinforces key concepts like run types, the importance of data quality, and the detailed configuration of multi-speaker training. It also demonstrates command-line inference at the end.
3. Step-by-Step Guide to Fine-tuning
Let's walk through the process, focusing on the key configuration choices you'll need to make.
3.1. Environment and Dataset
First, in your Colab environment, you would install Coqui TTS and its dependencies, then mount your Google Drive. This allows the notebook to access your dataset and save the trained models persistently.
Your dataset, prepared in the last lesson, should be organized in the LJSpeech format on your Drive:
/content/drive/MyDrive/tts_dataset/
├── wavs/
│   ├── speaker1_001.wav
│   ├── speaker1_002.wav
│   ├── speaker2_001.wav
│   └── ...
└── metadata.csv
The metadata.csv file would contain lines like:
speaker1_001|This is the first sentence spoken by speaker one.
speaker2_001|This is a sentence from the second speaker.
The speaker name in the filename is not strictly necessary but is good practice. The key is that the transcript in metadata.csv must be associated with a speaker name for multi-speaker training, which we'll see next. Coqui TTS formatters can often parse this automatically.
3.2. Choosing a Base Model and Run Type
You'll start by fine-tuning from a pre-trained model. Coqui provides many such models. You can list them and download one using the tts command line. For instance, to download the English VITS model trained on VCTK:
tts --model_name tts_models/en/vctk/vits --text "This will download the model."
This command will download the model files (model.pth, config.json, etc.) to a local directory. The path to this model.pth file will be your --restore_path.
When you launch training, you must specify a run type. This tells the trainer what to do with existing model files. The main options are:
restore: Start a new fine-tuning session from a pre-trained base model specified by--restore_path. This is what we will use.restore_checkpoint: Start a new session from one of your own previously saved checkpoints.continue: Resume an interrupted training session from the last saved checkpoint in the output directory.new_model: Train a model entirely from scratch.

3.3. The Configuration File: Your Control Panel
The core of setting up a training job is editing the configuration. This is usually done in a Python script or a config.json file. Let's break down the most important sections for our multi-speaker task.
Fine-tuning a TTS model - TTS 0.22.0 documentation
The Coqui TTS documentation outlines the essential parameters you'll need to modify.
Read sections 4 ('Setup the model config for fine-tuning') and 5 ('Start fine-tuning'). Pay close attention to the list of important fields (datasets, run_name, lr, etc.) and the use of the --restore_path flag.
Based on the documentation and practical recipes, here are the key parameters:
run_name: A unique name for your experiment (e.g.,vits_finetune_voice_clone). This will be the name of your output folder.output_path: The base directory where your run folder will be created (e.g.,/content/drive/MyDrive/coqui_training/).datasets: A list of dataset configurations. For our simple case, it will point to ourmetadata.csvand thepathto the dataset root folder.lr(Learning Rate): Crucially important for fine-tuning. You should use a much smaller learning rate than for training from scratch. A typical value for fine-tuning might be between1e-5and5e-6. A high learning rate can destroy the valuable knowledge in the pre-trained model.
Multi-speaker Specific Configuration
This is where we tell the model to handle multiple voices.
Training a Model - TTS 0.22.0 documentation
The general training documentation has an excellent section on multi-speaker training that explains the necessary components.
Read the 'Multi-speaker Training' section. Focus on the role of the SpeakerManager, and how to configure the model to use either speaker embeddings (use_speaker_embedding=True) or d-vectors.
As the documentation shows, we need to initialize a SpeakerManager and provide it to the model. This manager handles the mapping between speaker names in your dataset and the integer IDs the model uses internally.
# In your training script
...
train_samples, eval_samples = load_tts_samples(...)


# Init speaker manager
speaker_manager = SpeakerManager()
speaker_manager.set_ids_from_data(train_samples + eval_samples, parse_key="speaker_name")


# Configure the model with the number of speakers
config.num_speakers = speaker_manager.num_speakers


# Initialize the model, passing the speaker_manager
model = VITS(config, ap, tokenizer, speaker_manager=speaker_manager)
...
You also need to tell the model how to differentiate speakers. You have two main options:
- Speaker Embeddings (
use_speaker_embedding=True): The model will have a trainable embedding layer. Each speaker ID is mapped to a unique vector that is learned during training. This is a common and robust approach. - D-Vectors: You can pre-compute speaker embeddings (d-vectors) using a separate, pre-trained speaker encoder model. The trainer then computes these for your entire dataset and saves them to a file (e.g.,
speakers.pth). This can sometimes lead to faster initial convergence. The NanoNomad videos demonstrate this approach by computing d-vectors before training begins.
Finally, to ensure each speaker is seen equally during training, especially if your dataset is unbalanced, you should enable the weighted sampler:
use_weighted_sampler=True: This tells the data loader to sample from each speaker's data in a balanced way, preventing the model from becoming biased towards the speaker with the most data.
3.4. Launching and Monitoring
Once your configuration script is ready, you launch the training. In a Colab notebook, this is typically the last cell you run. The command would look something like this, using the main train_tts.py script:
python TTS/bin/train_tts.py \
    --config_path /path/to/your/config.json \
    --restore_path /path/to/pretrained/model.pth \


    # Any other command-line overrides
Or, if you're using a self-contained recipe script as shown in the documentation, you would simply run python your_recipe.py.
As the model trains, it will output logs to the console and, more importantly, to a TensorBoard log directory. You can launch TensorBoard to visualize the training process.
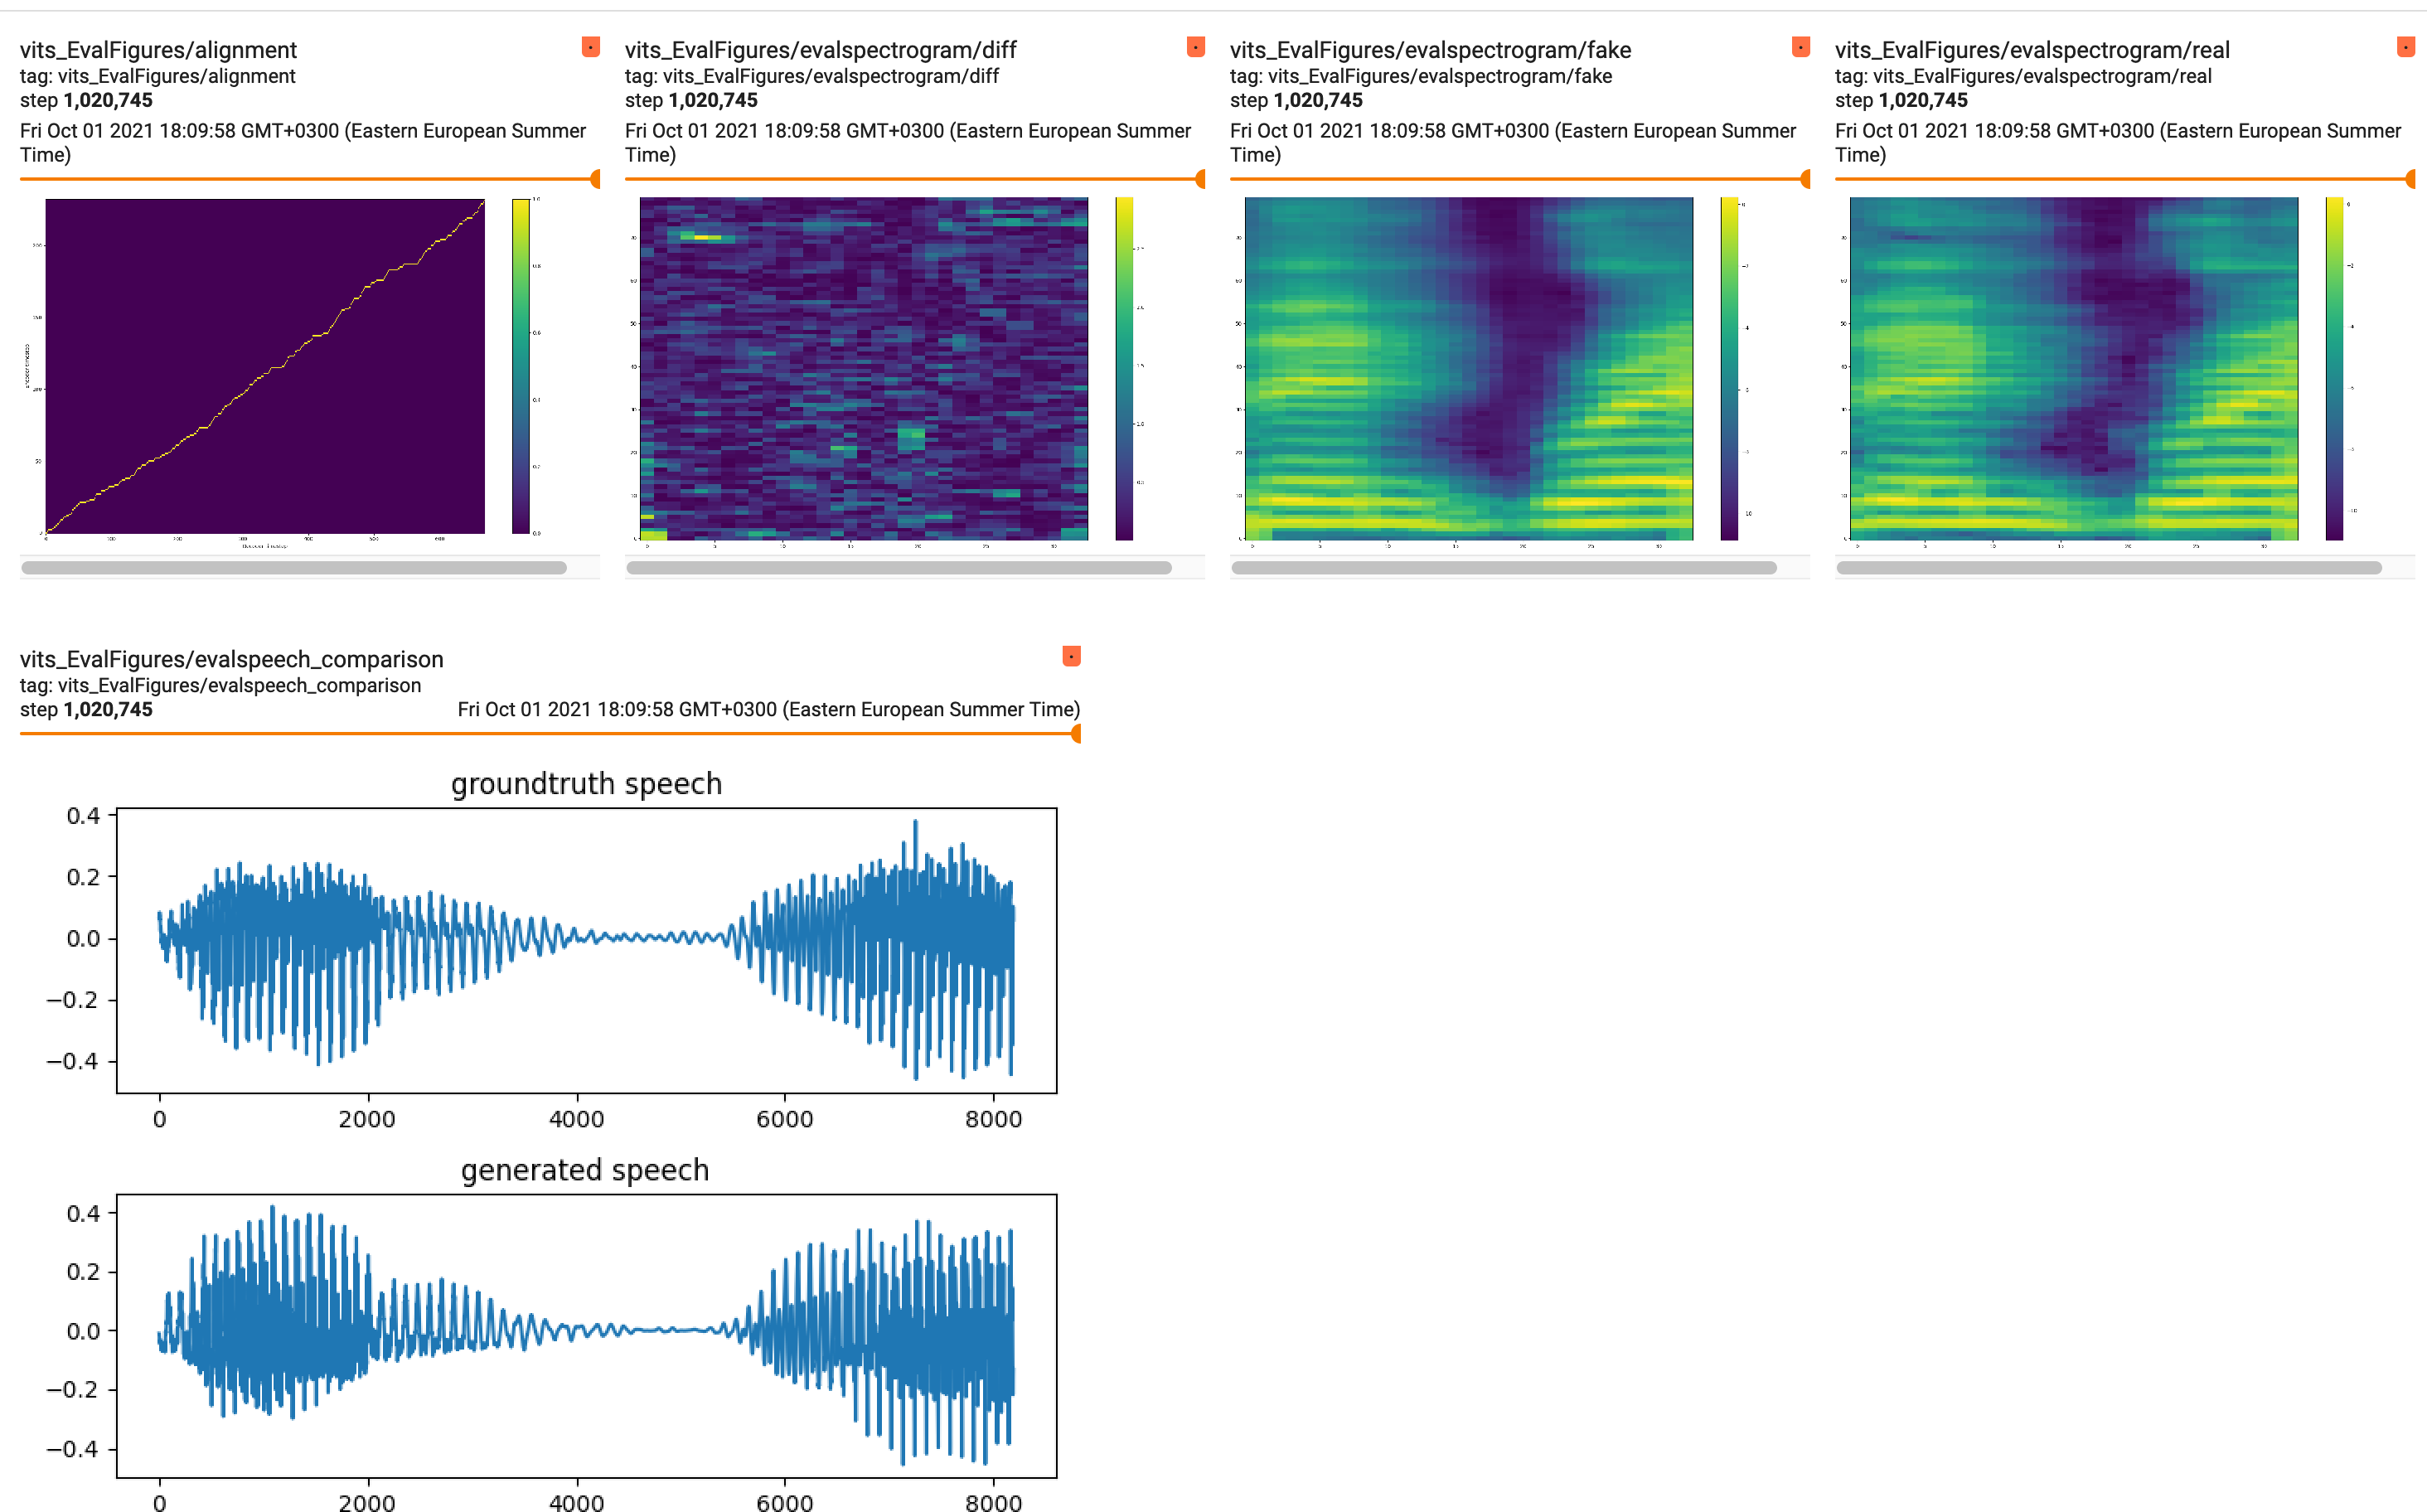
Beyond just watching the loss go down, the most valuable part of TensorBoard for TTS is the audio and image outputs. For VITS, you should look for:
- Alignment Plot: This shows how the model is aligning the input text (phonemes) to the output audio. A clean, sharp diagonal line indicates good alignment.
- Spectrogram Comparison: You can see the ground truth mel-spectrogram next to the one generated by the model. As training progresses, they should become more similar.
- Audio Samples: You can listen to synthesized audio samples at regular intervals. This is the ultimate test of your model's quality.
Conclusion
Congratulations! You have now walked through the entire process of launching a fine-tuning job for a multi-speaker VITS model. You've taken a prepared dataset and learned how to configure a training run that adapts a powerful base model to your specific voices.
Key Takeaways:
- Fine-tuning is an efficient method for voice cloning that leverages pre-trained models, requiring less data and computation.
- The training configuration is the central control panel. Key parameters for multi-speaker fine-tuning include a low learning rate, the
--restore_pathto the base model, and speaker settings likeuse_speaker_embeddinganduse_weighted_sampler. - The
SpeakerManageris a critical component in Coqui TTS for handling the mapping of speaker names to internal model IDs. - Monitoring with TensorBoard is essential for qualitatively assessing model performance through alignment plots and audio samples, not just quantitative loss metrics.
Preview of the Next Lesson:
We've now trained a model and can listen to the samples it produces. But how do we objectively measure "how good" the synthesized speech is? In our next lesson, we will cover how to evaluate synthesized speech quality using objective (e.g., PESQ) and subjective (e.g., Mean Opinion Score) metrics. This will give you the tools to systematically compare different models and training runs.