
Hello! Welcome back to our course on Audio AI.
In our last lesson, we explored the methodology of zero-shot voice cloning, focusing on how a decoupled speaker encoder can create a "voice fingerprint" from just a few seconds of audio. We established that this process enables a TTS model to mimic a new voice without any retraining.
While zero-shot cloning is powerful, its quality is fundamentally limited by the short reference audio clip. To achieve truly high-fidelity voice cloning or to adapt a model to a unique accent, we need a more robust approach: fine-tuning. This, in turn, requires a high-quality, custom dataset of the target voice.
Today, we'll tackle exactly that. Our learning outcome is to prepare a custom dataset for voice cloning, including audio segmentation, cleaning, and transcription. We will walk through the entire pipeline, from sourcing raw, long-form audio to producing a structured, training-ready dataset of clean, short audio clips paired with accurate text.
1. The Anatomy of an Ideal Voice Cloning Dataset
The principle of "garbage in, garbage out" has never been more true than in voice cloning. The quality of your final synthesized voice is almost entirely dependent on the quality of the data you train it on. An ideal dataset for fine-tuning a TTS model has several key characteristics:
- High Audio Fidelity: The recordings should be as clean as possible, with minimal background noise, music, echo, or reverb. The standard format is a single-channel (mono) WAV file, with a sampling rate that matches your target model (e.g., 22050 Hz or 24000 Hz).
- Sufficient and Varied Data: Aim for at least 15-30 minutes of clean speech. More is generally better, but quality is more important than quantity. The data should ideally capture a range of the speaker's natural prosody and intonation.
- Precise Segmentation: The audio should be broken down into short, individual clips, typically between 3 and 15 seconds long. Each clip should correspond to a single sentence or a coherent phrase.
- Accurate Transcription: Each audio clip must have a perfectly matching, normalized text transcript. This includes spelling out numbers and handling abbreviations.
- Speaker Purity: The recordings should contain only the voice of the target speaker.
Creating this dataset from "in-the-wild" sources like YouTube videos or podcasts is a multi-step process of refinement.

Let's break down each stage of this pipeline.
2. The Dataset Preparation Pipeline
We will follow a structured process to transform a long audio recording into a training-ready dataset. We'll use a combination of command-line tools and Python libraries to accomplish this.
Step 1: Sourcing and Standardization
First, you need to acquire the source audio. Good sources include podcasts, interviews, audiobooks, or any long-form content featuring your target speaker with relatively high-quality audio.
-
Download the Audio: You can use a tool like
youtube-dlp(an actively maintained fork ofyoutube-dl) to download audio from a YouTube URL. -
Extract and Convert: The downloaded file will likely be a video (MP4) or a compressed audio format (M4A, MP3). You need to extract the raw audio and convert it to a standard, uncompressed format. This is a perfect job for
ffmpeg, a powerful command-line tool for audio/video manipulation.To convert a video file
input_video.mp4into a mono WAV fileoutput_audio.wavsampled at 22050 Hz, you would use:ffmpeg -i input_video.mp4 -ac 1 -ar 22050 output_audio.wav-i: Specifies the input file.-ac 1: Sets the number of audio channels to 1 (mono).-ar 22050: Sets the audio sampling rate to 22050 Hz.
This gives you a single, long WAV file, which is the starting point for the next steps.
Step 2: Audio Cleaning and Enhancement
Raw audio often contains unwanted sounds. We need to isolate the speaker's voice as much as possible.
- Noise Reduction: For background noise like hiss or hum, tools like
RNNoisecan be effective. - Source Separation: If there's music or other competing sounds, you can use a source separation model like
Demucs. It uses deep learning to separate an audio track into its constituent parts (e.g., vocals, bass, drums, other). For our purposes, we just keep the 'vocals' track. - Volume Normalization: To ensure consistency across all your audio clips, it's crucial to normalize their volume. A common practice is to normalize to a specific loudness level, measured in LUFS (Loudness Units Full Scale), or to a target peak/RMS level.
The following video provides a practical overview of how to use tools for denoising, source separation, and normalization within a Google Colab environment.
Create Datasets for Voice Model Training on Google Colab | Updated Tools for Coqui TTS Training
This video from NanoNomad demonstrates several useful cleaning tools.
Watch the following sections to see these cleaning steps in action: RNN Noise (02:26 - 03:45): See how to apply a denoising model to a long audio clip. Demucs (04:32 - 05:57): Understand how to use a source separation model to isolate vocals from background music. Normalization (05:57 - 06:39): Observe two different methods for normalizing audio file volumes.
Step 3: Segmentation and Forced Alignment
This is the most critical and technically interesting step. We need to chop our long, clean audio file into short segments and generate an accurate transcript for each one. We achieve this using a process called forced alignment, powered by a high-performance Automatic Speech Recognition (ASR) model.
The workflow is as follows:
- An ASR model (like Whisper) first generates a transcript of the entire audio file.
- The model then revisits the audio and aligns the generated text word by word (or even phoneme by phoneme), producing precise start and end timestamps for each utterance.
- These timestamps are used to "slice" the long audio file into many short clips.
A powerful tool for this is WhisperX, which extends OpenAI's Whisper with highly accurate, word-level timestamps.
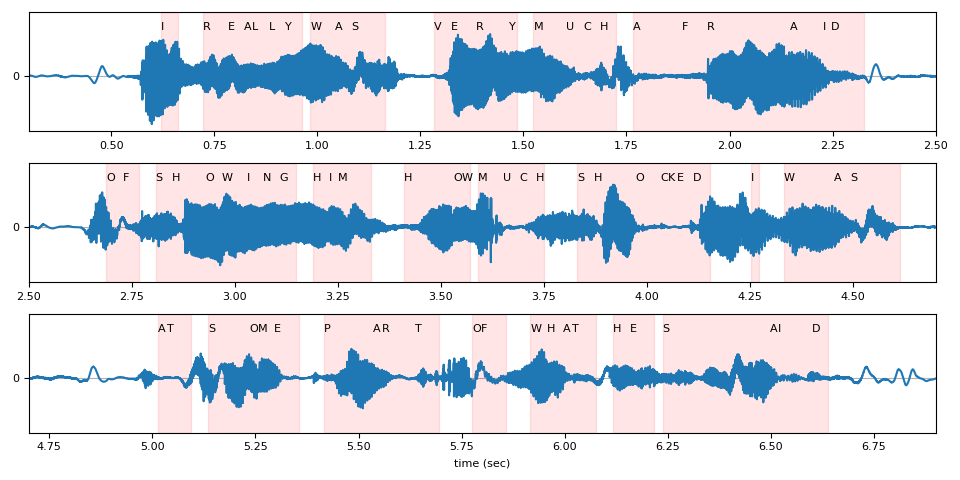
The NeMo framework from NVIDIA offers another powerful tool, CTC-Segmentation, which is particularly robust for aligning long audio files where the provided transcript might have slight deviations.
A Toolbox for Construction and Analysis of Speech Datasets
To understand the theory behind this, let's read about the CTC-Segmentation tool from the NeMo toolbox paper. This explains how a pre-trained ASR model can be used to find and segment utterances within a long audio file.
Please read Section 2.1, 'CTC-segmentation tool', and Section 3.2, 'Text and audio alignment'. Focus on the two-stage process: running a forward pass with an ASR model to get character probabilities, and then a backward pass to find the most likely path for the text utterance. This is the core mechanism of forced alignment.
Step 4: Filtering and Text Normalization
The automated segmentation process isn't perfect. The resulting dataset needs to be filtered to remove bad samples.
- Filter by Duration: Discard clips that are too short (e.g., < 2 seconds) or too long (e.g., > 15 seconds).
- Filter by Content: Remove clips with mispronunciations, stutters, or non-speech sounds. An interactive tool like NeMo's Speech Data Explorer (SDE) can be invaluable here, as it allows you to listen to clips and view their spectrograms to spot issues.
- Filter by ASR Confidence: High-quality alignment tools provide a confidence score. You can automatically discard segments with low scores, which often indicate a mismatch between the audio and the transcript.
- Text Normalization: The transcripts must be cleaned. This involves:
- Expanding numbers to words (e.g., "25" -> "twenty-five").
- Expanding abbreviations (e.g., "Mr." -> "Mister").
- Removing symbols and punctuation that aren't spoken.
This step requires careful manual and automated cleaning to ensure the model learns the correct text-to-audio mapping.
A Toolbox for Construction and Analysis of Speech Datasets
The NeMo paper also provides excellent guidance on error analysis and filtering.
Read Section 3.4, 'Error analysis and filtering', and Section 4.1, 'General ASR error analysis using SDE'. Pay attention to the common issues found in speech datasets and the heuristic rules suggested for cleaning them (e.g., checking character rates, using CER thresholds).
Step 5: Structuring the Final Dataset
Finally, you must organize your clean audio clips and transcripts into a format that training frameworks like Coqui TTS or ESPnet expect. A common format is the LJSpeech format:
-
A directory (e.g.,
wavs/) containing all the final, short.wavfiles. -
A single metadata file (e.g.,
metadata.csv) that maps each audio filename to its normalized transcript. Each line looks like this:filename_001|This is the normalized transcript for the first audio file.filename_002|This is the transcript for the second.
This simple, structured format is the final output of our preparation pipeline and the direct input for model fine-tuning.
3. A Practical Walkthrough
Theory is great, but let's see this in action. The following video from Trelis Research provides a complete, step-by-step walkthrough of this entire process within a Jupyter Notebook. It uses youtube-dlp, ffmpeg, and WhisperX to create a dataset ready for fine-tuning the StyleTTS2 model.
I encourage you to follow along with the video, as it demonstrates the practical implementation of the concepts we've just discussed.
Text to Speech Fine-tuning Tutorial
This video, 'Text to Speech Fine-tuning Tutorial', contains a fantastic section on dataset preparation. We'll walk through its key segments.
Please watch the following parts carefully: Data Requirements (00:25:24 - 00:26:20): The presenter outlines the goals: high-quality audio, proper segmentation, and minimal noise. Segmentation Logic (00:26:20 - 00:28:15): Listen to the explanation of why clean segmentation is vital and how WhisperX is used to get phoneme-level timestamps. The concept of adding a small padding buffer is a crucial practical tip. Downloading & Conversion (00:30:33 - 00:32:55): Watch the code execution for downloading a YouTube video and converting it to WAV format. Transcription with WhisperX (00:32:55 - 00:34:34): See how WhisperX is used to generate a timestamped transcript (SRT format). Segmenting Audio & Text (00:34:34 - 00:39:54): This is a key section. Follow the logic for splitting the long audio and text into chunks that respect the model's token limit (512 tokens for BERT-like models). Final Processing & Structuring (00:43:43 - 00:46:03): The video concludes the preparation by converting text to phonemes and organizing the data into training/validation sets before pushing it to the Hugging Face Hub.
Conclusion
In this lesson, we've systematically broken down the process of creating a custom voice cloning dataset. You now understand that this is a detailed pipeline requiring careful sourcing, cleaning, segmentation, and filtering.
Key Takeaways:
- Pipeline is Key: A structured pipeline (Source -> Standardize -> Clean -> Segment -> Filter -> Structure) is essential for creating high-quality data from raw sources.
- Tooling is Diverse: A combination of tools like
ffmpeg,Demucs, andWhisperXare used at different stages to manipulate, clean, and align the data. - Forced Alignment is Crucial: Using a powerful ASR model for forced alignment is the core technique for automatically segmenting long audio into short, transcribed clips.
- Quality Over Quantity: Meticulous cleaning and filtering are more important than simply having a large amount of data. A small, clean dataset will outperform a large, noisy one.
Preview of the Next Lesson:
Now that you know how to prepare the data, the next logical step is to use it. In our next lesson, we will configure and launch a fine-tuning job for a multi-speaker TTS model (e.g., VITS) using Coqui TTS, putting the dataset you've learned to create into practice.