
Hello! Welcome back to our course on Audio AI.
In the last lesson, we successfully configured and launched a fine-tuning job for a multi-speaker VITS model. You now have a model that has been adapted to generate speech in the specific voices from your custom dataset. The next logical step is to use this model to actually synthesize speech.
Today's lesson focuses on exactly that. Our learning outcome is to synthesize speech using the fine-tuned model for both seen and unseen speakers (zero-shot). We will explore two distinct modes of synthesis:
- Generating speech for the speakers the model was explicitly trained on ("seen" speakers).
- Cloning a completely new voice that the model has never encountered before, using just a short audio sample ("unseen" speakers).
This lesson will equip you with the practical skills to use Coqui TTS for both of these powerful applications.
1. Synthesizing Speech for "Seen" Speakers
A multi-speaker model, like the one we fine-tuned, learns a unique representation for each speaker in its training data. During training, the SpeakerManager we configured created a mapping from the speaker names in your metadata.csv to internal IDs. To generate speech in a specific voice, we simply need to provide the corresponding speaker ID or name.
1.1. How It Works
For models like VITS trained on multi-speaker datasets (e.g., VCTK), the model architecture includes a speaker embedding layer. When you provide a speaker ID, the model looks up the corresponding learned embedding vector. This vector is then used to condition the entire synthesis process, ensuring the output speech has the vocal characteristics of the chosen speaker.
You can easily find the available speakers for your fine-tuned model and use them for synthesis.
Minimal Example for English Text-to-Speech with VITS
This Hugging Face blog post provides a very clear and minimal example of how to synthesize speech from a multi-speaker VITS model using the Coqui TTS library. The process is identical for a model you've fine-tuned yourself.
Please read 'Example 2: English male voice (multi-speaker VITS)' and 'About speaker IDs (VCTK)'. Focus on how the speaker parameter is used in the tts_to_file function and how you can programmatically list the available speakers.
1.2. Practical Implementation
Let's put this into practice. The following Python code demonstrates how you would load your fine-tuned model and generate speech for one of the speakers it was trained on.
import torch
from TTS.api import TTS


# Get device
device = "cuda" if torch.cuda.is_available() else "cpu"


# --- Step 1: Load your fine-tuned model ---
# The path should point to the output directory of your training run.
# Coqui TTS will automatically load the best model and the config.
model_path = "/path/to/your/training/output/vits_finetune_voice_clone/best_model.pth"
config_path = "/path/to/your/training/output/vits_finetune_voice_clone/config.json"


# Initialize the TTS object
tts = TTS(model_path=model_path, config_path=config_path).to(device)


# --- Step 2: List the 'seen' speakers ---
# These are the speakers the model learned during fine-tuning.
seen_speakers = tts.speakers
print("Available speakers:", seen_speakers)


# --- Step 3: Synthesize speech for a chosen speaker ---
if seen_speakers:
    target_speaker = seen_speakers[0] # Using the first available speaker as an example
    print(f"Synthesizing for speaker: {target_speaker}")

    tts.tts_to_file(
        text="This speech was generated using a fine-tuned model for a known speaker.",
        speaker=target_speaker,
        language="en", # Make sure to set the correct language
        file_path="output_seen_speaker.wav"
    )
    print("Audio saved to output_seen_speaker.wav")
This process is straightforward: you load the model, identify the speaker you want, and pass their name to the tts_to_file function.
2. The Leap to "Unseen" Speakers: Zero-Shot Voice Cloning
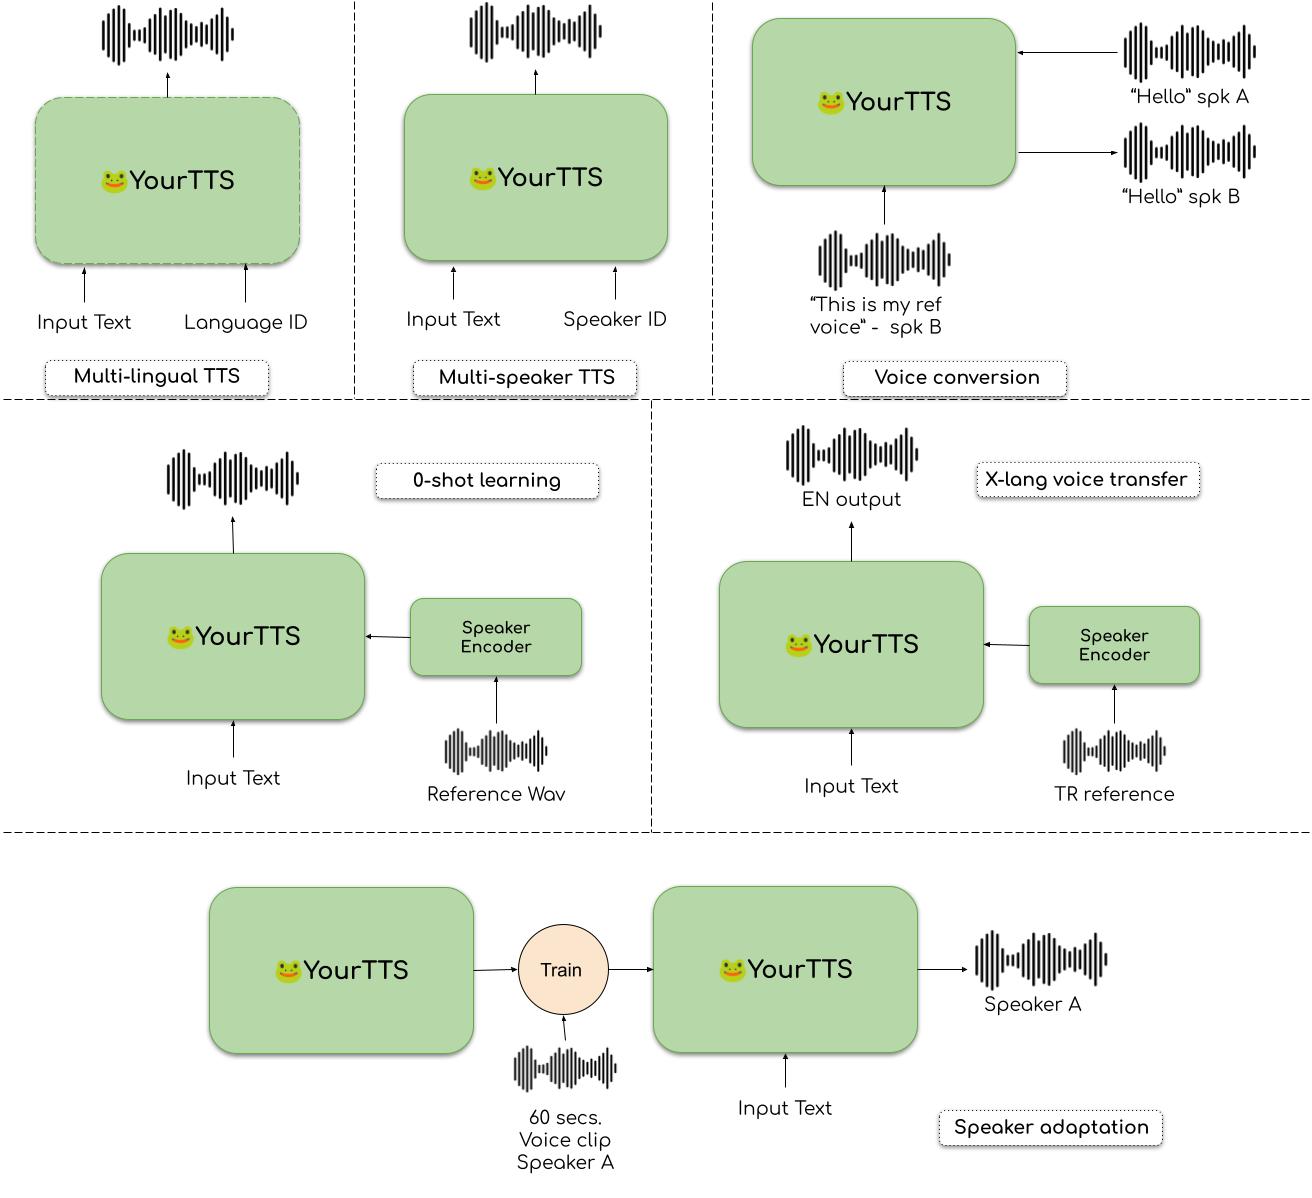
What if you want the model to speak in a voice it wasn't trained on? This is the domain of zero-shot voice cloning. Standard VITS models are not inherently designed for this, as they only know the fixed set of voices from their training data. To achieve this, we need a more advanced architecture.
Models like Coqui's YourTTS and XTTS are specifically designed for this task. They build upon the VITS architecture but integrate a crucial component: a separate speaker encoder.
2.1. How Zero-Shot TTS Works
The process involves two key stages at inference time:
- Voice Encoding: You provide a short (3-6 seconds) audio clip of the target voice (the "unseen" speaker). This clip is fed into a pre-trained speaker encoder model. This encoder's job is to extract the unique timbre and characteristics of the voice and compress them into a fixed-size vector, known as a speaker embedding.
- Conditioned Synthesis: This speaker embedding is then passed to the TTS model (e.g., XTTS) as a condition. The TTS model uses this embedding, instead of a learned speaker ID, to guide the synthesis process, generating new speech that mimics the voice from the original audio clip.
YourTTS - Towards Zero-Shot Multi-Speaker TTS for everyone
The creators of YourTTS provide an excellent explanation of this concept. This video clearly distinguishes between standard multi-speaker TTS and zero-shot TTS.
Watch the segment from 02:05 to 03:59. Pay close attention to the explanation of how the speaker verification model (the speaker encoder) is used to create a vector representation (embedding) of an unseen voice, which then conditions the TTS model.
This ability to generalize to new speakers from a short sample is what makes zero-shot models so powerful. The speaker encoder is typically trained on a speaker verification task across thousands of speakers, making it robust at creating discriminative embeddings.
3. Practical Zero-Shot Synthesis with Coqui XTTS
While YourTTS was a significant step, Coqui's latest model, XTTS, offers state-of-the-art performance in zero-shot voice cloning and is the recommended model for this task. We'll explore two ways to use it.
3.1. Quick Test with a Web UI
The easiest way to experiment with XTTS is through the web interface provided by Coqui and Hugging Face. This lets you test its capabilities without any local installation.
Local voice cloning with 6 seconds audio | Coqui XTTS on Windows
This video by Thorsten-Voice provides a complete guide to using XTTS, starting with the Hugging Face Space. It's a great way to see the model in action.
Watch from 02:31 to 09:43. This section demonstrates the entire process on the Hugging Face Space: uploading a reference audio, inputting text, and generating the cloned voice. This gives you a feel for the input requirements and the quality of the output.
3.2. Local Synthesis using the Python API
For integration into your own applications, you'll use the Coqui TTS Python API. The process is very similar to what we did for seen speakers, but instead of a speaker ID, you provide a path to a reference audio file via the speaker_wav argument.
Synthesizing Speech - TTS 0.22.0 documentation
The official Coqui TTS documentation provides the definitive code snippet for using the XTTS model for voice cloning.
Read the section 'Python 🐸TTS API'. Focus on the first example, which shows how to run a 'multi-speaker and multi-lingual model' like xtts_v2. Note the key arguments: text, speaker_wav, and language.
Here is a complete, runnable code block to perform zero-shot voice cloning locally.
import torch
from TTS.api import TTS


# Get device
device = "cuda" if torch.cuda.is_available() else "cpu"


# --- Step 1: Load the XTTS v2 model ---
# This is a multi-lingual, multi-speaker model designed for zero-shot cloning.
# It will be downloaded on the first run.
print("Loading XTTS model...")
tts = TTS("tts_models/multilingual/multi-dataset/xtts_v2").to(device)
print("Model loaded.")


# --- Step 2: Prepare your reference audio ---
# This should be a high-quality audio file, 3-10 seconds long,
# of the voice you want to clone.
reference_audio_path = "/path/to/your/unseen_speaker_voice.wav"


# --- Step 3: Synthesize speech using the reference voice ---
print(f"Cloning voice from: {reference_audio_path}")
tts.tts_to_file(
    text="Hello, this is a test of zero-shot voice cloning. I am speaking in a voice the model has never heard before.",
    speaker_wav=reference_audio_path,
    language="en", # Specify the language of the TEXT.
    file_path="output_unseen_speaker.wav"
)
print("Cloned audio saved to output_unseen_speaker.wav")


# You can even clone across languages. The model will speak Spanish
# in the voice from your English reference audio.
# tts.tts_to_file(
#     text="Hola, esto es una prueba de clonación de voz en otro idioma.",
#     speaker_wav=reference_audio_path,
#     language="es",
#     file_path="output_unseen_speaker_spanish.wav"
# )
Important Note on Reference Audio: The quality of the zero-shot cloning is highly dependent on the quality of your reference audio clip (speaker_wav). For best results, use a clean, noise-free recording with no background music. A duration of 6 seconds is often optimal.
Conclusion
In this lesson, you've learned how to harness your fine-tuned model and other powerful pre-trained models to synthesize speech for both speakers the model knows and those it has never met.
Key Takeaways:
- Seen Speakers: Synthesizing for speakers in the training set is done by providing a
speakerID to a multi-speaker model. The model uses a pre-learned embedding for that speaker. - Unseen Speakers (Zero-Shot): Voice cloning for new speakers requires a specialized model like XTTS. It uses a speaker encoder to generate a speaker embedding on-the-fly from a reference audio clip (
speaker_wav). - Practical Tools: The Coqui TTS library provides a unified and powerful API for both synthesis modes through its
TTSobject, making it easy to switch between methods. - Quality Matters: The quality of the input (especially the reference audio for zero-shot cloning) directly impacts the quality of the output.
Preview of the Next Lesson:
We've now generated speech, but how do we objectively say if it's "good"? How does our fine-tuned model compare to the base model, or how does XTTS's clone compare to the original speaker? In our next lesson, we will dive into evaluating synthesized speech quality using objective (e.g., PESQ) and subjective (e.g., Mean Opinion Score) metrics. This will give you the tools to systematically measure and compare the performance of your TTS systems.