
Good to see you again. Your Burp project should now contain only the authorized lab host, with ordinary browsing captured in Proxy > HTTP history. Scope answers which traffic belongs in the engagement; this lesson answers what a single request and response actually say.
By the end, you will be able to select an exchange in Burp and reliably identify its method, path, parameters, headers, cookies, body, response status, and content type. This is the observation skill behind later testing: before changing an identifier, replaying a form submission, or testing a cookie, you need an accurate baseline.
An HTTP exchange is a structured conversation
A web application interaction consists of two messages:
- The browser sends a request asking the server to retrieve or act on a resource.
- The server returns a response describing the result and, usually, supplying content.
Burp lets you inspect both messages side by side. This is why it is more useful to think of history rows as exchanges, not merely URLs.
HTTP messages - MDN Web Docs - Mozilla
Read MDN’s “HTTP messages” guide for the durable mental model behind Burp’s request and response panes. It explains the shared structure first, then separates request and response details.
In “Anatomy of an HTTP message,” read the shared anatomy. Then, under “HTTP requests,” read the request breakdown, focusing on the request target, headers, and body. Under “HTTP responses,” read the explanation of the status line beginning with the reason phrase; then read the response-header introduction and the response-body explanation.
The abstract structure is compact:
Request
  start line
  headers
  blank line
  optional body

Response
  status line
  headers
  blank line
  optional body
HTTP/1.1 messages are traditionally shown as readable text. Modern applications often use HTTP/2, which encodes traffic differently on the wire, but the meaning is unchanged. Burp presents HTTP/2 traffic in a human-readable form, so you can still identify the same method, target, headers, body, status code, and content type.
Start in Burp: choose a meaningful exchange
In Proxy > HTTP history, select a request for an application page or feature you intentionally visited in the authorized lab. Good starting candidates include:
- the main home page;
- a product or article page;
- a search result;
- a login page;
- a captured form submission you made as part of normal, authorized lab use.
Avoid beginning with an image, stylesheet, font, or JavaScript file. Those exchanges are valid HTTP, but an application page more clearly shows the elements you will later test.
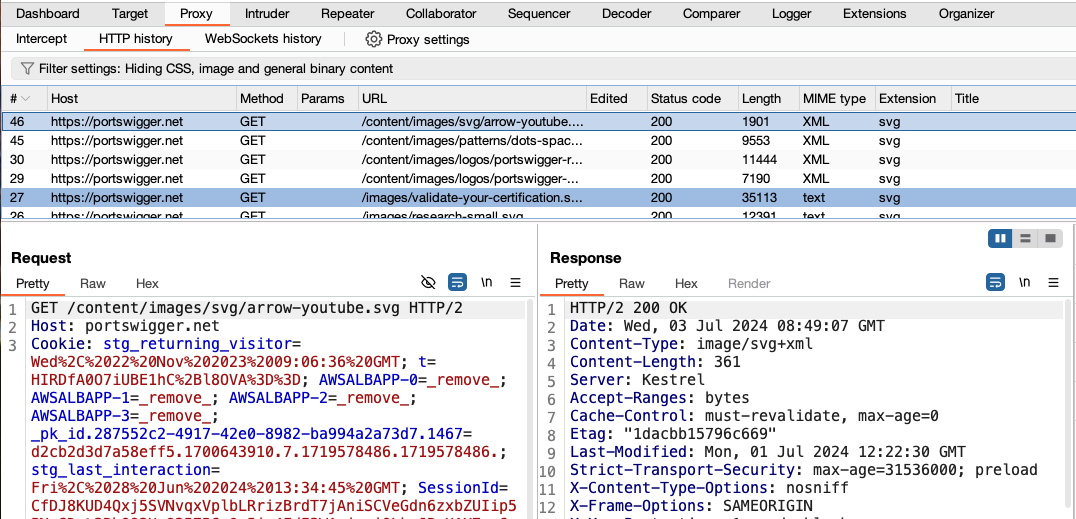
The upper history table gives you a rapid summary:
- Host identifies the destination host.
- Method tells you the request action, such as
GETorPOST. - URL shows the path and any query string.
- Params indicates that Burp detected parameters.
- Status code is the server’s result.
- MIME type is Burp’s categorization of the returned content.
But the table is only a triage view. Select the row and use the lower Request and Response panes to inspect the full messages. Prefer the Raw view when you need to establish exactly where data occurs; Pretty is useful when formatted HTML or JSON is easier to read.
PortSwigger’s HTTP history documentation maps Burp’s table columns to the data you will analyze and confirms how to open the full exchange.
Read the history columns, paying particular attention to Method, URL, Params, Status code, MIME type, and Cookies. Then read how the lower pane works. In Burp, select the same in-scope row as you read so each documented field has a visible counterpart.
A useful discipline is to work from the first line downward, rather than jumping immediately to an interesting-looking value. That sequence prevents common mistakes, such as confusing a response cookie with a request cookie or reading a query parameter as though it were in a form body.
Parse the request: what did the browser ask for?
Consider this representative request to an authorized lab:
GET /product?productId=3&view=full HTTP/2
Host: lab-id.web-security-academy.net
User-Agent: Mozilla/5.0
Accept: text/html,application/xhtml+xml
Referer: https://lab-id.web-security-academy.net/
Cookie: session=REDACTED; preferences=compact
The request has no body: the blank line after the headers would mark its end. Parse it in this order.
1. Method
The method is the first token of the request line:
GET
GET usually retrieves a resource. Common methods you will encounter include:
| Method | Usual meaning | Testing interpretation |
|---|---|---|
GET | Retrieve a resource or view | Often carries inputs in the URL. |
POST | Submit data for processing or create an action | Often carries inputs in the body. |
PUT or PATCH | Update a resource | May reveal update functionality or APIs. |
DELETE | Request removal of a resource | Treat especially carefully because it may change state. |
OPTIONS | Ask about communication options | Can reveal supported methods or CORS behavior. |
HEAD | Retrieve headers without a response body | Useful for normal web behavior, but less commonly a primary testing request. |
The word “usual” matters. A method communicates the client’s intended semantics, but it does not prove what the server actually does. A GET request may still trigger a poorly designed state change; a POST request might only perform a search. Later testing checks whether server-side controls enforce the intended behavior.
2. Path
The path is the part after the method and before the question mark:
/product
It identifies the requested application route. In a complete browser URL such as:
https://lab-id.web-security-academy.net/product?productId=3&view=full
the pieces are:
| URL component | Value |
|---|---|
| Scheme | https |
| Host | lab-id.web-security-academy.net |
| Path | /product |
| Query string | productId=3&view=full |
In the displayed request, Host supplies the destination host. Burp’s history table combines these components into the familiar URL view.
A value embedded in a route, such as /users/42, is a path segment. The application may treat 42 as an object identifier, but it is not a query parameter merely because it looks like one. Record where an input actually occurs before you test it.
3. Query parameters
Everything after ? in the request target is the query string:
productId=3&view=full
This request has two query parameters:
| Location | Name | Value |
|---|---|---|
| URL query string | productId | 3 |
| URL query string | view | full |
Query parameters are commonly separated by & and written as name=value. They are visible in the URL and history table, which makes them a frequent first place to notice user-controlled input.
Captured values may be encoded. For example, %2F represents a slash in URL encoding. Preserve the raw captured value in an evidence note, then use Burp’s Decoder later when you need to understand its decoded form. Do not assume that a decoded character will be accepted or interpreted identically by the application.
4. Headers
Every line after the request line and before the blank line is a header. Headers are name-value metadata, separated by a colon.
In the example:
| Header | What it tells the server |
|---|---|
Host | Which virtual host or application the client intends to reach. |
User-Agent | The browser or client identity string. |
Accept | Media types the client is willing to receive. |
Referer | The page from which the browser navigated, when the browser sends it. |
Cookie | Stored cookie values that the browser is sending back. |
Headers can influence authentication, content negotiation, caching, routing, logging, and application behavior. Their names are case-insensitive, though Burp generally displays conventional capitalization.
For now, treat headers as observable inputs and metadata, not as values to alter casually. Later, you will test specific headers in carefully bounded lab scenarios. A baseline request first tells you what “normal” looks like.
5. Cookies in a request
The Cookie header deserves special attention because it often carries session state:
Cookie: session=REDACTED; preferences=compact
This means the browser is sending two cookie name-value pairs:
| Cookie name | Displayed value | Likely purpose |
|---|---|---|
session | REDACTED | A session identifier or authentication state token. |
preferences | compact | A user-interface preference. |
A cookie is technically carried in a request header, but it is useful to label it separately when analyzing traffic because cookies frequently determine identity and authorization.
Never paste live session values into public notes, screenshots, or portfolio material. For learning notes, retain the cookie name, record that it was present, and redact its value.
Parse a request body: data sent outside the URL
A request can also include data after the blank line separating headers from content. Here is a normal form-style submission:
POST /comment HTTP/2
Host: lab-id.web-security-academy.net
Content-Type: application/x-www-form-urlencoded
Cookie: session=REDACTED
Content-Length: 39

postId=7&comment=Useful+article&email=a%40b.test
The key distinction is location:
| Item | Location in this request |
|---|---|
| Method | POST in the request line |
| Path | /comment in the request line |
| Request header | Content-Type: application/x-www-form-urlencoded |
| Cookie | session=REDACTED in the Cookie header |
| Body parameters | postId, comment, and email after the blank line |
The body is the data after the empty line. Its format is described by the request’s Content-Type header:
application/x-www-form-urlencodedcommonly contains ampersand-separated form fields.application/jsoncommonly contains structured JSON.multipart/form-datacommonly appears in file uploads and multi-part forms.text/plaincontains unstructured text.
For example, an API request body might look like this:
PATCH /api/profile HTTP/2
Host: lab-id.web-security-academy.net
Content-Type: application/json
Authorization: Bearer REDACTED

{"displayName":"Sam","marketingOptIn":false}
Here, displayName and marketingOptIn are JSON body properties. They are not URL query parameters, even though they may become important input locations later.
Hands-on pass in Burp: find a captured POST, PUT, or PATCH request in your authorized history. In Raw request view, locate the first blank line. Everything below it is the body. Identify the body format from Content-Type, then list the field names only in your notes. If your current lab interaction has no captured request with a body, do not create an unnecessary state-changing request just for this lesson; use the examples above and wait for a naturally occurring form submission in a later lab.
Parse the response: what did the server return?
Now examine the response paired with the selected request:
HTTP/2 200 OK
Content-Type: text/html; charset=utf-8
Content-Length: 4812
Cache-Control: no-cache
Set-Cookie: lastViewedProduct=3; Path=/

<!doctype html>
<html>
  ...
</html>
Again, read top to bottom.
1. Status code
The first line is the status line:
HTTP/2 200 OK
The important value is 200, the status code. The text OK is a reason phrase for humans; the code is the more reliable structured signal.
| Status family | General meaning | What to inspect in Burp |
|---|---|---|
1xx | Informational | Uncommon as the final result you focus on. |
2xx | Successful handling | Compare content and behavior across inputs or roles later. |
3xx | Redirection | Inspect the Location header and the following request in history. |
4xx | The server rejected or could not fulfill the client request | Note authentication, authorization, validation, and not-found differences. |
5xx | A server-side error occurred | Preserve concise evidence; do not repeatedly trigger errors without purpose. |
A 200 response says the server completed the request successfully. It does not prove that the response is correct, secure, authorized, or free of vulnerabilities. Conversely, an error status is evidence of an outcome, not automatically evidence of a security finding.
2. Response headers and content type
The response headers are the lines between the status line and the blank line. The most important one for basic parsing is:
Content-Type: text/html; charset=utf-8
The response content type is text/html; the optional charset=utf-8 tells the browser how to decode characters. This describes the type of the response body.
Common content types you will encounter are:
| Content-Type value | Typical response body |
|---|---|
text/html | An HTML page |
application/json | API data in JSON |
text/css | A stylesheet |
application/javascript or text/javascript | JavaScript |
image/png or image/jpeg | An image |
application/pdf | A PDF document |
Burp’s HTTP history table has a MIME type column that provides a convenient classification. When documenting what the server actually declared, the Content-Type response header is the authoritative item to quote.
3. Response cookies: Set-Cookie is not Cookie
This response includes:
Set-Cookie: lastViewedProduct=3; Path=/
Set-Cookie instructs the browser to store or update a cookie. On a later matching request, the browser may send it back in a request header such as:
Cookie: lastViewedProduct=3
Keep the directions clear:
| Message direction | Header | Meaning |
|---|---|---|
| Server response | Set-Cookie | Server asks the browser to store a cookie. |
| Browser request | Cookie | Browser sends stored cookies to the server. |
This distinction will become central when you assess session security. At this stage, identify the direction accurately and avoid exposing sensitive values.
4. Response body
Everything after the response’s blank line is the response body. In the example, it is HTML. In an API call, the body might instead be JSON:
{"id":3,"name":"Product name","price":19.99}
A response body is often where you see the application’s visible result, error message, returned data, or reflection of submitted input. Some responses deliberately have no body, and redirects may primarily be understood through status and headers rather than visible page content.
A repeatable parsing routine
Use this routine for every interesting Burp history row. It takes less than a minute once practiced, and it creates a reliable baseline before any later testing.
Request checklist
- Confirm the host is in scope.
- Record the method.
- Separate the path from the query string.
- Identify every parameter and its location: query string, path segment, body, header, or cookie.
- Identify material request headers, especially
Content-Type,Authorization, andCookie. - Determine whether a body exists and, if so, its format.
Response checklist
- Record the status code.
- Identify
Content-Type. - Note material response headers, especially
LocationandSet-Cookie. - Determine whether a response body exists and what kind of content it contains.
- If the request or response contains secrets, redact values before recording evidence.
A concise baseline note might look like this:
Exchange: GET /product?productId=3
Request: query parameter productId=3; Cookie session present (value redacted)
Response: 200; Content-Type text/html; HTML body returned
Purpose: normal product-view baseline
This is not yet a vulnerability report. It is a precise, reproducible observation of normal behavior. In later modules, you will compare such a baseline with a deliberately changed request and explain the resulting difference.
Key takeaways
A captured Burp history row is one HTTP exchange: request on the left, response on the right.
- The request line provides the method and path; text after
?contains query parameters. - Parameters can occur in the query string, body, headers, cookies, and path segments. Record their actual location.
- Headers are metadata.
Cookieis a request header that sends stored browser cookies. - A request or response body begins after the blank line.
Content-Typedescribes the body format. - The response status line gives the status code; use it as an outcome signal, not as proof of security.
Set-Cookieappears in a response to set a browser cookie;Cookieappears in later requests to return it.- Redact session identifiers, credentials, tokens, and personal data in notes and screenshots.
Next, you will use HTTP history filters more deliberately to isolate the requests and responses most relevant to a testing question, rather than reviewing every captured in-scope asset.
Can't find a good explanation? Sign up and we'll make it for you
Sign up