
Welcome back. In the previous lesson, you established the central professional rule for testing: permission has concrete boundaries. An authorized target, approved methods, safe conditions, and a valid testing window all matter. This lesson turns that scope card into a practical Burp configuration.
By the end, you will be able to use Burp’s built-in browser to access an authorized HTTPS lab, add the exact lab host to Target scope, and configure HTTP history so that your working record contains only relevant in-scope traffic. This is the foundation for every later activity in the course: inspecting requests, replaying them, and documenting evidence without mixing in unrelated browser noise.
What Burp is doing, and what scope does not do
Burp Proxy sits between the browser and the web application. When the browser makes an HTTPS request, Burp can record it, pause it for inspection, and later allow you to modify or replay it. Burp’s built-in browser is the easiest starting point because it is already configured to send its traffic through Burp.
Read PortSwigger’s short overview, Burp Proxy, to establish the relationship between the proxy, the built-in browser, and HTTPS traffic.
On the Burp Proxy documentation page, read the proxy and browser setup. Focus on the distinction between capturing traffic and changing it: for now, you are building a safe observation workflow, not altering requests.
Four controls can seem similar at first, but they serve different purposes:
| Control | What it does | What it does not do |
|---|---|---|
| Burp’s browser | Routes its web traffic through Burp automatically. | It does not decide which hosts you are authorized to test. |
| Intercept | Pauses matching requests or responses before they continue. | It does not define scope; leaving it on can make normal browsing tedious. |
| Target scope | Defines which URLs, hosts, and paths Burp considers in scope. | It does not grant permission or replace your written scope card. |
| HTTP history filter | Changes which captured items you can see in the history view. | By itself, it does not erase old items or prevent traffic from occurring. |
The practical distinction is important:
Authorization is the human and contractual boundary. Target scope is Burp’s operational representation of that boundary.
Scope is also not a magic network firewall. A browser may still try to load an external image, analytics script, or font. Your configuration should ensure those destinations are not included in your Burp testing record or sent to later tools, while you avoid intentionally interacting with them.
For this course, use only an intentionally vulnerable Web Security Academy lab or another lab explicitly authorized for you. Do not use a public application, employer site, or unrelated PortSwigger page as a configuration test.
Start with a controlled Burp workspace
Before opening a lab, create or open a separate Burp project for the exercise. A distinct project keeps lab traffic, notes, and future evidence separate from unrelated browsing.
Record these items in your scope card:
- Authorized lab URL: the exact HTTPS URL once the lab instance launches.
- In-scope host: for example, the unique
web-security-academy.netlab hostname created for your session. - Permitted activity: manual browsing and the lab’s stated exercise steps.
- Out-of-scope destinations: third-party hosts, account portals, analytics services, and every unrelated browser destination.
- Safety boundary: no high-volume activity, no testing outside the lab, and no testing of linked external hosts.
Then launch Burp’s preconfigured browser:
- In Burp, open Proxy > Intercept.
- Confirm that interception is off before ordinary browsing.
- Select Open Browser.
- Use this browser exclusively for the authorized lab. Keep normal personal browsing in your ordinary browser.
Leaving interception off is deliberate. Burp still records traffic in Proxy > HTTP history, but the browser does not stop on every page asset. Later, when you need to modify a single request, you will enable interception selectively or use Repeater.
Intercept HTTP traffic with Burp Proxy
Watch PortSwigger’s Intercept HTTP traffic with Burp Proxy to see the built-in browser, interception toggle, and HTTP history in action.
Watch browser and intercept to see why a page waits while interception is enabled. Then watch history without pausing. The key point is that HTTP history records proxied requests even while interception is off.
Now open your authorized Web Security Academy lab. If you must first sign in to PortSwigger and select Access the lab, do only that necessary setup. Once the lab opens, note the exact hostname in the built-in browser’s address bar. The unique lab hostname, not every PortSwigger-related domain visible during setup, is the target you will scope.
Browse only enough to generate representative lab traffic:
- load the lab home page;
- open one or two product or application pages;
- avoid external links and unrelated browser tabs.
At this point, Proxy > HTTP history will probably look noisy. That is normal. Modern pages often request third-party resources, and you may see hosts that have no place in your testing notes.
Add the exact HTTPS lab host to Target scope
Open Target > Site map. The left panel lists hosts that the built-in browser has contacted. Find the exact host for the lab instance, not a parent domain and not an external resource.
For a typical Web Security Academy lab, that means selecting the generated lab host, such as:
https://<unique-lab-id>.web-security-academy.net
It does not mean adding all of the following simply because they appeared during browser setup:
portswigger.netyoutube.com- analytics or advertising hosts
- a linked identity provider
- a content-delivery or font host
- a broader wildcard such as every
web-security-academy.netsubdomain
Right-click the exact lab host and select Add to scope. When Burp asks whether to exclude out-of-scope traffic from Proxy history and other tools, choose Yes.
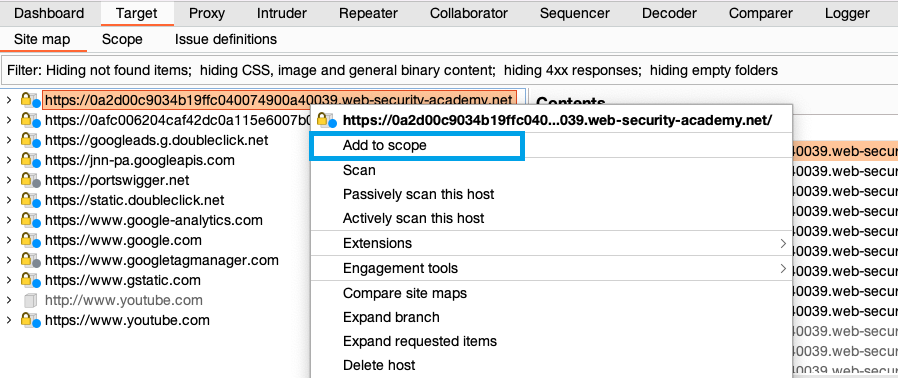
This prompt is valuable because it goes beyond a display preference. It tells Burp to avoid adding future out-of-scope traffic to the core places where you work with captured requests. That reduces clutter, lowers the chance of accidentally sending an unrelated request to Repeater or Intruder later, and makes your project evidence more defensible.
Next, open Target > Scope and verify the result:
- Confirm that the include rule identifies the exact HTTPS lab URL or host.
- Check that you did not accidentally include a broad parent domain or unrelated protocol.
- If the authorization excludes a specific path or feature, add an exclude rule for that path.
- Do not create an exclusion merely because a page looks uninteresting. Exclusions represent genuine engagement boundaries or deliberately protected functions.
A URL belongs to Burp scope only when it matches an inclusion rule and does not match an exclusion rule. Scope can be defined at different levels:
| Authorized boundary | Suitable scope approach |
|---|---|
| One generated HTTPS lab host | Include that exact host. |
| One application area within a host | Include the authorized path, such as /training/, if the scope is truly path-limited. |
| A host with an explicitly excluded sensitive function | Include the host and add an exclusion for the specified function or path. |
| Multiple separately authorized applications | Add each approved host or path deliberately; do not use a broad wildcard for convenience. |
For today’s lab, an exact HTTPS host is the appropriate default. It is narrow, clear, and easy to validate.
Follow PortSwigger’s Set the target scope tutorial alongside your own authorized Web Security Academy lab. It provides the same browser, Site map, scope, and history workflow you are configuring here.
Begin with Step 1: Launch Burp's browser and use your own authorized lab rather than any unrelated target. Continue through Step 3: Study the HTTP history, Step 4: Set the target scope, and Step 5: Filter HTTP history. Read the complete workflow, paying particular attention to the prompt to exclude out-of-scope traffic and the distinction between Site map scope and the HTTP history display filter.
Filter HTTP history to your authorized traffic
Return to Proxy > HTTP history. Open the display filter above the request list and enable Show only in-scope items.
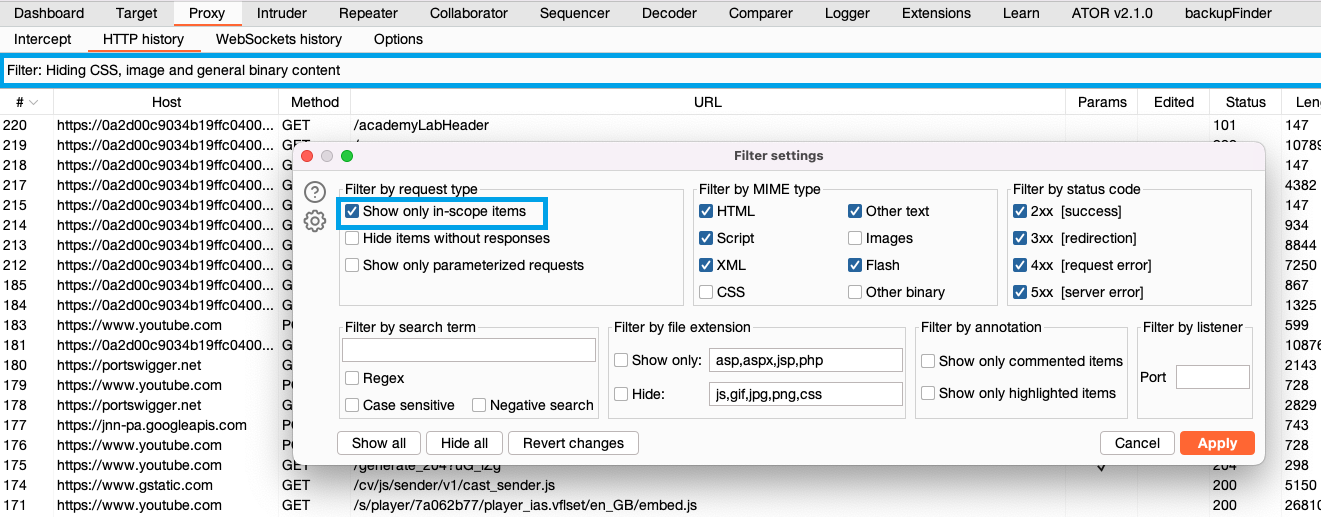
The filter answers a simple operational question: “What requests should I review right now?” With the in-scope filter enabled, the visible rows should belong to your lab host.
Browse one additional page in the authorized application and confirm that it appears. Your history should now be a compact working record of the lab interaction rather than a mixture of resources from many domains.
Perform this validation before moving on:
| Check | Expected result |
|---|---|
| Built-in browser URL | It shows the authorized HTTPS lab host. |
| Target > Scope | The exact lab host is included. No overly broad wildcard appears. |
| Target > Site map | The lab host is marked as in scope. |
| Proxy > HTTP history filter | Show only in-scope items is enabled. |
| Visible HTTP history | Newly browsed lab pages appear; unrelated hosts do not appear in the filtered view. |
| Intercept state | Off during ordinary navigation, unless you intentionally need to pause a request. |
If an unexpected host appears, do not add it automatically. Treat it as an observed dependency and compare it with the scope card:
- If it is not explicitly authorized, leave it out of scope.
- If it is supposedly covered but the wording is unclear, pause and obtain clarification.
- If it is a third-party service, assume it is out of scope unless written authorization says otherwise.
A redirect requires the same caution. If the lab redirects from one hostname to another, confirm that the final destination is part of the lab’s authorized setup before adding it. A redirect is evidence of a relationship, not permission to test the destination.
Scope as a workflow guardrail
Once scope is configured, Burp can use it in several parts of the workflow. That matters because scope should remain consistent from browsing through evidence collection.
How to use target scope in Burp Suite
Watch PortSwigger’s How to use target scope in Burp Suite for a concise explanation of inclusion rules, exclusions, and the ways scope affects later Burp work.
Watch scope rules for the inclusion-and-exclusion model. Skip the advanced rule discussion for now, then watch the Site map method and scope across Burp. Focus on why scope supports clean history, filtered views, and later interception rules.
For now, keep your use of scope simple:
- Use the built-in browser only for the lab.
- Include only the authorized HTTPS lab host.
- Exclude anything specifically excluded by the lab or engagement.
- Select Show only in-scope items in HTTP history.
- Keep interception off while mapping normal behavior.
- Record the final scope setting in your evidence note.
Later modules will use this same boundary when you send a single request to Repeater, vary bounded inputs in Intruder, or test role-based access. A clean scope today prevents a common junior-tester mistake: mixing unrelated traffic into an assessment and then losing track of what was actually tested.
Key takeaways
Burp’s built-in browser is already configured to proxy HTTPS traffic through Burp, making it the safest starting point for a new workflow. For ordinary browsing, keep interception off and review requests in HTTP history afterward.
Most importantly:
- Target scope operationalizes authorization; it does not create authorization.
- Add the exact authorized lab host, not broad parent domains or third-party dependencies.
- When Burp offers to exclude out-of-scope traffic from history and other tools, select Yes.
- Use the HTTP history display filter to show only in-scope items.
- Treat unexpected hosts, redirects, and linked services as out of scope until verified.
Next, you will use this clean, authorized history to parse a captured HTTP exchange: method, path, parameters, headers, cookies, body, status code, and content type.
Can't find a good explanation? Sign up and we'll make it for you
Sign up