
Welcome back. You can now read an individual request-response exchange in Burp’s HTTP history. The next practical challenge is volume: even a short browsing session produces pages, scripts, images, analytics calls, redirects, and background requests. A web tester needs to reduce that noise without losing the evidence that matters.
In this lesson, you will use HTTP history display filters to isolate relevant in-scope traffic by request characteristics, response type, status code, and search terms. The goal is not to make history look tidy for its own sake; it is to form a focused, repeatable view for a specific testing question.
Filters are a view, not a deletion tool
Think of HTTP history as your underlying capture record and a filter as a temporary lens over it. Filtering changes what Burp displays, not what Burp has captured.
That distinction matters for investigations. If you hide image requests and later realize an image upload endpoint is relevant, you can simply change or disable the filter. You have not destroyed evidence.
Filtering the HTTP history - PortSwigger
Read PortSwigger’s official overview before configuring your own view. It establishes the central distinction between captured traffic and displayed traffic, and introduces the filter bar you will use throughout the course.
In the opening section, “Filtering the HTTP history,” read the purpose of filtering. Then, under “Settings mode,” read how display filters behave. Notice in particular that hidden history items remain available when you reset or disable the filter.
You already configured the authorized lab host as your target scope. Keep the two concepts separate:
| Concept | Question it answers | Effect |
|---|---|---|
| Target scope | “Which hosts, paths, and features are authorized for this engagement?” | Establishes the boundary for your work. |
| HTTP history filter | “Which captured items are useful for the question I am investigating now?” | Changes the visible subset of history. |
For this course, your default starting view should be in-scope items only. That prevents third-party browser traffic from distracting you or being mistaken for target behavior. A filter does not make out-of-scope testing permissible, however. Authorization comes from the agreed scope, not from a Burp checkbox.
Open the filter settings and read the current view
Go to Proxy > HTTP history. Directly above the history table, Burp displays a summary beginning with Filter settings or Filter. Click that bar to open the filter configuration window.
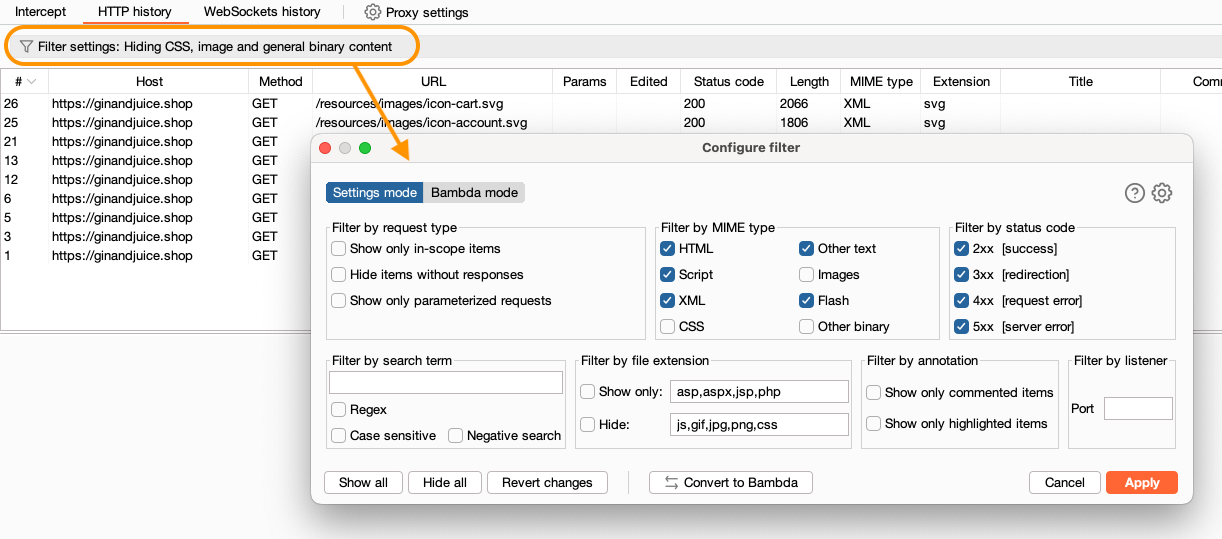
The Filter settings dialog may look slightly different depending on your Burp version, but the working principle remains the same: select criteria, apply them, then read the sentence in the filter bar to confirm exactly what you are looking at.
Before using any specialized filter, establish this baseline:
- Confirm that Show only in-scope items is enabled.
- Keep all status-code families visible at first.
- Keep response types visible until you understand the application’s traffic.
- Sort the
#column so the most recent requests are at the top. - Read the filter-bar summary aloud or into your notes in plain language.
For example:
Displaying in-scope requests, hiding images, CSS, and generic binary content.
This small habit prevents a common testing mistake: concluding an endpoint “does not exist” when it was simply excluded by a forgotten filter.
Burp also provides Filter on and Filter off controls in current versions. These are useful when comparing the focused view to the complete history without discarding your settings. Use Show all, Hide all, or a filter reset only when you deliberately want to rebuild the view.
The main filter families and when to use them
A filter is useful only when it is tied to a question. Start with the question, then choose the least restrictive filter that makes the answer easier to see.
1. Scope and request-oriented filters
The request-type area includes practical controls such as:
- Show only in-scope items
- Hide items without responses
- Show only parameterized requests
In-scope only is your normal engagement view. It is particularly valuable after browsing a lab through the built-in browser, because browser activity can still include requests unrelated to the target application.
Hide items without responses is helpful when you want completed request-response pairs to compare, such as normal page loads or form submissions. Do not use it automatically in every situation. A missing response can be meaningful: it may reflect a connection issue, an aborted request, or behavior worth documenting during a controlled test.
Show only parameterized requests is an efficient first pass when you are looking for inputs. Burp identifies common parameters in places such as URLs and request bodies. It is a triage aid, not a complete input-discovery method:
- It may not treat a number inside a path such as
/users/42as a conventional parameter. - It does not mean headers and cookies are irrelevant inputs.
- It does not prove that every displayed parameter is security-sensitive.
Later, you will map inputs systematically across URLs, forms, JSON bodies, headers, cookies, and path segments. For now, the parameterized filter helps you quickly find promising exchanges to inspect.
2. MIME type and file-extension filters
The MIME type filter concerns the kind of content returned by the server. In a first-pass application view, it is often sensible to hide:
- images;
- CSS;
- general binary content.
That leaves HTML pages, API responses, and often JavaScript visible, reducing a large amount of routine browser noise.
Do not turn this into a permanent rule that static content is uninteresting. JavaScript files frequently reveal client-side routes, API endpoints, and parameter names. File uploads, downloads, and unusual content types can also be security-relevant. The right question is not “Is this static?” but “Does this content help answer my current testing question?”
The file-extension filter is more literal. It lets you show or hide particular extensions, such as css, png, jpg, or js. Use it when the filename itself is meaningful to your investigation. MIME filtering is usually safer for early noise reduction because it follows the response classification rather than relying only on a path suffix.
3. Status-code filters
Status codes let you separate successful, redirected, rejected, and error-producing behavior. Burp groups them by families:
| Filter | Typical use in a test workflow | What to inspect |
|---|---|---|
2xx success | Establishing normal baselines | Returned content, cookies, data, and actions completed |
3xx redirection | Understanding login and navigation flows | Location header and the next request in history |
4xx request or access errors | Reviewing validation or authorization outcomes | Error body, redirect behavior, and differences from a baseline |
5xx server errors | Preserving potential evidence cautiously | Concise error details and the request that triggered them |
A status code is a useful signal, not a verdict. A 200 response can still contain an error message, and a 403 can be an expected access-control defense. Always open the paired request and response and compare their actual content.
4. Search-term filters
A search filter narrows history to exchanges containing a term relevant to your current hypothesis. Useful search terms include:
- a visible endpoint fragment such as
productorsearch; - a known parameter name such as
productId,email, orredirect; - a response marker such as
Invalid password; - a header name such as
Location; - a JSON property such as
userId.
The Filter settings dialog also offers options such as Regex, Case sensitive, and Negative search. Begin with literal, case-insensitive terms. A regular expression is powerful, but it can unintentionally exclude items if you have not first confirmed the basic literal search works.
A negative search is best treated as a refinement. For example, after verifying that a repeated response marker is harmless noise, you might exclude it temporarily. Record that choice in your testing notes, because negative filters are easy to forget.
5. Annotation and listener filters
As your history becomes larger, you can add notes or highlights to individual history entries. Filtering by annotation lets you later return to the exchanges you marked for follow-up.
Filtering by listener port is most useful when a project intentionally uses multiple proxy listeners. In a standard built-in-browser lab workflow, this is rarely the first filter you need. Keep your attention on scope, MIME type, parameters, status, and search terms first.
A disciplined filtering workflow
A strong manual workflow narrows traffic in stages. Do not begin by selecting many filters at once: if the result is empty, you will not know which criterion removed the item you needed.
Use this sequence whenever you start investigating a feature.
Stage 1: Establish an authorized, readable baseline
- In Proxy > HTTP history, enable Show only in-scope items.
- Sort newest items first.
- Hide obvious image, CSS, and generic binary responses if they overwhelm the table.
- Browse normally in the authorized lab with interception off. Visit a small, purposeful set of pages such as the home page, a product or article, and a search or login page if the lab provides one.
- Confirm that the visible rows belong to the intended host and include the pages you visited.
At this stage, you are trying to understand the application’s ordinary traffic, not prove a vulnerability.
Stage 2: Narrow to a testing question
Now decide what you are looking for. The filter should follow from that decision.
| Testing question | First useful filter combination |
|---|---|
| “Where does this feature accept user input?” | In-scope items, then parameterized requests |
| “What happened after I submitted this search?” | In-scope items, search for the endpoint or parameter name, then inspect 2xx and 3xx results |
| “Which requests redirected me to login?” | In-scope items, 3xx responses, then inspect Location headers |
| “Did normal browsing produce server errors?” | In-scope items, 5xx responses |
| “Which requests returned API-like data?” | In-scope items, retain text-like responses and search for a known API path or JSON property |
| “Where did I see a particular error message?” | In-scope items, search for a distinctive phrase, then compare the matching exchanges |
This is a key professional habit: formulate the question before applying the filter. “Show only 4xx” is a display instruction. “Find the response behavior when an unauthenticated user reaches the account page” is an investigation.
Stage 3: Inspect, annotate, and widen again
Once the filtered table is small:
- Select each candidate row.
- Read the full request and response, using the parsing routine from the previous lesson.
- Check method, path, parameter location, cookies, status code,
Content-Type, and relevant response content. - Add a short annotation or note to items worth revisiting.
- Temporarily turn the filter off if the surrounding sequence matters.
Context matters. A 302 redirect may be meaningless on its own, but the preceding request, the Location response header, and the next request together may show a login flow or a workflow transition.
Guided lab: create three useful history views
Reserve about 20–25 minutes for this hands-on pass. Stay within your configured authorized lab scope. Keep Intercept off so normal browsing generates history without repeatedly stopping the browser.
View A: Application-only browsing history
In Proxy > HTTP history:
- Enable Show only in-scope items.
- Hide images, CSS, and generic binary content.
- Keep HTML, scripts, XML, and other text-like responses visible where your Burp version offers those categories.
- Apply the filter and inspect the filter-bar description.
- Select three remaining rows: a page request, a script request, and any dynamic feature request you can identify.
For each row, use the lower panes to identify why it survived the filter. The expected result is a shorter table that still represents the application’s visible behavior.
View B: Candidate input requests
Starting from View A:
- Enable Show only parameterized requests.
- Keep all status-code families enabled initially.
- Review the remaining requests in Raw view.
- For each candidate, note the parameter name and its location: query string, form body, JSON body, cookie, header, or path segment.
- If the list is empty, do not assume the application has no inputs. Disable this one filter and look for route values, cookies, or headers in ordinary requests.
Create a brief note like this, redacting sensitive values:
History view: In scope; static binary content hidden; parameterized requests only
Candidate: GET /product?productId=3
Input location: query string
Baseline response: 200, text/html
Reason to retain: product identifier may be relevant to later authorization testing
This is an evidence-oriented observation, not a claim that productId is vulnerable.
View C: Follow one feature through history
Choose one feature you used naturally, such as a product page, search, login page, or account page.
- Disable the parameterized-only filter if necessary.
- Enter a literal search term tied to the feature: an endpoint fragment or parameter name is usually best.
- Review the results in chronological context. If you sorted newest first, remember to read the sequence from older to newer when reconstructing a flow.
- If there are redirects, temporarily show only
3xxresults and inspect each response’sLocationheader. - Return to the broader search view and annotate one representative request-response pair.
Your objective is to be able to say: “This filter isolates the traffic for this feature, and this particular row is the normal baseline I would later replay or modify.”
Avoid the most common filtering mistakes
Filtering too aggressively
If you hide scripts because they look like static noise, you may hide endpoint clues that matter in the next module. If you show only 2xx, you may hide redirects that explain why the normal workflow works. Start broad, then reduce deliberately.
Treating “parameterized” as a complete input inventory
This filter is useful, but it does not replace manual inspection. Identifiers can appear in paths; state can reside in cookies; APIs can accept JSON properties; behavior can depend on headers. Use the filter to prioritize, not to conclude.
Confusing absent results with absent traffic
If a search produces no rows, remove one condition at a time:
- Check the in-scope filter and host.
- Remove the search term.
- Re-enable status-code families.
- Re-enable MIME categories.
- Disable the filter temporarily and locate a known request manually.
This turns troubleshooting into a controlled process instead of random clicking.
Forgetting the active filter state
The filter bar is part of your evidence. Before taking a screenshot, copying a request, or saying “there were no errors,” check what was visible and what was excluded. A conclusion based on a filtered view should state the filter conditions.
Confusing traffic reduction with authorization
A narrow display filter makes analysis safer and faster, but it does not establish permission to test an endpoint. Continue to respect the lab’s stated scope and avoid unnecessary state-changing actions.
Key takeaways
HTTP history filters transform a noisy capture into a focused investigative view.
- Scope sets the authorized target boundary; a display filter selects relevant captured items.
- Filters hide traffic temporarily rather than deleting it.
- Start with in-scope items, then reduce static noise only when it serves the current question.
- Use parameterized-request filtering as a triage shortcut, not as a complete inventory of inputs.
- Use status-code filtering to inspect normal behavior, redirects, client-side rejections, and server errors separately.
- Search terms help isolate a feature, endpoint, parameter, header, or response marker.
- Always record the active filter conditions when a filtered view supports a testing note or finding.
Next, you will take a useful baseline request from this filtered history, send it to Burp Repeater, modify it in a controlled way, and compare the resulting response.
Can't find a good explanation? Sign up and we'll make it for you
Sign up