
Good to have you back. In the last lesson, you reduced HTTP history to a usable set of in-scope baseline requests. That gives Repeater its value: instead of manually constructing a request or guessing how a feature works, you start from traffic the application has already accepted.
In this lesson, you will take one captured, non-state-changing request, send it to Burp Repeater, replay it unchanged to establish a baseline, then alter one input at a time and compare the responses. This is the core manual-testing loop you will use throughout the course.
Repeater: a controlled HTTP experiment
Burp Repeater sends a live HTTP request to the target server. It is not a simulator and it does not merely edit your history entry. Each time you select Send, Burp makes a new request using the message currently shown in the Repeater request editor.
The basic discipline is simple:
- Start with a request you understand from HTTP history.
- Send it unchanged and observe the normal response.
- Make one deliberate change.
- Send the modified request.
- Compare the result with the baseline.
- Record what changed and what did not.
The intellectual work is in the comparison. A 404 Not Found after changing a product identifier may simply mean that no product exists with that ID. A different response is a result to investigate, not automatically a vulnerability.
For this lesson, remain inside the authorized lab scope you configured earlier and use GET requests only. Do not replay actions such as purchases, account updates, password changes, file uploads, or message submissions. Repeating a state-changing request can have real effects, even in a lab.
How to resend individual requests with Burp Repeater
Watch PortSwigger’s “How to resend individual requests with Burp Repeater” for a compact visual tour of the send, edit, response, and local-history workflow.
Watch the purpose to establish what Repeater does. Then watch the core workflow, which shows transferring a request, editing the left request pane, sending it, and reading the response pane. Finish with request history to see how the back and forward controls preserve your prior attempts. Pause after each stage and locate the same control in your own Burp interface.
Move a known request from history into Repeater
Open Proxy > HTTP history and retain your in-scope filtering from the previous lesson. Find a request with a visible query parameter that is safe to replay. In many Web Security Academy labs, this is a request like:
GET /product?productId=3 HTTP/1.1
Host: example-lab.web-security-academy.net
A search request with a harmless query term can also work. The important properties are:
- it is directed to the authorized lab;
- it is a
GETrequest; - you can identify the input you intend to change;
- you understand the normal page or data it returns.
Right-click the row and choose Send to Repeater. Burp creates a numbered Repeater tab containing a copy of that request.
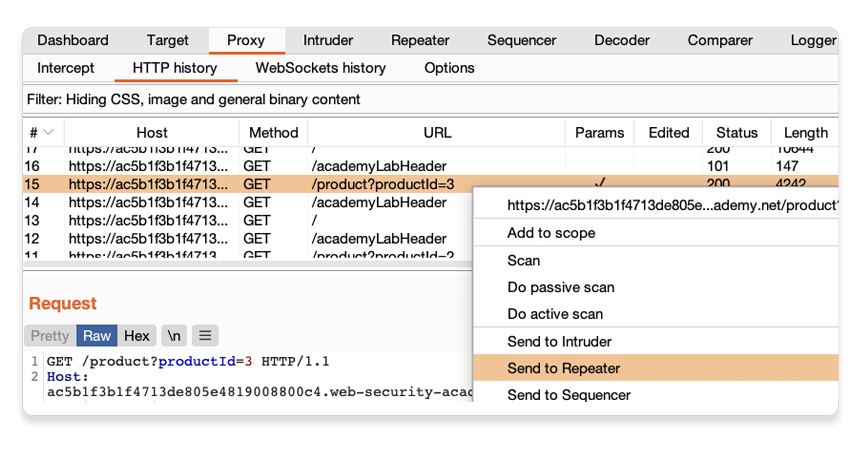
The copied request should be treated as a test case, not as a discovery by itself. Its cookies, headers, method, path, and parameter values represent the browser state at the time you captured it. This is precisely why capturing normal application behavior first is useful.
Working with HTTP messages in Burp Repeater
Read PortSwigger’s official Repeater guide to consolidate the transfer, modification, resend, and response-analysis workflow before your hands-on pass.
At the start of the page, read the introductory explanation and the five-step sequence beginning with “To send HTTP requests with Burp Repeater”. Follow the complete request loop, focusing on the difference between copying a request to Repeater and actually sending it with Send. Then read the subsection “HTTP Repeater tab”. Read the interface description. Locate the request editor, target server display, response editor, response size and timing information, and the controls for navigating requests sent from this particular tab.
Read the Repeater workspace before changing anything
Select the new tab under Repeater. Depending on your layout, the request and response may appear side-by-side or one above the other, but the roles are the same:
| Area | What it means | What to do in this lesson |
|---|---|---|
| Request editor | The exact message Burp will send next | Inspect and edit it in Raw view |
| Target display | Destination Burp will contact | Confirm it is your authorized lab host |
| Send | Issues the current request to the server | Use it first without edits |
| Response editor | Server response to the request you sent | Compare status, headers, and body |
| History controls | Prior requests sent from this Repeater tab | Return to a baseline or previous variant |
Before you send anything, inspect the request in Raw view. Use the parsing routine from the earlier HTTP-message lesson:
- Method: Is it
GET? - Path: Which endpoint is requested?
- Query parameter: Which value will you vary?
- Host: Does it match the authorized lab?
- Cookies: Is the request carrying a session or other state?
- Headers: Is there anything that explains the normal request?
Do not alter the Host header, target destination, or protocol settings in this lesson. A copied request can contain a Host header that is technically editable, but changing it is not part of testing a feature’s input handling and can send traffic somewhere unintended.
First send: establish the baseline
Click Send with the request unchanged. Now read the response:
- Record the status code.
- Check the response
Content-Type. - Identify one short, meaningful marker in the body, such as a product name, search term, JSON field, or “Not Found” message.
- Note the response length and time as supporting observations, not decisive evidence.
Why resend an unchanged request when you already have a response in HTTP history? The captured response is a useful reference, but the Repeater baseline confirms what the server returns now, with the copied request and current session state. Dynamic content, expiring sessions, cache behavior, and server-side changes can make an old history response differ from a fresh one.
A useful baseline note is concise:
Baseline
Request: GET /product?productId=3
Status: 200
Content-Type: text/html
Body marker: product page displays the expected product name
Interpretation: normal request accepted; productId=3 resolves to an existing product
This is an observation, not a security finding.
Change one variable, then compare
Now alter only the value you selected. For example, change:
GET /product?productId=3 HTTP/1.1
to:
GET /product?productId=100 HTTP/1.1
Leave the method, path, headers, cookies, and every other request component unchanged. Click Send again.
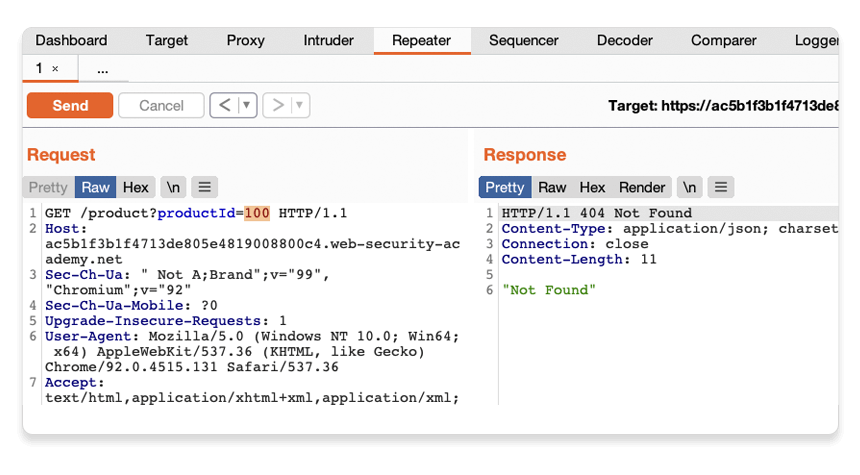
Compare the baseline and modified responses systematically:
| Observation | Baseline question | Modified-request question |
|---|---|---|
| Status code | What is the normal outcome? | Did the status class or code change? |
| Headers | Does it set cookies, redirect, or return a notable content type? | Are those headers different? |
| Body | What normal content or marker is present? | Is data, an error message, or different content returned? |
| Length | Roughly how large is the normal response? | Is a large change explained by the body? |
| Timing | Is the response broadly normal? | Is a difference consistent across a few safe repeats? |
The key is to explain the result at the narrowest justified level:
Changing
productIdfrom3to100changed the response from200with a product page to404with a “Not Found” body. The observed behavior is consistent with the application rejecting a nonexistent product identifier.
That does not establish an access-control flaw, injection flaw, or information disclosure. It simply documents how the endpoint behaves for a controlled input variation.
Why one variable matters
Suppose you simultaneously change productId, remove cookies, add a header, and alter the method. A new response would not tell you which change caused it. You would have created a confusing experiment.
A disciplined Repeater sequence is closer to a small test matrix:
| Variant | Single controlled change | Purpose |
|---|---|---|
| Baseline | None | Confirm expected behavior |
| Variant 1 | Existing numeric value changed to another number | Test identifier handling |
| Variant 2 | Numeric value changed to a clearly nonexistent value | Learn missing-object behavior |
| Variant 3 | Numeric value replaced with a short alphabetic string | Observe type-validation behavior in an authorized lab |
Do not send every imaginable payload merely because Repeater makes it easy. Begin with a specific question, make the smallest useful change, and interpret the response. Later modules will give you vulnerability-specific test cases; for now, the goal is reliable use of the tool and sound comparison.
Guided lab: replay and modify a safe request
Reserve about 20–25 minutes. Keep interception off, work only against the authorized lab, and use a non-state-changing GET request.
1. Choose and transfer a baseline request
In Proxy > HTTP history:
- Keep in-scope items only enabled.
- Select a request such as a product page or search endpoint with a query parameter.
- Read the full request and its original response once.
- Right-click the request and select Send to Repeater.
- In Repeater, confirm the destination is your lab host and inspect the request in Raw view.
If you cannot identify a safe parameterized GET, browse a product or use a search feature in the lab, then return to HTTP history. Do not substitute a state-changing form submission simply to complete the exercise.
2. Establish a fresh baseline
- Leave the copied request unchanged.
- Click Send.
- Record the status code,
Content-Type, and one body marker. - If the result differs greatly from the historical response, pause and explain the difference before continuing. The session may have expired, the request may require a prior workflow step, or the application may be dynamic.
3. Create two controlled variants
Make one change per send:
- Change the chosen query parameter to a different plausible value. Send it and compare it to the baseline.
- Change that same parameter to a value expected not to exist. Send it and compare it again.
- If the lab is designed for input testing and you can remain within its stated scope, replace the value with a short alphabetic string. Send once and observe whether the application validates the type cleanly.
For each response, write only what you can support from the request-response pair. For example:
Variant: productId changed from 3 to 100
Changed field: query parameter productId
Response: 404; Content-Type application/json; body contains "Not Found"
Comparison: the normal 200 product response was replaced by a missing-resource response
Conclusion: product identifier 100 was not available in this lab at test time
If a response contains an unexpected error, preserve the request and response, but avoid escalating the test blindly. An error is a lead for later investigation, not permission to send high-volume or destructive payloads.
4. Use Repeater history deliberately
Use the back and forward controls near Send to revisit the requests you transmitted. You should be able to return to:
- the unchanged baseline;
- the first modified value;
- the second modified value.
This history is local to the Repeater tab and is useful when you need to verify exactly what you sent. Do not rely on memory, especially once variants begin to differ by a single character.
A practical habit is to rename tabs once you have more than one, using labels such as product baseline or search input. Keep tab names descriptive and free of sensitive values.
Interpret results without overclaiming
Repeater makes response differences highly visible, which can tempt you to draw conclusions too quickly. Use these distinctions:
- Different object returned: May indicate normal object lookup, not broken access control.
404response: May be ordinary missing-resource handling.400response: Often indicates input validation or malformed syntax.302response: May be normal navigation or an authentication redirect; inspect theLocationheader and surrounding flow.500response: Worth preserving carefully, but it is not automatically exploitable.- Verbose error details: May be an information-disclosure lead; document the exact details rather than guessing at impact.
Also remember that Repeater can resend a request with existing cookies. If you replay an authenticated request, a response may reflect your current role and session—not a universal result. Later, you will intentionally compare requests across roles and session states. For now, preserve the session context and learn the baseline behavior.
Key takeaways
Burp Repeater turns a captured request into a controlled live test case.
- Send a request from HTTP history to Repeater rather than building one from scratch.
- Confirm the target is in scope and use a safe, non-state-changing request for initial practice.
- Send the request unchanged first to create a fresh baseline.
- Modify one component at a time, then compare status, headers, body, length, and timing.
- Treat response changes as evidence of behavior, not automatic proof of a vulnerability.
- Use Repeater’s per-tab history to revisit exactly what you sent and received.
Next, you will use Burp Decoder to recognize and transform common URL, HTML, and Base64 encodings—an important preparation for reading parameters and data accurately before you modify them.
Can't find a good explanation? Sign up and we'll make it for you
Sign up