
Hello! In our last lesson, we focused on hx-target, which answers the question: where does the server's response go? You learned to direct HTML fragments to specific locations in the DOM using both explicit CSS selectors and powerful relative finders like closest.
Now, we'll tackle the essential counterpart to hx-target: the hx-swap attribute. This lesson is all about answering the question: how is the response placed into the target? By default, HTMX replaces the content inside the target, but for the dynamic CRUD interfaces you're planning to build, you'll need a full palette of swapping strategies. We will explore how to replace elements, append to lists, prepend new items, and delete elements from the DOM, all by selecting the right hx-swap value.
The Two Fundamental Modes: innerHTML vs. outerHTML
At the core of all DOM manipulation are two primary ways of thinking about an element: its contents, and the element itself including its contents. HTMX directly maps its two most fundamental swap strategies to these concepts.
innerHTML(The Default): This strategy takes the HTML from the server response and places it inside the target element, replacing whatever was there before. The target element itself remains.outerHTML: This strategy replaces the entire target element—including its tags and attributes—with the HTML from the server response.
This distinction is crucial and mirrors decisions you make constantly in a component-based framework like React. Is a component re-rendering its children, or is the component itself being unmounted and replaced by a different one?
The following image provides a clear visualization of this core difference.
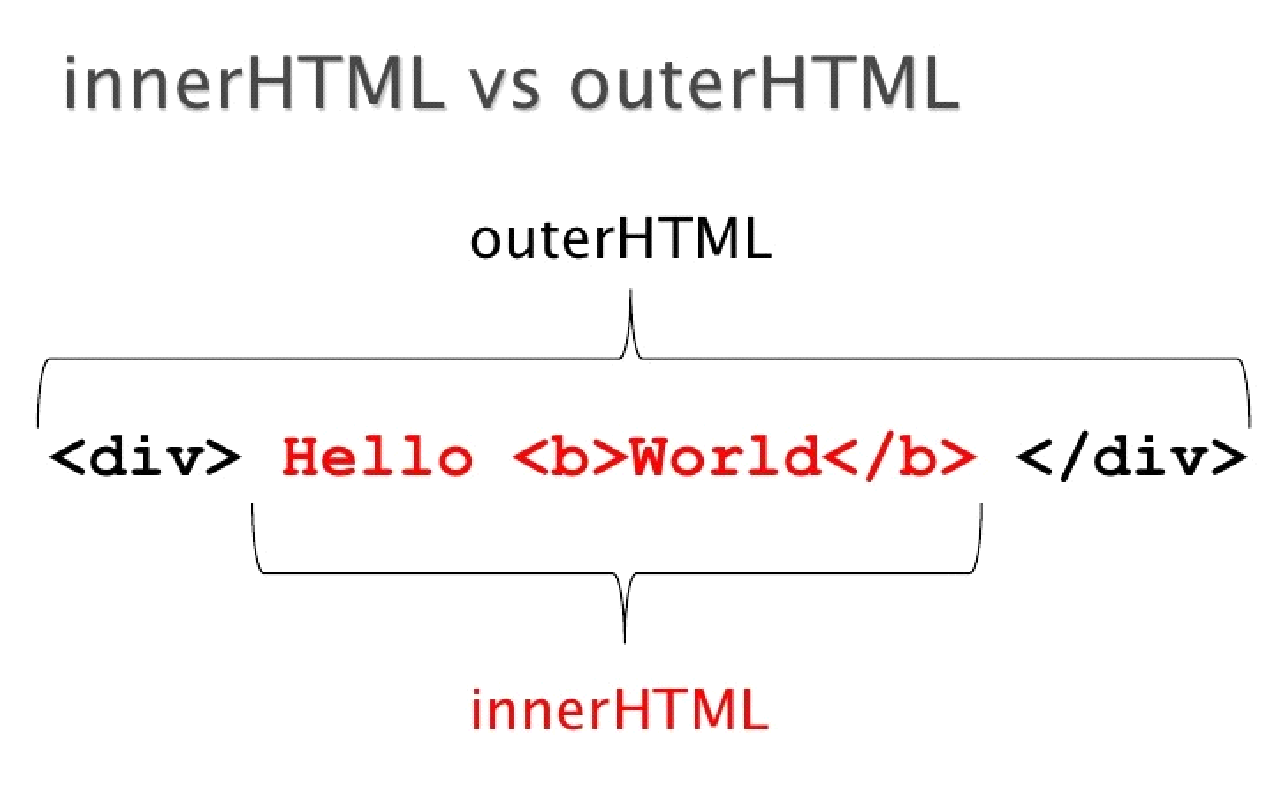
Let's watch a short video that demonstrates these two primary modes in action.
HTMX Tutorial for Beginners #4 - Using hx-swap & hx-target
This clip from the Net Ninja's HTMX tutorial first explains the innerHTML default and then shows the effect of switching to outerHTML.
Watch from the explanation of hx-swap where the default innerHTML behavior is discussed. Then, continue from the outerHTML demonstration to see how it replaces the entire button element, not just its text content.
The outerHTML swap is particularly powerful for state transitions. A common pattern in a CRUD application is an "edit-in-place" feature. You click "Edit" on a table row, and the row is replaced by a form. This is a perfect use case for hx-swap="outerHTML".
HTMX and Signals: Modern Frontend Without JavaScript Frameworks
This article from SitePoint demonstrates a practical and compelling inline-editing pattern that leverages hx-target="closest tr" and hx-swap="outerHTML".
Please read the code examples under the heading Editing a Contact. Notice the symmetry: The "Edit" button gets the edit form and swaps it over the entire table row (closest tr). The "Save" button inside the form puts the updated data and swaps the updated row back over the form. This achieves a common interactive pattern without any custom JavaScript for DOM manipulation.
Positional Swaps: Appending, Prepending, and Inserting
While replacing content is common, you also frequently need to add to it. This is where positional swaps come in. These strategies don't destroy the target or its content; instead, they add the new HTML from the server relative to the target element. These four values correspond directly to the browser's insertAdjacentHTML() method positions.
afterbegin: Inserts the response inside the target, before its first child. (Prepending)beforeend: Inserts the response inside the target, after its last child. (Appending)beforebegin: Inserts the response before the target element itself.afterend: Inserts the response after the target element itself.
The cwoodruff.github.io book provides a clear, structured overview of these.
Working with hx-target and hx-swap
This section of the online book "Enterprise-ready HTMX" provides concise definitions and code snippets for all four position-based swap strategies.
Please read the subsection Position-Based Swaps. Pay attention to the distinction between swaps that happen inside the target (afterbegin, beforeend) and those that happen outside (beforebegin, afterend).
Let's see two of the most common positional swaps in the context of a CRUD list.
- Appending with
beforeend: This is the classic "infinite scroll" or "load more" pattern. New items are added to the end of a list.
HTMX and Signals: Modern Frontend Without JavaScript Frameworks
This example shows a "Load More" button that fetches the next page of contacts and appends the new rows to the table body.
Examine the HTML template code within the Load More example. The key is hx-target="#contact-rows" and hx-swap="beforeend". The button targets the <tbody> and appends the new <tr> elements fetched from the server. Prepending with afterbegin: When a user submits a "Create New Item" form, you typically want the new item to appear at the top of the list for immediate feedback.
- Prepending with
afterbegin: When a user submits a "Create New Item" form, you typically want the new item to appear at the top of the list for immediate feedback.
HTMX and Signals: Modern Frontend Without JavaScript Frameworks
This form uses hx-post to create a new contact and then uses afterbegin to prepend the new row to the top of the table.
Review the attributes on the <form> tag in Code Example 5. The combination hx-target="#contact-rows" and hx-swap="afterbegin" ensures the new contact row, returned by the server on successful creation, is inserted as the first child of the <tbody>.
Special Strategies: delete and none
Finally, HTMX provides two special-purpose swap strategies.
delete: This removes the target element from the DOM. The content of the server response is completely ignored. This is a very explicit way to handle deletion.none: This performs the request and receives the response, but does nothing with it. The DOM is not modified. This is useful for requests that have only server-side effects, like logging an analytic event or triggering a background job, where no UI feedback is required.
The "Impatient Devs" video gives a rapid-fire summary of all the swap strategies, including these two.
This fast-paced video for experienced developers quickly covers all the major swap options. It's a great way to consolidate your understanding of the available tools.
Watch the segment from the explanation of hx-swap. It will quickly recap innerHTML and the positional swaps, then introduce delete and none.
You might notice that you can achieve a "delete" effect by using hx-swap="outerHTML" and having the server return an empty response. The SitePoint article's delete example does exactly this. Using hx-swap="delete" is simply a more direct and declarative way to state your intent.
A Note on Advanced Swaps
The hx-swap attribute has even more capabilities that you can add as modifiers. For example, you can add transition delays (swap:500ms), control the viewport scrolling behavior after a swap (scroll:bottom), and more. We will touch on these as they become relevant in later patterns.
Furthermore, HTMX has a powerful feature for updating multiple, disconnected parts of the page from a single server response, called Out of Band (OOB) Swaps. This is the HTMX answer to complex state updates that would typically require a Redux action or React Context update affecting multiple components. We will dedicate a full lesson to this advanced topic in Module 5. For now, just know that it exists for when you need it.
Conclusion
You now have a complete toolkit for controlling how server responses modify the DOM. By combining hx-target (where) with hx-swap (how), you can implement the vast majority of UI updates for a modern web application.
Key Takeaways:
innerHTML(default): Replaces the content inside the target.outerHTML: Replaces the target element itself. Essential for state transitions like inline editing.- Positional Swaps:
beforeend(append) andafterbegin(prepend) are workhorses for list manipulation.beforebeginandafterendare also available for inserting content as siblings. - Special Swaps:
deleteremoves the target element, whilenoneignores the response, ideal for fire-and-forget server actions. - Choosing the right strategy: The choice of swap strategy is directly tied to the user action:
- Loading content into a container ->
innerHTML - Loading more items ->
beforeend - Adding a new item to the top ->
afterbegin - Replacing an item with an edit form ->
outerHTML - Deleting an item ->
deleteorouterHTMLwith an empty response
- Loading content into a container ->
In our next lesson, we will complete the core triad of HTMX attributes by exploring hx-trigger. It answers the final question: when is a request sent? This will move us beyond simple clicks and form submissions into a world of debounced search inputs, polling, and other sophisticated event handling, all within your HTML.
Can't find a good explanation? Sign up and we'll make it for you
Sign up