
Hello! In our previous lessons, we've established a solid foundation for making requests and handling responses. We've covered:
hx-get/hx-postto define what request to make.hx-targetto specify where the response should go.hx-swapto control how the response is placed in the DOM.
In this lesson, we'll complete this core set of mechanics by exploring the hx-trigger attribute, which answers the final crucial question: when is the request sent? By default, HTMX uses sensible triggers like clicks or form submissions. However, to build the dynamic, responsive interfaces you're used to creating in React—like live search or auto-saving forms—you need finer control. We will dive into how hx-trigger allows you to listen for any DOM event and use powerful modifiers like delay, throttle, and changed to manage request frequency declaratively.
Understanding Default Triggers
Before customizing triggers, it's important to know HTMX's default behavior, which is designed to be intuitive. As a seasoned developer, you know that sane defaults are a hallmark of a well-designed library.
Tricks Of The Htmx Masters - Hypermedia Systems
This section from the "Hypermedia Systems" blog outlines the default trigger events that HTMX applies to different elements.
Please read the first three paragraphs of the hx-trigger section. This will quickly establish the baseline behavior for inputs, forms, and other elements before we learn how to override it.
As you've just read, the defaults are what you'd expect: change for inputs, submit for forms, and click for almost everything else. Now, let's see how to change that.
Overriding Defaults with Standard Events
The simplest use of hx-trigger is to specify a different standard DOM event. For example, you might want to trigger a request on a mouseover instead of a click.
HTMX Crash Course | Dynamic Pages Without Writing Any JavaScript
This clip from Traversy Media's HTMX Crash Course provides a very quick and clear demonstration of changing the trigger event.
Watch from the brief introduction to hx-trigger, then see it in action from the mouseover example.
This is straightforward: hx-trigger="mouseover" or hx-trigger="focus" does exactly what it says. But the real power comes from the modifiers you can add to these events.
Trigger Modifiers: The Key to Responsive UIs
Trigger modifiers allow you to fine-tune the conditions under which an event will fire a request. We'll focus on three of the most important ones: changed, delay, and throttle. These are your tools for building performant, user-friendly features like live search.
The Live Search Pattern: changed and delay
A classic use case for these modifiers is a search input that sends requests as the user types. A naive implementation would send a request on every single keystroke (keyup), which is highly inefficient. HTMX provides declarative solutions for two common problems here.
-
Problem: Unnecessary requests on non-character keys (e.g., Shift, Alt, Arrow keys).
- Solution: The
changedmodifier. It ensures a request is only sent if the element'svaluehas actually changed since the last event.
- Solution: The
-
Problem: Sending a flood of requests while the user is still typing a word.
- Solution: The
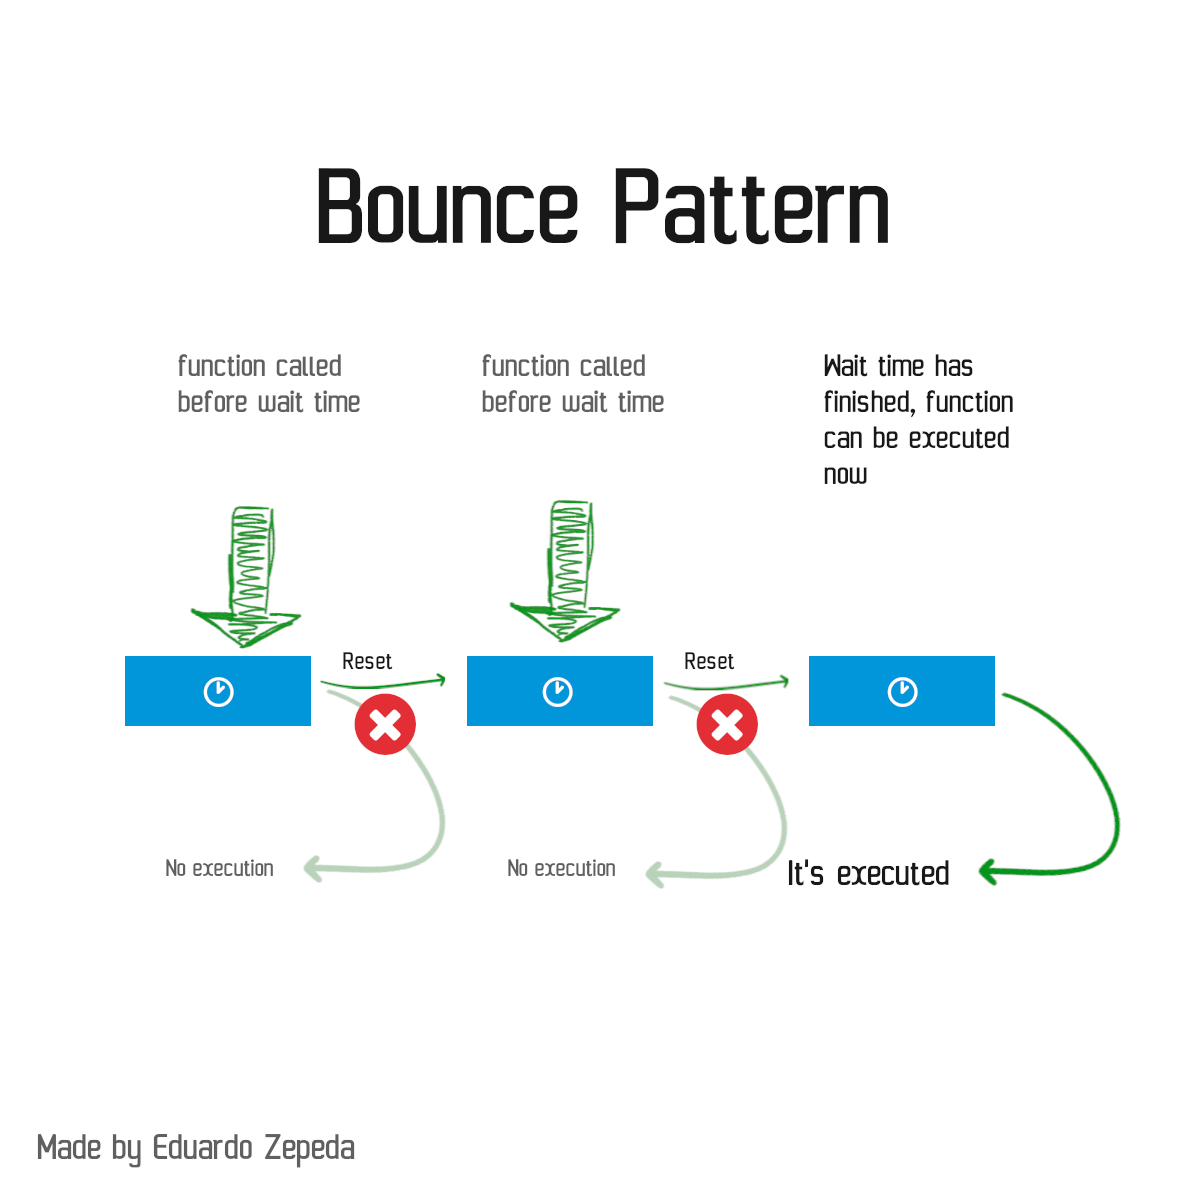
delaymodifier. This effectively "debounces" the event. It will wait for a specified period of inactivity before sending the request. If a new event arrives during the delay, the timer resets.
- Solution: The
You are certainly familiar with implementing debouncing with setTimeout and clearTimeout in JavaScript. HTMX lets you achieve this directly in your markup. The "Bounce Pattern" image illustrates this concept well: subsequent events reset the timer, and execution only happens after the wait time finishes.
Let's see how these modifiers are combined in practice.
HTMX Tutorial for Beginners #12 - Search & Trigger Modifiers
This tutorial from The Net Ninja builds a live search feature from scratch, perfectly demonstrating how and why to use the changed and delay modifiers.
First, watch how the basic keyup trigger is set up at this point. Next, understand the rationale for the changed modifier from this explanation. Then, see how the delay modifier is added to debounce requests from here. Finally, see the result in action from this demonstration. The final attribute looks like this: hx-trigger="keyup changed delay:300ms". Notice how a single attribute declaratively describes a sophisticated behavior.
Rate Limiting with throttle
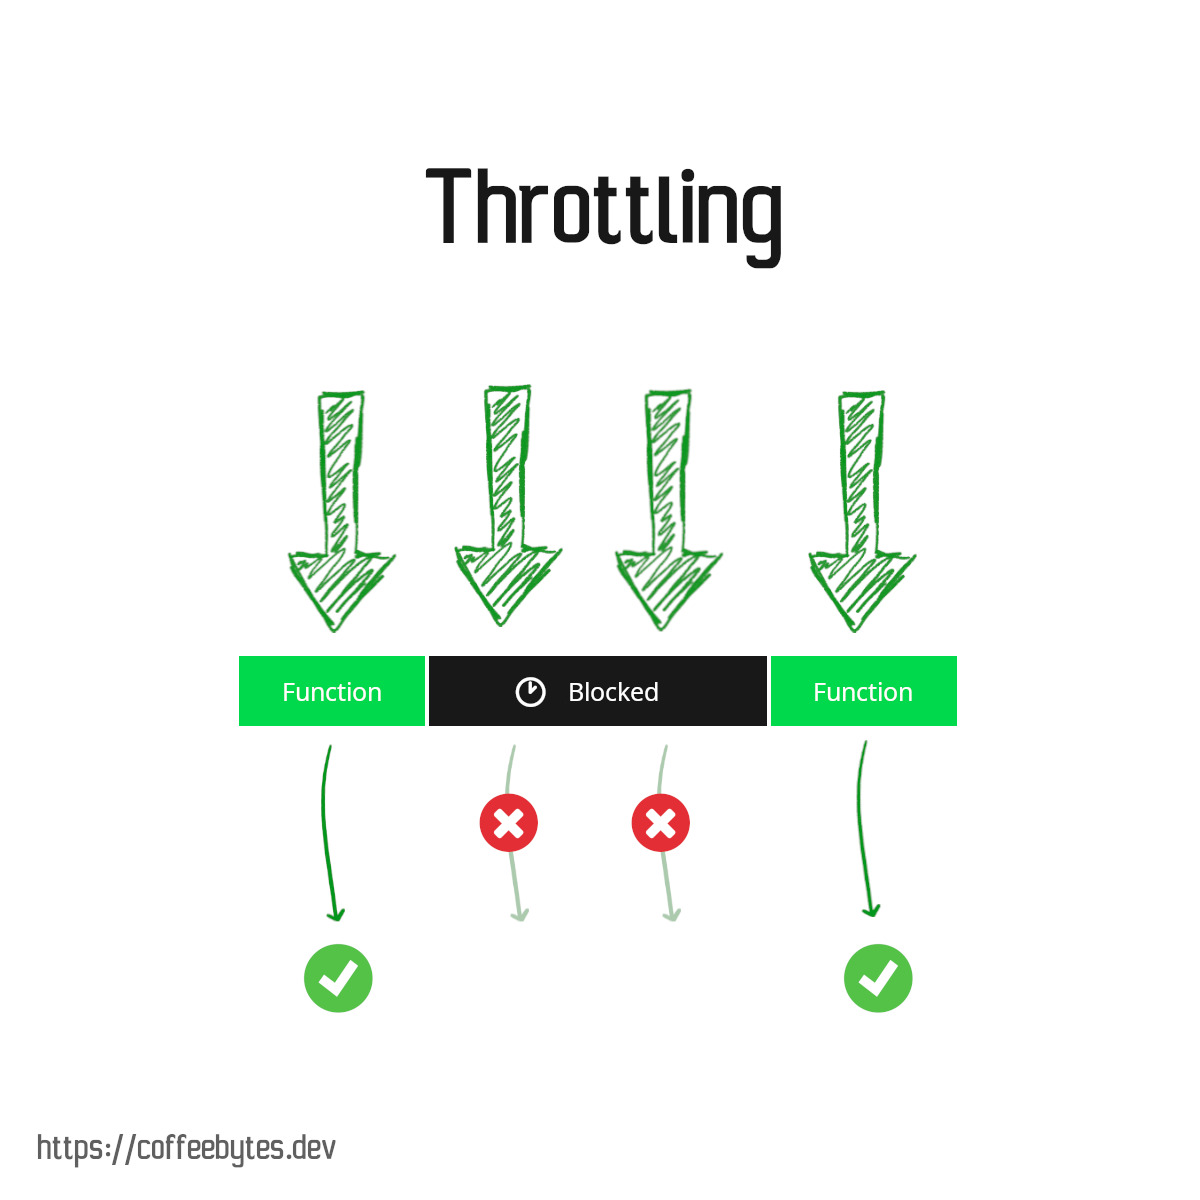
Throttling is another form of rate limiting, but it works differently than debouncing. Whereas delay waits for a quiet period, throttle ensures a request is sent at most once per specified interval. The first event fires a request immediately, but subsequent events within the throttle window are ignored.
This is useful for continuous events like scroll or resize, where you might want to send periodic updates but not overwhelm the server.
Tricks Of The Htmx Masters - Hypermedia Systems
This resource provides a concise textual distinction between delay and throttle.
In the hx-trigger section, find the descriptions for delay and throttle. This will solidify your understanding of their different behaviors. For example, hx-trigger="scroll throttle:500ms" would be a good way to track a user's scroll position without firing an event for every single pixel scrolled.
Beyond User Input: Polling with every
hx-trigger isn't limited to user-initiated DOM events. HTMX also includes a mechanism for polling the server at regular intervals. This is invaluable for UI elements that need to reflect changing server state, such as dashboards, progress bars, or notification indicators.
The syntax is hx-trigger="every <timing declaration>", for example, hx-trigger="every 5s".
HTMX Crash Course | Dynamic Pages Without Writing Any JavaScript
Brad Traversy provides an excellent example of polling by building a mock weather widget that updates its temperature every few seconds.
Please watch the segment on polling, from the introduction to the concept through the implementation of the weather example. This clearly demonstrates how to set up a polling element and the server endpoint it communicates with.
Combining Triggers and Advanced Usage
For more complex scenarios, HTMX allows for even greater flexibility.
-
Multiple Triggers: You can specify multiple, comma-separated triggers, each with its own modifiers. For example,
hx-trigger="load, click delay:1s"will trigger a request once when the page loads, and then again after any click (with a 1-second delay). -
Event Filters: You can add a JavaScript conditional in square brackets to gate the trigger. For example,
hx-trigger="click[event.shiftKey]"would only fire a request on a shift-click. Given your extensive JavaScript experience, you can see how this opens the door to very specific, conditional logic directly in your HTML.
</> htmx ~ hx-trigger Attribute
The official HTMX documentation is the definitive source for all trigger variations.
Skim through the official docs for hx-trigger. Pay particular attention to the syntax for Event Filters, Polling, and Multiple Triggers. This will serve as a good reference for the various tools at your disposal.
Conclusion
You now have control over the when of HTMX requests. You can move beyond the simple default triggers to create rich, interactive experiences declaratively.
Key Takeaways:
- Defaults are Sensible: HTMX triggers on
click,submit, orchangeby default, depending on the element. - Modifiers are Powerful:
changedprevents requests if an input's value hasn't changed.delaydebounces events, waiting for a pause in user activity (e.g., for live search).throttlerate-limits events, ensuring they fire at most once per interval (e.g., for scroll tracking).
- Polling is Built-in: The
every <interval>syntax provides a simple way to create components that periodically refresh themselves from the server. - Composition: You can combine multiple triggers and use JavaScript filters to handle complex triggering logic without leaving your HTML.
In our previous lessons, we defined the request and handled the response. In this lesson, we defined when the request is sent. The final piece of the core request puzzle is defining what data gets sent. In our next lesson, we will explore hx-vals, hx-include, and hx-params to see how HTMX gives you precise control over the payload sent to your server.
Can't find a good explanation? Sign up and we'll make it for you
Sign up