
In our previous lesson, we established how to make any HTML element issue an AJAX request using attributes like hx-get and hx-post. This is the first half of the hypermedia interaction. Now, we'll address the second half: what happens when the server sends back its HTML response? By default, HTMX has a simple rule, but the real power lies in precisely controlling where that new content gets placed in the DOM.
This lesson focuses on the hx-target attribute, the primary mechanism for directing the flow of incoming content. You'll learn how to use standard CSS selectors to target any element on the page, and then we will explore HTMX's extended syntax, including powerful modifiers like closest and find. Mastering hx-target is key to creating surgical UI updates and building complex, component-like behaviors without leaving your HTML.
The Default Behavior: Swapping into Self
Before introducing hx-target, it's important to understand what HTMX does out of the box. If you trigger a request from an element without specifying a target, HTMX will place the server's response inside the triggering element itself, replacing its current content.
The video "Using hx-swap & hx-target" from The Net Ninja provides a clear demonstration of this default.
HTMX Tutorial for Beginners #4 - Using hx-swap & hx-target
This short clip explains and shows the default behavior where the server response replaces the content of the element that initiated the request.
Watch the segment from this overview of the default behavior. The narrator points out that the response HTML gets swapped into the button that triggered the request, which is often not the desired outcome.
This default is simple, but for most applications, you need more control. You don't want a "Load More" button to be replaced by the very content it just loaded. This is where hx-target comes in.
Explicit Targeting with CSS Selectors
The hx-target attribute allows you to specify exactly where the response content should be placed, using any valid CSS selector. This immediately decouples the element that triggers an action from the element that displays the result. In your experience with React, this is analogous to an event handler in one component updating a piece of state that is consumed and rendered by a completely different component.
Let's see how this works in practice.
HTMX Tutorial for Beginners #4 - Using hx-swap & hx-target
This part of the same video from The Net Ninja demonstrates how to use hx-target with a simple CSS class selector to direct the response to a different div.
Watch the demonstration from using hx-target. Notice how adding hx-target=".book-list" redirects the HTML fragment from the button to the container div, achieving a much more sensible UI update.
The official HTMX documentation provides the formal definition.
This section of the documentation formally introduces the hx-target attribute and shows its use in a live search example.
Read the section on Targets. The example here is a classic use case: a search input (<input>) that, upon user input, fetches results and places them into a separate container (<div id="search-results">).
Using ID and class selectors for hx-target will cover a significant portion of your use cases, especially for updating larger, distinct sections of a page like a search results panel, a main content area, or a sidebar.
Relative Targeting: Extended CSS Selectors
While targeting by ID is effective, it can lead to a proliferation of unique identifiers in your markup. For more modular and reusable patterns—akin to self-contained React components—HTMX offers an "extended" CSS selector syntax for hx-target. This allows an element to find its target relative to its own position in the DOM.
These relative selectors are invaluable for building components like editable lists or data tables, where many identical items need to function independently without hardcoded IDs.
The official documentation provides a complete list of the keywords you can use for relative targeting.
Please read the section on Extended CSS Selectors. Pay close attention to the keywords listed: this, closest, next, previous, and find.
Let's break down the most common and useful modifiers:
closest <CSS selector>
This is perhaps the most powerful relative selector. It travels up the DOM tree from the current element and finds the first ancestor that matches the provided selector. It's the perfect tool for actions that affect the container of the element that was acted upon.
A classic example is a "Delete" button within a table row or a list item. You want the button click to delete the entire row, not just the button itself.
The article on the HTMX blog by Michael Volkmann provides a concise list of target options and a perfect example for closest.
This resource first gives a quick reference for target values and then demonstrates the closest selector in a practical delete scenario.
First, quickly review the list of supported values under the Targets heading. Then, examine the Deleting an Element example. The key attribute here is hx-target="closest div". This tells the delete button to find its nearest div ancestor and make that the target of the operation.
previous <selector> and next <selector>
These modifiers search for sibling elements—elements at the same level in the DOM tree—that appear before (previous) or after (next) the current element.
This GIF provides a crystal-clear demonstration of hx-target="previous <selector>".
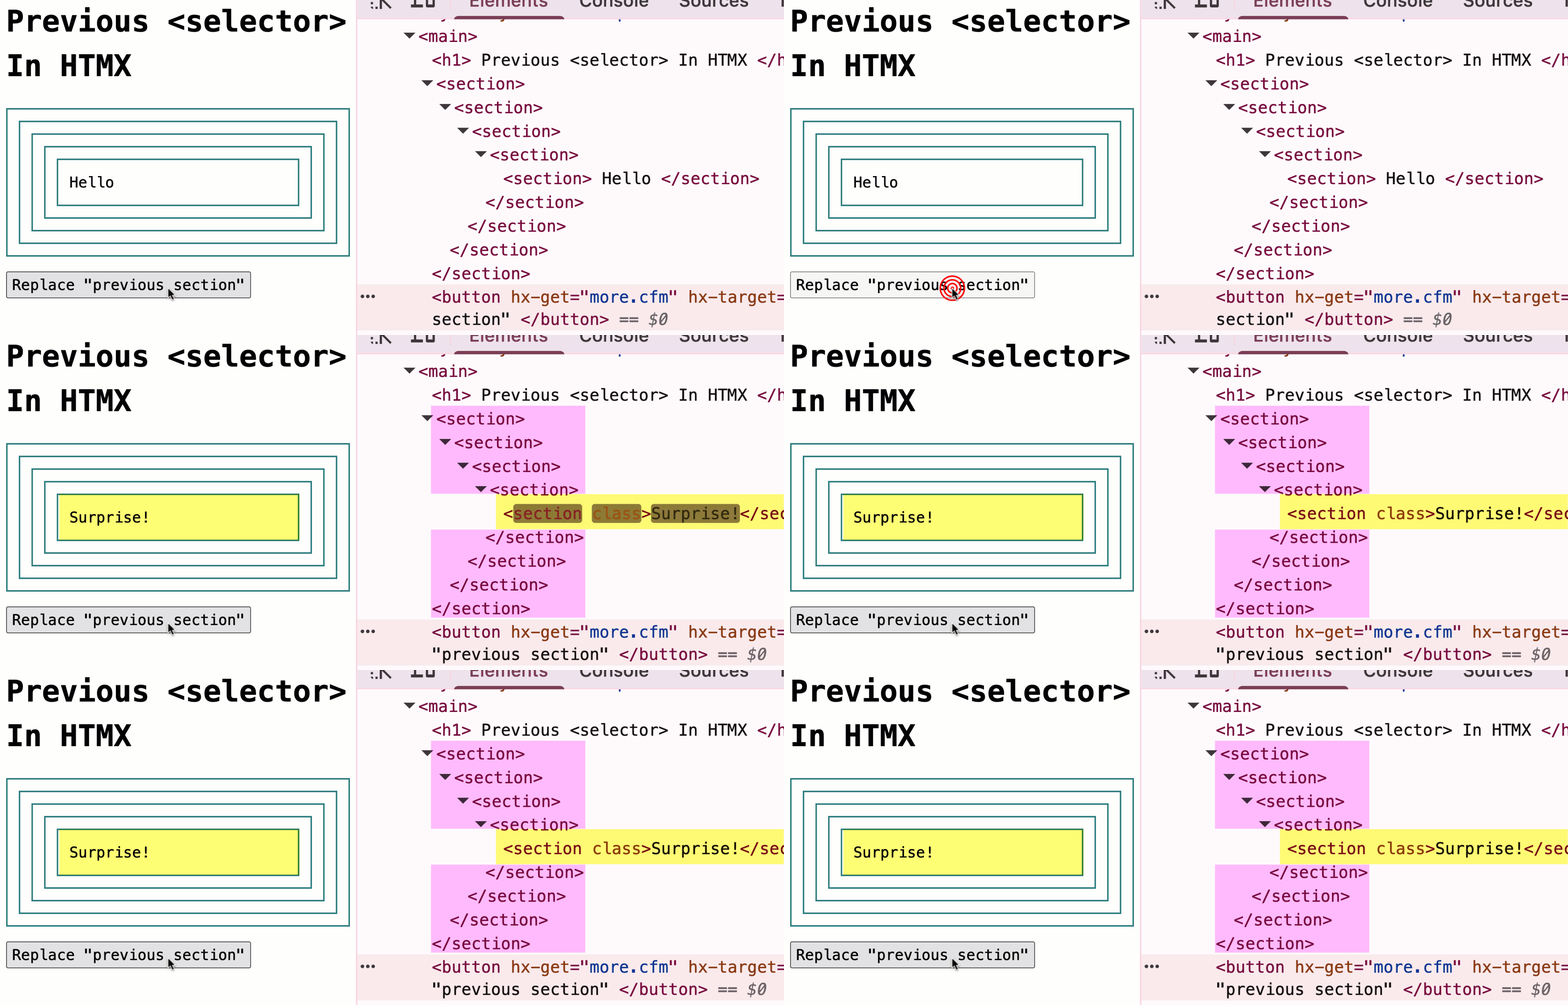
find <CSS selector>
The find modifier is the inverse of closest. It travels down the DOM tree to find the first descendant element that matches the selector. This can be useful if a container element triggers a request but needs to update a specific child within its own scope.
this
Finally, you can use hx-target="this" to explicitly target the element itself. This is the default behavior, but it can be useful for overriding an inherited hx-target from a parent element, a concept we will explore later.
The Role of hx-swap
As you've seen in some examples, hx-target often appears alongside another attribute: hx-swap.
hx-targetanswers the question: Where does the response go?hx-swapanswers the question: How is the response placed there?
The default swap strategy is innerHTML, which replaces the content inside the target element. However, in the "delete" example using closest, you might have noticed the use of hx-swap="delete" or hx-swap="outerHTML". The outerHTML value replaces the entire target element itself, which is how you remove a whole row from the DOM.
We are just scratching the surface of hx-swap. It offers a rich set of strategies for inserting, prepending, appending, and even transitioning content. For now, simply recognize that hx-target and hx-swap work as a pair to give you complete control over the UI update. We will dedicate our entire next lesson to mastering hx-swap.
Conclusion
In this lesson, you've learned how to precisely control where server responses are placed in the DOM using hx-target. This is a fundamental skill for moving beyond full-page reloads and creating the dynamic, targeted updates that users expect from modern web applications.
Key Takeaways:
- Default Behavior: Without
hx-target, an element's content is replaced by the response. - Explicit Targeting: Use
hx-targetwith a CSS selector (e.g.,#my-id,.my-class) to direct the response to any element on the page. - Relative Targeting: Leverage extended selectors like
closest,find,next, andpreviousto create modular, self-contained interactive elements without relying on unique IDs. Theclosestmodifier is particularly powerful for actions within a list or table. - Target and Swap:
hx-targetdetermines which element to update, whilehx-swap(our next topic) determines how to update it.
You can now send a request and control its destination. The next logical step is to explore the different ways you can swap that content into the target. In our next lesson, we will dive deep into the hx-swap attribute to cover all the strategies, from simple replacement to appending, prepending, and deleting content.
Can't find a good explanation? Sign up and we'll make it for you
Sign up