
Hello. In the last two lessons, we configured our Express server and established a robust structure for our views, separating them into layouts, pages, and partials. Our server is now capable of responding to requests with either full HTML documents or targeted HTML fragments, a crucial capability for a hypermedia-driven application.
Today, we move to the client side to initiate those requests. This lesson introduces the core of HTMX's functionality: the attributes that allow any HTML element to make an AJAX request. Your extensive experience with JavaScript's fetch API and libraries like Axios in React has involved writing imperative code to handle data fetching, submission, and UI updates. Here, you will see how HTMX achieves the same results declaratively, directly within your HTML markup. Our goal is to master the five fundamental attributes—hx-get, hx-post, hx-put, hx-patch, and hx-delete—that serve as the primary triggers for server interaction.
The Hypermedia Exchange
Before we dive into the attributes, let's revisit the core data flow. In a traditional SPA, the client requests JSON, which it then uses to render HTML via a JavaScript framework. With HTMX, the client requests HTML directly from the server, which is then swapped into the DOM.
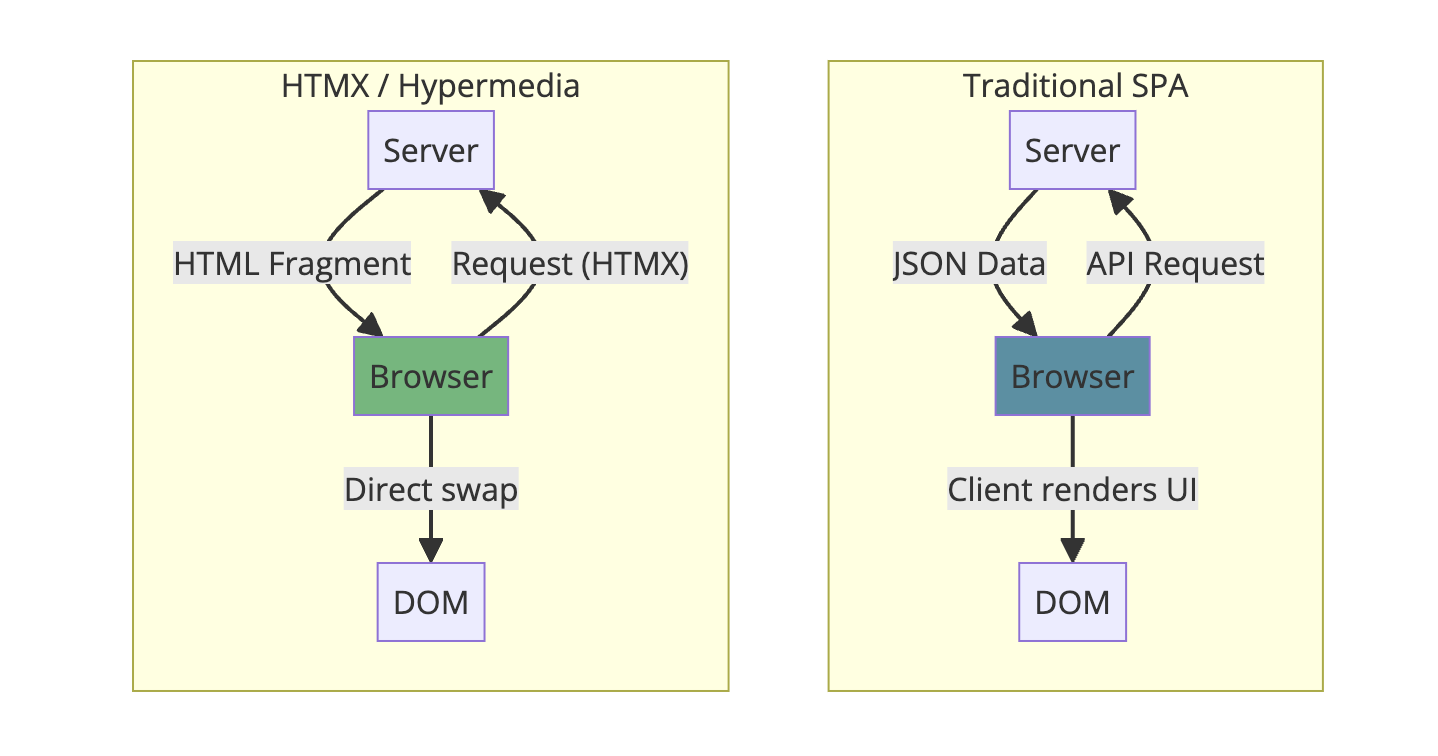
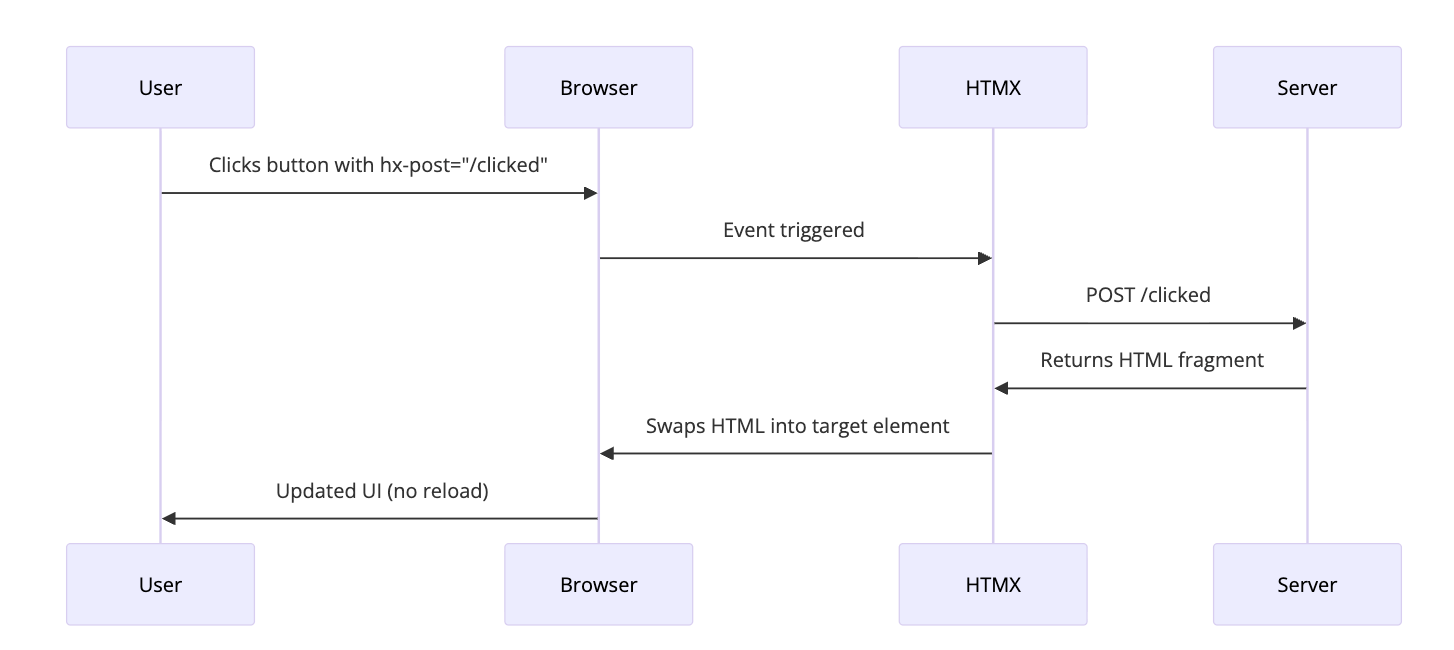
This simple shift is profound. The server retains control over rendering, and the client's role is simplified. The following diagram illustrates a typical POST request sequence, which we will be implementing shortly.
Declarative AJAX: HTTP Verbs as Attributes
The central idea of HTMX is to bring the full power of HTTP to any element, not just <a> (for GETs) and <form> (for GETs/POSTs). It does this by providing a set of attributes that map directly to HTTP verbs. As you'll see, this declarative approach significantly reduces the amount of client-side JavaScript required for typical CRUD operations.
The Traversy Media video "HTMX Crash Course" provides an excellent introduction to this concept.
HTMX Crash Course | Dynamic Pages Without Writing Any JavaScript
This video introduces why HTMX extends HTML's native capabilities to include all HTTP verbs on any element.
Watch the brief introductory segment from "why should only get and post...". This highlights the core motivation behind HTMX's design, which is to overcome the traditional limitations of HTML forms and links.
The LogRocket article "Creating server-driven web apps with htmx" also provides a concise list of these primary attributes.
Creating server-driven web apps with htmx - LogRocket Blog
This article section gives you a direct mapping of the five core request attributes to their corresponding HTTP methods.
Please read the section titled "Making requests," specifically the list from the five attributes. This serves as our master list for this lesson.
Now, let's explore each of these attributes with practical examples using our Node.js and Express stack.
hx-get: Fetching and Displaying Data
The hx-get attribute is used to issue a GET request to a given URL. This is the direct replacement for patterns like fetching initial data within a useEffect hook in React.
The Contentful article "What is HTMX? Tutorial and practical examples" offers a clean, self-contained example of hx-get.
What is HTMX? Tutorial and practical examples | Contentful
This resource demonstrates the most basic usage of hx-get to load content from a server endpoint.
Focus on the section Basic content loading. Note how a GET request is attached to a <button> element. The example also introduces hx-target and hx-swap, which we will cover in detail in the next lesson. For now, understand that they tell HTMX where to place the response.
While the above example is simple, a more realistic scenario involves fetching a list of items and rendering it. The Traversy Media video demonstrates this by building an Express route that returns an HTML list of users.
HTMX Crash Course | Dynamic Pages Without Writing Any JavaScript
This segment shows a complete, practical example of using hx-get to fetch a list of users from an Express server and render it as an HTML fragment.
Watch the section from building a user list. Pay close attention to two key parts: The client-side HTML: A simple button with hx-get="/users". The server-side Express route: The app.get('/users', ...) handler that constructs and sends back an HTML string containing the <ul> of users. This directly illustrates the server-side work we prepared for in the last lesson.
hx-post: Creating Data
The hx-post attribute is used for POST requests, which typically create new resources on the server. Its most common use is with forms. HTMX automatically includes the values of all inputs within the form that triggers the request.
Let's look at how to submit a form to an Express backend.
HTMX Crash Course | Dynamic Pages Without Writing Any JavaScript
This part of the "HTMX Crash Course" provides a clear example of submitting form data with hx-post and handling it on the server.
Watch the temperature converter example from form submission. This demonstrates: Attaching hx-post to a <form> element. The server handler (app.post) accessing the submitted data via req.body. Sending back an HTML fragment as the response.
For a more CRUD-centric example, the LogRocket article shows how to create a new "todo" item and append it to a list.
Creating server-driven web apps with htmx - LogRocket Blog
This resource applies hx-post to a classic CRUD use case: creating a new item in a list.
Read the section on creating data. Here, a form with hx-post="/todos" sends the new task to the server. Notice the Express app.post('/todos', ...) handler: it inserts the data and then renders the updated list partial (partials/todo-list) as the response. This pattern is fundamental to HTMX.
hx-put, hx-patch, and hx-delete: Updating and Deleting
The remaining verbs—PUT, PATCH, and DELETE—are essential for building full CRUD functionality. They allow you to perform updates and deletions declaratively.
hx-put: Replaces an entire resource. Often used for "edit" functionality.hx-patch: Partially updates a resource. Syntactically used just likehx-put.hx-delete: Deletes a resource.
The LogRocket and Net Ninja resources provide excellent examples for PUT and DELETE.
Creating server-driven web apps with htmx - LogRocket Blog
This section demonstrates how to wire up update and delete actions using hx-put and hx-delete within a list of items.
Read the section Updating and deleting data. Key takeaways: Dynamic URLs: The attributes use EJS templating to include the item's ID in the URL, like hx-put="/todos/<%= todo.id %>". This is how you target a specific resource. Server-side Handlers: Note the corresponding app.put('/todos/:id', ...) and app.delete('/todos/:id', ...) routes that use req.params.id to identify the resource to act upon.
The Net Ninja has a video that focuses specifically on the DELETE pattern, which is a great reinforcement of the concept.
HTMX Tutorial for Beginners #8 - Delete Requests
This short video provides a very clear, step-by-step guide to implementing a delete request.
Watch the entire video (implementing delete). It cleanly separates the front-end change (adding the hx-delete attribute) from the back-end implementation (app.delete handler), making the relationship between the two very explicit.
Power Move: Requests from Any Element
Finally, it's crucial to internalize that these attributes are not limited to buttons or forms. You can add them to any element to trigger a request. This enables powerful UX patterns that are often complex to implement in other frameworks.
A prime example is inline validation. Let's see how you can trigger a POST request from an <input> field as the user types or tabs away.
HTMX Crash Course | Dynamic Pages Without Writing Any JavaScript
This advanced example from the "HTMX Crash Course" demonstrates using hx-post on an input field for real-time server-side validation.
Watch the segment on email validation. This is a powerful demonstration of the hypermedia approach. In a React context, this would involve onChange handlers, state variables for the input value and validation status, and conditional rendering for error messages. With HTMX, it's a single hx-post attribute that triggers a server endpoint, which returns a snippet of HTML containing the input field itself, now with an error or success message.
This pattern of embedding server interaction on fine-grained elements is a cornerstone of building rich, responsive interfaces with HTMX while keeping the client-side logic minimal.
Conclusion
In this lesson, we have covered the five core HTMX attributes for making AJAX requests. You now understand how to declaratively issue GET, POST, PUT, PATCH, and DELETE requests from any HTML element, effectively replacing imperative JavaScript fetch calls.
Key Takeaways:
- HTTP Verbs as Attributes: HTMX provides
hx-get,hx-post,hx-put,hx-patch, andhx-deleteto perform AJAX requests. - Declarative by Nature: You declare the desired interaction in your HTML rather than writing JavaScript event listeners and fetch logic.
- Any Element Can Be a Trigger: This paradigm extends beyond forms and links, allowing any element to initiate a server request.
- Server-Client Partnership: The front-end HTMX attributes work in tandem with back-end Express routes (
app.get,app.post, etc.) that are designed to return HTML fragments.
We have now successfully triggered requests from the client. However, we've only briefly touched upon what happens when the response arrives. In our next lesson, we will dive deep into hx-target and hx-swap, the attributes that give you precise control over how and where the server's HTML response is placed in the DOM.
Can't find a good explanation? Sign up and we'll make it for you
Sign up