
Hello! Welcome to the fifth lesson in our "Foundations of Digital Audio" module.
In our previous lesson, we explored the "what" and "why" of digital audio formats. You learned about the trade-offs between uncompressed (WAV), lossless (FLAC), and lossy (MP3) formats, as well as the distinction between mono and stereo channel layouts.
Today, we move from theory to practice. This lesson is all about the "how." You will learn to use ffmpeg, an essential command-line tool that is the de facto standard for audio and video manipulation. Mastering ffmpeg is a fundamental skill for any audio AI developer, as it's used universally for the crucial first step in any pipeline: preparing and standardizing your data.
Our goal is to perform audio format conversion, resampling, and channel manipulation using ffmpeg commands. By the end of this lesson, you'll be able to take an audio file of any common format and transform it into the precise specification (e.g., 16 kHz, single-channel WAV) required by most speech recognition models.
1. The Engineer's Toolkit: ffmpeg and ffprobe
Before you can manipulate a file, you need to know its properties. The ffmpeg suite comes with two essential tools:
ffmpeg: The core tool for converting, filtering, and manipulating multimedia files.ffprobe: A companion tool for inspecting files and printing detailed metadata without modifying them.
A professional workflow always starts with inspection. Let's get these tools set up and learn how to use ffprobe to see what's inside an audio file.
Audio File Downsampling - Recommendations and Best Practices
The AssemblyAI documentation provides a concise guide for installing ffmpeg and using ffprobe to check audio metadata. This is the perfect starting point.
First, follow the instructions in the 'Prerequisites' section to install ffmpeg on your system. Once installed, read the 'Checking your audio' section. Pay close attention to the ffprobe command provided and the key metadata fields it highlights: codec_name, sample_rate, channels, and bit_rate. You should be able to run this command on any audio file you have.
Running ffprobe on a file before processing is like checking the dtype and shape of a tensor in PyTorch—it prevents unexpected errors and ensures your pipeline receives data in the format it expects.
2. Understanding the ffmpeg Command Structure
An ffmpeg command can look intimidating at first, but it follows a logical and consistent structure. The key is to understand the order of operations.
The general syntax is:ffmpeg [global options] {[input options] -i input_file} ... {[output options] output_file} ...
Let's break this down:
- Global Options: Flags that affect the overall execution (e.g.,
-yto overwrite output files). - Input Files: Specified with the
-iflag. You can have multiple inputs. - Output Files: Specified by just a filename at the end of the command. You can have multiple outputs.
- Options: Options that apply to the next file specified. This is a critical concept. Options placed before
-i input.wavapply to the input file, while options placed beforeoutput.mp3apply to the output file.

To understand this structure more deeply, the following reading is excellent.
The IMG.LY blog has a fantastic, in-depth guide to ffmpeg. We'll use this section to solidify your understanding of the command-line syntax.
Please read the section titled 'FFmpeg's command line system' and its three subsections: 'FFmpeg CLI', 'Specifying an input file', 'Specifying an output', and 'Understanding the command line order'. This will cement the concept of how ffmpeg organizes its arguments.
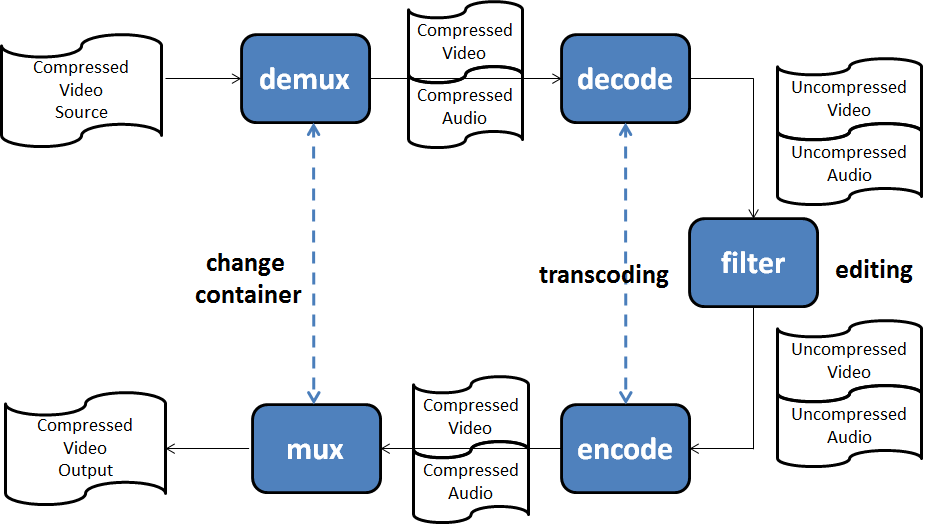
Conceptually, ffmpeg works through a series of stages: demultiplexing (demuxing), decoding, filtering, encoding, and multiplexing (muxing).
3. Core Audio Operations
Now for the practical part. We'll cover the three operations central to this lesson's outcome. For a quick visual reference on these commands, the following video is a great resource.
FFmpeg Tutorial for Beginners: Mastering the Command Line
This 'FFmpeg Tutorial for Beginners' by CodeLucky provides quick, clear examples of the exact audio options we'll be using.
Watch the section from 01:57 to 03:06. It directly introduces the flags for audio codec (-c:a), bitrate (-b:a), sample rate (-ar), and channels (-ac), along with practical examples.
Let's dive into each operation with specific commands.
a) Format Conversion
ffmpeg is brilliant at format conversion. In most cases, it can guess the desired output format (the container and default codec) from the file extension you provide.
Example: Convert a lossless WAV to a lossy MP3.
ffmpeg -i input.wav output.mp3
This is the simplest form of transcoding. ffmpeg uses a default bitrate for the MP3, which may not be what you want. To control the quality, you set the audio bitrate (-b:a).
Example: Convert WAV to MP3 with a higher bitrate (320 kbps).
ffmpeg -i input.wav -b:a 320k output_hq.mp3
You can also explicitly specify the audio codec with -c:a. For example, to convert to the AAC codec, you might use -c:a aac.
b) Resampling (Changing Sample Rate)
Most ASR models, including Whisper, expect audio at a 16,000 Hz (16 kHz) sample rate. Your source audio might be at 44.1 kHz (CD quality) or 48 kHz (video standard). The -ar (audio rate) flag is used for resampling.
Example: Downsample a 48 kHz WAV file to 16 kHz.
# First, inspect the file
ffprobe input_48k.wav


# Now, convert it
ffmpeg -i input_48k.wav -ar 16000 output_16k.wav
This is one of the most common preprocessing steps you will perform.
c) Channel Manipulation
Similarly, most ASR tasks work with single-channel (mono) audio. You can easily convert stereo files to mono using the -ac (audio channels) flag.
Example: Convert a stereo WAV file to mono.
ffmpeg -i input_stereo.wav -ac 1 output_mono.wav
4. Combining Operations and Advanced Mapping
The real power of ffmpeg comes from combining these operations. You can perform format conversion, resampling, and channel manipulation in a single command.
Example: Convert a stereo, 44.1 kHz FLAC file to a mono, 16 kHz WAV file.
ffmpeg -i source_audio.flac -ac 1 -ar 16000 output_for_asr.wav
What if your input file has multiple audio streams (e.g., one stereo, one 5.1 surround sound)? ffmpeg will automatically select one, but it's better to be explicit using the -map flag.
The IMG.LY guide explains how to manually select specific streams from an input file, giving you precise control.
Read the section 'Mapping files'. Understand the -map 0:1 syntax, which means 'from the first input file (index 0), select the second stream (index 1)'.
Example: Extract the second audio stream (0:a:1 or 0:2) from a video and convert it.
# Using stream index: stream 0:2 (third stream of first file)
ffmpeg -i video_with_two_audio_tracks.mp4 -map 0:2 -ac 1 -ar 16000 audio_stream_2.wav


# Using stream specifier: first audio stream (a:0) vs second audio stream (a:1)
ffmpeg -i video.mp4 -map 0:a:1 -ac 1 -ar 16000 audio_stream_2.wav
The -map option is incredibly powerful for handling complex multimedia files.
5. Automating ffmpeg with Python
Running commands manually is great for individual files, but for preparing a dataset with thousands of files, you need to automate. Given your background in Python and software development, integrating ffmpeg into a script is a natural next step. The standard way to do this is with Python's subprocess module.
Audio File Downsampling - Recommendations and Best Practices
This section from the AssemblyAI guide provides a perfect, practical Python script for wrapping ffmpeg commands.
Study the Python code snippet in the 'Pre-transcription processing step' section. Notice how the ffmpeg command and its arguments are passed as a list of strings to subprocess.run. This is a robust way to programmatically execute command-line tools.
This pattern of using subprocess to call ffmpeg is fundamental to building data preprocessing pipelines for audio AI. You can loop through a directory of files, inspect each one with ffprobe, and then apply the necessary ffmpeg conversions to standardize your entire dataset, all within a single Python script.
Conclusion
In this lesson, you have acquired a practical and powerful skill: manipulating audio files from the command line. You've learned how to use ffprobe to inspect metadata and how to use ffmpeg to change a file's format, sample rate, and channel count. More importantly, you understand the syntax and can combine these operations to prepare audio for real-world AI applications.
Key Takeaways:
- Inspect First: Always use
ffprobeto check a file's properties before you process it. - Command Structure:
ffmpeg [options] -i input [options] output. Options are applied to the next file in the command. - The Core Flags:
-i: Specifies an input file.-b:a: Sets the audio bitrate (e.g.,-b:a 192k).-ar: Sets the audio rate (sample rate) (e.g.,-ar 16000).-ac: Sets the audio channel count (e.g.,-ac 1for mono).-map: Selects specific streams from an input.
- Automation is Key: Use Python's
subprocessmodule to integrateffmpeginto your data processing scripts for handling large datasets.
In our next lesson, we will move from command-line file manipulation to working with audio data in memory. You will learn how to use torchaudio, PyTorch's native audio library, to load, decode, and represent audio files as tensors, setting the stage for building and training neural networks.