
Hello again! In our last session, you expertly drafted the back neckline and the shoulder slope, giving the upper edge of your pattern its fundamental shape. You successfully translated your measurements into the first curves and angles that begin to represent the three-dimensional form of the body.
This lesson continues that journey as we define the side boundary of the back bodice. We will construct the back armhole curve, which connects the shoulder point you've already established down to the side of the torso. The armhole, or 'armscye' as it's known in patternmaking, is a crucial intersection of fit and function, directly impacting comfort and range of motion. Your background in product design, where ergonomics and user experience are paramount, will provide a useful lens for understanding the importance of this step.
By the end of this lesson, you will have constructed a well-formed back armhole curve, completing the main outline of your back bodice piece.
Part 1: Setting the Boundaries for the Armhole
Before you can draw the curve, you need to establish its key boundaries. The armhole doesn't simply occupy the entire side of your pattern; it's defined by the width of your back. We will mark this width on your block and create guide points that will act as a scaffold for drawing a smooth, accurate curve.
We'll use the methodical approach from the In the Folds tutorial to plot these critical points. You will need your back width measurement for this step.
This section guides you through creating the precise vertical and horizontal guide points that will define the shape of your back armhole. We will be creating points W, X, and Z.
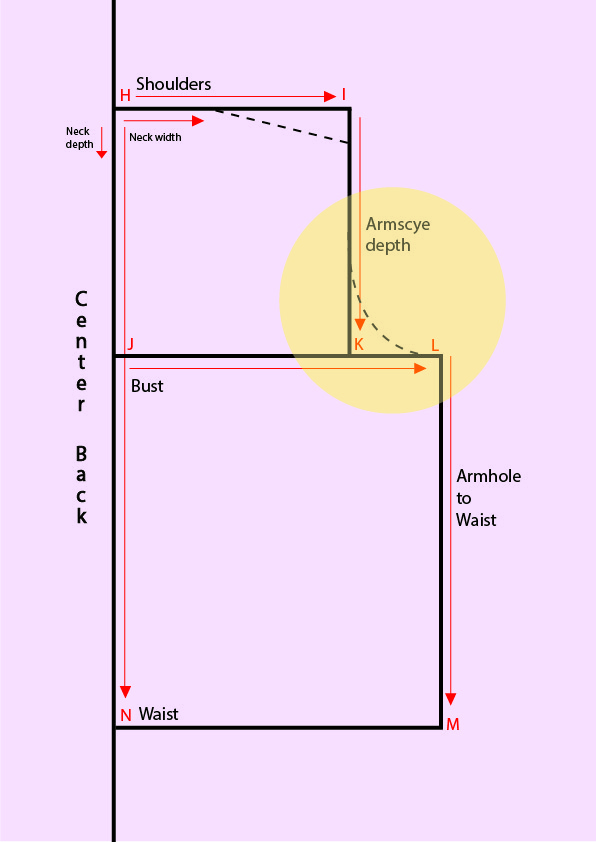
Navigate to the heading "Drafting the armhole." Follow the first three steps in this section to create the scaffolding for your back armhole: Mark the Back Width (Point W): Follow the instruction to mark a point on the horizontal line HI (your bust/armscye line). You will calculate this as half of your back measurement + 0.5cm (1/4”) ease, measured from point H (at the Center Back). Label this new point as W. Create the Vertical Guide (Point X): As instructed, draw a vertical line up from point W until it meets the horizontal guideline you drew for your shoulder slope. Label the intersection point as X. You now have a corner (X-W) that will contain the upper part of your armhole curve. Find the Midpoint (Point Z): Finally, find the midpoint of the vertical line you just drew (XW) and label it Z. This point is a crucial guide for ensuring your curve is shaped correctly and not too deep or too shallow.
At this stage, your draft should have the key points needed to form the curve: the shoulder tip (O), the midpoint guide (Z), and the back width point (W).
Part 2: Sculpting the Armhole Curve
With your guide points in place, you can now draw the armhole curve itself. The goal is to create a smooth line that connects your shoulder point (O) through the region of your midpoint (Z) and curves down to meet the bust line, blending smoothly into a vertical line at point W.
A French curve ruler is the ideal tool for this. The curve should be relatively gentle at the top, passing near point Z, and then become more pronounced as it approaches the underarm.
To see this process in action and understand the general shape you're aiming for, the following video is helpful. The instructor drafts freehand, but it provides a good visual for the shape of the curve.
How to draft a bodice block (or sloper) from your own measurements. Detailed step by step tutorial.
This video from Creative Bobbin demonstrates the drawing of the back armhole curve and explains the difference in shape between the front and back armholes.
First, watch how the instructor establishes a midpoint guide from this section. This is the same principle as the point Z you just marked. Next, watch from this clip as she discusses and draws the armhole curves. Notice her comment that the front armhole is typically cut deeper to allow for more forward arm movement. Your back curve should be shallower and smoother.
As you draw your curve, here is a practical tip to ensure a good shape at the underarm:
How to draft the Basic Bodice Pattern
This resource offers a succinct tip for shaping the bottom of the armscye curve.
In the "Bodice Pattern: Back piece" section, find step 4. The author notes that the curve should stay a couple of millimeters outside the corner point (your point W) before it turns down into the side seam. This prevents a sharp, restrictive corner at the underarm.
Using your French curve, connect points O, Z, and W to form one continuous, elegant curve.
Part 3: From Blueprint to Prototype: Why the Curve Shape Matters
You've now drafted a technically correct armhole. But why this specific shape? Just as in product design, a 2D technical drawing must translate into a functional 3D object. The shape of this curve directly determines how the finished garment will fit and feel around your arm.
The ultimate test of any pattern is the muslin prototype. This process of testing and refining will feel familiar to your work in discovery and user research. The following clips show exactly how a fitting session reveals necessary adjustments to the armhole and how to transfer them back to the paper pattern.
How to draft a bodice block (or sloper) from your own measurements. Detailed step by step tutorial.
These clips demonstrate the crucial link between the paper pattern and the final fit, showing how to diagnose and correct armhole issues.
Diagnosing the Fit: Watch from this section where the instructor, wearing her muslin, identifies that the armhole is a bit too tight and restricts movement. She pins it to mark where more room is needed. Adjusting the Pattern: Now see how that insight is translated back to the paper pattern. From this clip, she redraws the curve to give more space, connecting the physical feedback from the prototype directly to the 2D blueprint.
This iterative cycle—draft, test, refine—is the core of patternmaking, just as it is in design. The lines you draw are not merely decorative; they are functional specifications for a wearable product.
Conclusion
Congratulations on completing the outline of your back bodice block! By constructing the armhole, you have connected the shoulder to the side seam, creating a complete and recognizable pattern piece.
Key Takeaways:
- The back armhole curve is not drawn arbitrarily; it is guided by specific points determined by your back width measurement.
- Guide points (like your points W, X, and Z) provide a scaffold for creating a smooth and functional curve with a French curve ruler.
- The shape of the back armhole is typically shallower than the front to accommodate the body's natural shape and movement.
- The true test of the curve is in the fitting of a muslin, where you can assess comfort and movement and transfer any necessary adjustments back to your pattern.
Now that the entire outline of the back bodice is complete, our next lesson will focus on adding the internal shaping. We will draft the back waist dart, which will contour the flat pattern to the curve of your lower back, adding the final dimension of fit to the piece.
Can't find a good explanation? Sign up and we'll make it for you
Sign up