
Welcome back. In our last lesson, you successfully drafted the back armhole, completing the full outline of the back bodice. Your pattern piece now has a defined top, back, and side edge. However, it's still a flat, two-dimensional shape representing the widest part of your torso, the bust. To make it conform to the body's curves, we need to introduce three-dimensional shaping.
This lesson focuses on creating that shape by drafting the back waist dart. Think of a dart as a triangular wedge of fabric that is folded and stitched out of the pattern. Its purpose is to remove excess fabric and contour a flat piece to a curved surface, in this case, the curve of your lower back. Your background in industrial design, which often involves transforming flat materials into 3D forms, provides a direct parallel to this fundamental patternmaking principle.
By the end of this lesson, you will have calculated the necessary shaping for your waist and drafted a precise back waist dart, turning your flat outline into a pattern piece ready for three-dimensional fitting.
Part 1: Calculating the Waist Shaping
Currently, the waist of your pattern block is the same width as the bust. For a fitted garment, we need to reduce the waist measurement. The total amount of this reduction is what we call the "dart intake." We will calculate this total amount and then distribute it across the pattern. For a standard bodice, this intake is shared between three locations: a dart on the back, a dart on the front, and the side seams.
The In the Folds tutorial provides a clear, methodical way to calculate this. You will need your bust and waist measurements.
This reading explains the logic behind waist darts and provides the formula to calculate the total amount of fabric to be removed.
Navigate to the section titled "creating darts." Read this short section to understand the principle. The formula for the total reduction on your half-block is: (Bust measurement - (Waist measurement + 2cm ease)) / 2 Once you have this number, you will divide it by three, as the text explains, to determine the amount that will be handled by our back waist dart. Let's call this the Dart Width.
For example, if your bust is 92cm and your waist is 72cm:
- Working Waist: 72cm + 2cm ease = 74cm
- Total Reduction (full pattern): 92cm - 74cm = 18cm
- Reduction for Half Block: 18cm / 2 = 9cm
- Back Dart Width: 9cm / 3 = 3cm
This 3cm is the total width of the wedge you will draw and eventually sew out of the fabric.
Part 2: Locating and Drafting the Dart
Now that you know the size of your dart, you need to determine its location and shape. A dart consists of a point (the apex) and two "legs" that form the triangle.
The placement is key for a flattering fit. For the back waist dart, we will center it on the back panel. The apex of the dart typically points towards the area with the least curvature, stopping below the shoulder blades to avoid creating a point or bubble in the fabric.
The In the Folds guide provides precise instructions for this.
This section provides step-by-step instructions for placing and drawing the back waist dart.
Please follow the steps under the heading DRAFT THE BACK WAIST DART: Find the Dart's Center Line: The instructions guide you to find the midpoint of the line segment that defines your upper back width (on the bust line) and to square down to the waistline. This vertical line will be the center of your dart. Label the top point C1 (at the bust line) and the bottom point C2 (at the waistline). Draw the Dart Legs: Now, you will distribute the Dart Width you calculated in Part 1. For example, if your dart width is 3cm, you will mark 1.5cm on each side of point C2 along the waistline. Connect these two new points back up to the apex, point C1, to form the dart.
The video below offers a helpful visual of this process, reinforcing the concept of how the dart takes in the excess fabric you created at the waistline.
How to draft a simple fitted bodice block with darts? Beginners STEP-BY-STEP tutorial
This clip from Thoughtful Creativity visually demonstrates the logic of calculating and drawing a waist dart.
Watch from this section where the instructor explains how the difference between the bust and waist measurements is translated into a dart. Notice how she first extends the waistline and then pinches out the excess with the dart—this is exactly what you've just done through calculation.
Your drafted dart should look similar to the one shown in this diagram.

Part 3: The Dart as a System Component
You have now drafted one dart, but it's important to see it as part of a system. The shaping you calculated is distributed between this back dart, the side seam, and a future front dart. All three elements must work in concert to smoothly transition the garment from the bust to the waist.
Your experience with systems thinking in design is relevant here; no single component works in isolation. The image below shows a completed front and back bodice block. You can clearly see how the back waist dart, the front waist dart, and the shaped side seams all contribute to the final contoured silhouette.
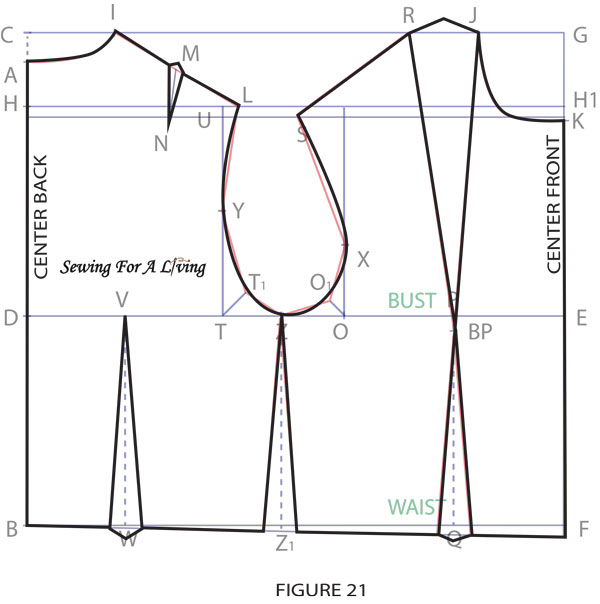
By drafting this first dart, you have programmed the initial piece of shaping information into your pattern. The subsequent darts and seams will build upon this to complete the fit.
Conclusion
In this lesson, you have taken a critical step from 2D outlining to 3D shaping. By calculating the required waist reduction and drafting the back waist dart, you've embedded the first crucial piece of fit information into your pattern.
Key Takeaways:
- Darts are the primary tool for turning a flat pattern into a form-fitting garment by removing excess fabric in a controlled way.
- The total amount of shaping needed at the waist (the dart intake) is calculated from the difference between your bust and waist measurements.
- This total intake is systematically distributed across the pattern, typically between the back dart, front dart, and side seams.
- The placement and length of a dart are just as important as its width for achieving a smooth, flattering fit.
You have now completed the majority of the back bodice block. In our next lesson, we will begin drafting the front bodice, starting with the front neckline and shoulder slope. This will mirror the process you've already mastered for the back, setting the foundation for the unique shaping required for the front of the body.
Can't find a good explanation? Sign up and we'll make it for you
Sign up