
Hello! Welcome back to our module on Sales Funnels & Conversion Analytics.
In the previous lesson, you crafted the persuasive copy for a 3-part welcome email sequence using an AI assistant. You now have the messages designed to build trust and guide a new subscriber toward your solution.
Today, we move from content to construction. This lesson will show you how to implement the sales funnel by connecting a landing page form to an automated sequence in ConvertKit or Mailchimp. We'll build the technical plumbing that takes your AI-generated copy and turns it into a 24/7 lead-nurturing machine. For a founder aiming to launch multiple SaaS ventures, mastering this automation is a fundamental skill for achieving scale with efficiency.
We will walk through the process in both ConvertKit and Mailchimp. While the specific clicks differ, the underlying logic is the same, and understanding both will make you adaptable to any email marketing platform.
The Core Logic of Email Automation
At its heart, the system we are building has three simple parts that work like a flywheel:
- The Trigger: A user performs an action. Most commonly, they submit their email address on a landing page or form to get a lead magnet.
- The Identifier: The system applies a label to that new subscriber. This could be a tag (e.g.,
downloaded-guide-A) or adds them to a specific segment. This step is crucial for sending the right message to the right person. - The Sequence: The presence of that specific tag or segment triggers a pre-written series of emails to be sent automatically at scheduled intervals (e.g., immediately, 1 day later, 3 days later).
Your job as a founder is to connect these three parts. Let's see how it's done in two of the most popular tools.
Implementation Guide: ConvertKit
ConvertKit is highly favored by creators and SaaS founders for its user-friendly and powerful visual automations. The process is very direct.
Step 1: Create the Email Sequence
First, let's get the emails you wrote in the last lesson into ConvertKit. A "Sequence" is simply a series of emails sent automatically.
Getting Started with Kit, Part 6: Sequences and Automations
This article from the Click & Repeat blog provides a clear, step-by-step guide to creating sequences in ConvertKit. We'll follow this process to build our automated welcome series.
Read the first half of the article, from the start down to the section titled 'All about Automations'. Follow the steps to create a new sequence, add your three emails, set the timing between each one (e.g., Email 1 sends 'Immediately', Email 2 sends '1 day after previous email'), and publish them.
As you follow the guide, use the email copy you generated in the previous lesson for the body of each email. Remember to set the delay between emails to match the cadence you designed in your sequence blueprint.
Step 2: Create or Identify the Triggering Landing Page
Next, we need the entry point—the landing page where users will sign up. You may have already created one in a previous module. If not, ConvertKit makes it easy to create a simple one.
The key is to ensure the form on this page will feed subscribers into our automation.
How to create a landing page in 5 minutes with Kit
This short video from ConvertKit shows how to quickly build a landing page. We'll focus on the settings that connect the form to your subscribers.
Watch these two short clips to understand the setup: Creating the Page (00:32 - 01:00): See how to start a new landing page from a template. Configuring the Form (06:28 - 08:21): This is the most important part. Pay attention to how you can add custom fields or tags directly to the form. For our purpose, we don't need to add complex tags here, as the automation will handle it, but it's good to know this feature exists.
Step 3: Connect the Landing Page and Sequence with an Automation
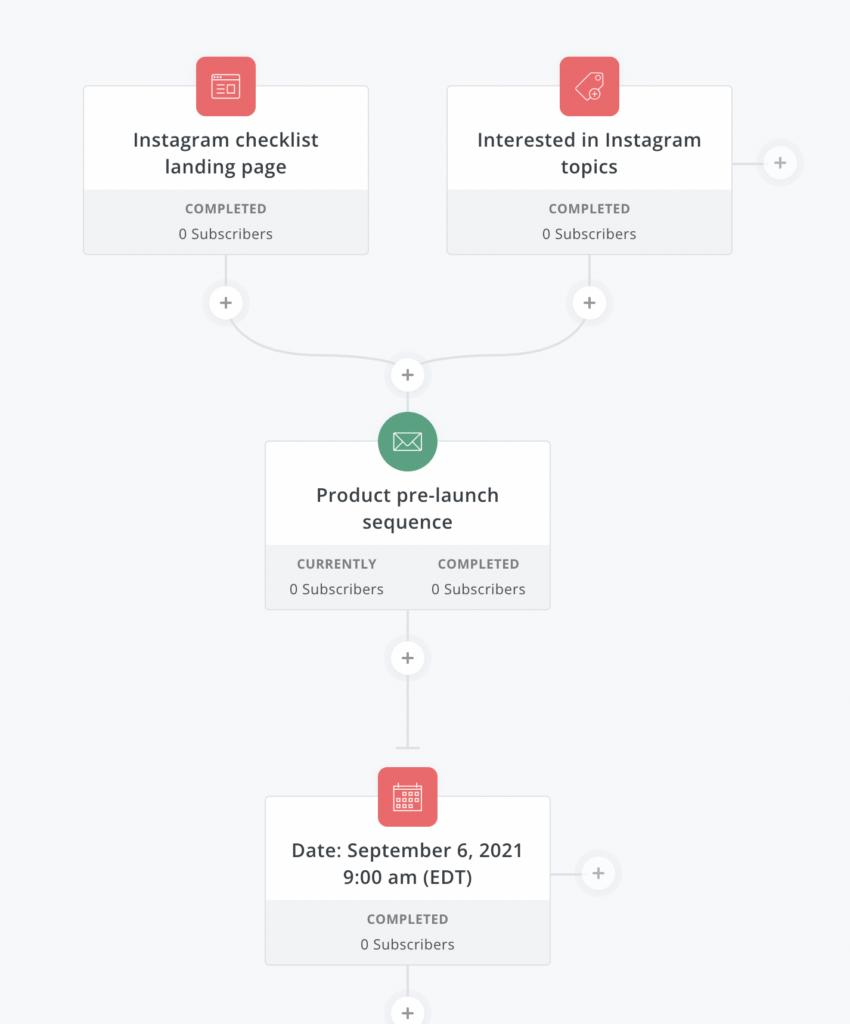
This is where we wire everything together. ConvertKit's Visual Automations make this incredibly intuitive. You will create a simple rule: "When someone joins this form, add them to that sequence."
Getting Started with Kit, Part 6: Sequences and Automations
Let's return to the Click & Repeat article, which perfectly explains how to build the visual automation that connects your landing page to your sequence.
Read the second half of the article, starting from the section 'All about Automations'. Follow the guide to create a new visual automation from scratch. Set the Trigger: Choose 'Joins a form' and select the landing page you just created. Set the Action: Click the '+' icon, choose 'Email sequence', and select the sequence you built in Step 1. Finally, turn the automation on!
Your final automation should look clean and simple, clearly showing the path a new subscriber will take.
Step 4: Test the Funnel
Never assume your automation works. Test it.
- Open the published landing page in a private/incognito browser window.
- Sign up with a test email address you have access to.
- Check your inbox. Did you receive the first email?
- Wait for the specified delay. Did the second email arrive on time? And the third?
This end-to-end testing is non-negotiable and will save you from losing valuable leads to technical glitches.
Implementation Guide: Mailchimp
Mailchimp is a powerhouse in email marketing. On its free plan, there's a key constraint: you can only have one "Audience" (list). Therefore, to send different email sequences to different groups of people, you must master the use of Tags.
The Mailchimp Logic: Tags as a Bridge
Instead of directly linking a form to a sequence, the process in Mailchimp is:
- Landing Page sign-up adds a specific tag to the subscriber.
- An automation is set to start when that tag is added.
How to Use MailChimp Landing Pages to Create A New List In Free MailChimp
This article from KCO Creative clearly explains the strategy of using tags to manage different subscriber lists within Mailchimp's single-audience free plan. Understanding this concept is key to using Mailchimp effectively for multiple projects.
Read these sections to grasp the core strategy. Focus on understanding: The problem of the single audience limit. What tags are and how they solve this problem. How to create a landing page and ensure it assigns a specific tag to new subscribers.
Now let's build it.
Easily Add Automation to a Mailchimp Landing Page
This video from Larry Snow provides a complete, hands-on walkthrough of creating a Mailchimp landing page and connecting it to an automation using tags.
Watch this video from start to finish. It's a comprehensive guide, but pay special attention to these key steps: Adding a Tag to the Landing Page (01:29 - 02:47): This is the crucial trigger setup. You'll create a unique tag for people who sign up for this specific lead magnet (e.g., welcome-sequence-SaaS-A). Creating the Automation (06:26 - 11:28): The video shows how to use 'Classic Automations'. The trigger for your automation will be 'Email subscribers when they're tagged'. You'll select the tag you just created. Testing the Flow (11:28 - 12:08): Just like with ConvertKit, the final step is to test the entire process.
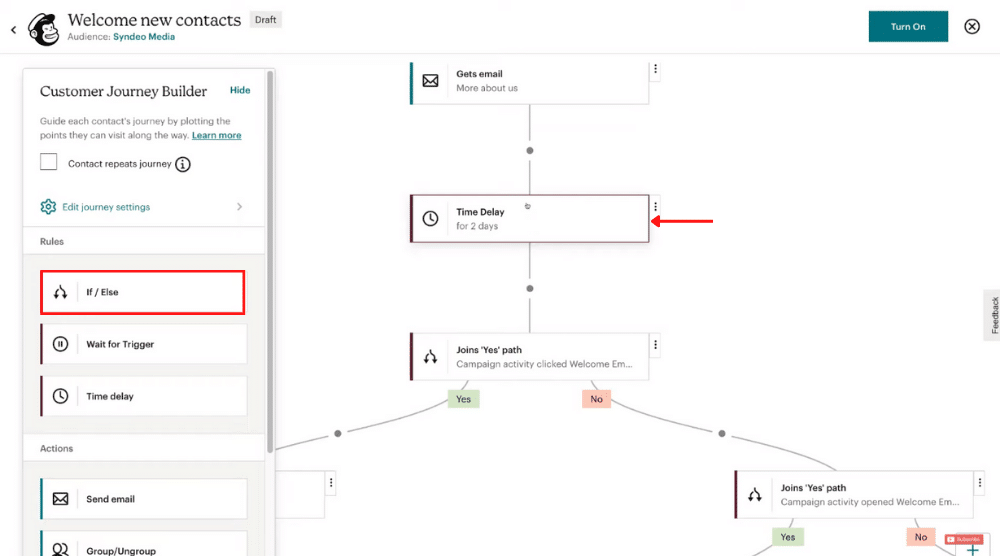
Note on Mailchimp's Interface: The video above uses "Classic Automations." Mailchimp is transitioning to a more visual builder called "Customer Journeys." The logic is identical, but the interface looks more like ConvertKit's. If you see the Customer Journey builder, your steps will be:
- Starting Point: Choose "Tag added" and select the tag from your landing page.
- Action: Drag an action like "Send Email" onto the canvas.
- Content: Design your first email using the copy you wrote.
- Delay: Add a "Time delay" rule (e.g., wait 1 day).
- Next Action: Add another "Send Email" action for your second email, and so on.
Test your understanding!
You are building two different SaaS products and want to collect email sign-ups for both. You are using Mailchimp's free plan, which only allows one Audience. How would you set this up to ensure subscribers for each product receive the correct, distinct welcome email sequence?
Show answer
The correct approach is to use tags for segmentation:
- Create two separate landing pages, one for each SaaS product.
- In the settings for the first landing page, assign a unique tag, such as
product-a-interest. - In the settings for the second landing page, assign another unique tag, such as
product-b-interest. - Create two separate automations (Customer Journeys).
- The first automation will have a starting point (trigger) of "Tag added:
product-a-interest" and will send the welcome sequence for Product A. - The second automation will be triggered by "Tag added:
product-b-interest" and will send the welcome sequence for Product B.
This allows you to manage multiple 'lists' and funnels within a single Mailchimp Audience.
Conclusion
Congratulations! You have now bridged the critical gap between marketing content and marketing automation. You've transformed your landing page and email copy from static assets into a dynamic system that nurtures leads for you around the clock.
Key Takeaways:
- The core automation flow is Trigger -> Identifier -> Sequence.
- ConvertKit uses a direct visual model: A form/landing page directly triggers an email sequence in a Visual Automation.
- Mailchimp (especially on free plans) uses an indirect model: A landing page adds a Tag, and the automation is triggered when that Tag is added.
- Always test your funnel end-to-end by signing up yourself to ensure every step works as expected.
Preview of the Next Lesson:
Your automated funnel is now live and capturing leads. But how do you know if it's actually working effectively? How many sign-ups are you getting? Where are they coming from? In our next lesson, we will learn how to set up goal and event tracking in Google Analytics 4 for key conversions. This will give you the data you need to measure your success, find bottlenecks, and make informed decisions to optimize your entire marketing funnel.