
Hello. In the previous lesson, you learned that 95 mL of water should be measured with a 100 mL graduated cylinder. The same tool-selection principle now applies to a much smaller amount, but the best cylinder changes.
For the slime lab, the quiz-ready answer is:
Use a 10 mL graduated cylinder to measure 5 mL of borax solution.
This lesson explains why the 10 mL cylinder is the correct choice and how to fill it accurately to the 5 mL mark.
Match the cylinder to the amount
A graduated cylinder measures liquid volume in milliliters, abbreviated . Cylinders come in several capacities. The photo below shows a 10 mL, 25 mL, 50 mL, and 100 mL cylinder.

The first rule is that the target volume must fit within the cylinder’s measuring range. Since is less than , a 10 mL graduated cylinder can hold and measure the entire portion in one measurement.
The second rule is just as important:
Use the smallest graduated cylinder that can hold the whole amount.
A 100 mL cylinder could physically contain 5 mL, but it is designed for larger volumes. Near the bottom of a large cylinder, the markings are usually harder to read precisely, and a small difference in liquid level is less noticeable. A 10 mL cylinder gives you a clearer scale for a small 5 mL measurement.
Read Carolina Biological Supply's “Graduated Cylinder Tutorial” to connect cylinder capacity, scale markings, and measurement accuracy.
In Section 3, “Select the appropriate-size graduated cylinder,” read the explanation that begins with the selection rule. Then continue into Section 4, “Determine the value of the graduations on the cylinder.” Focus on the idea that the spaces between markings represent known amounts of volume. For this lab, confirm that 5 mL lies comfortably within the 10 mL cylinder's range.
Read the scale on the actual 10 mL cylinder
Do not assume that every 10 mL graduated cylinder has identical markings. Before filling it, inspect the printed scale.
Find two nearby numbered markings, subtract their values, and count the spaces between them. For example, if the cylinder labels 6 mL and 8 mL with ten equal spaces in between:
That means each small line represents . Some classroom cylinders may use different intervals, so the scale itself—not a guess—tells you what each line means.
For a requested amount of exactly 5 mL, locate the 5 mL line before you begin pouring. On some cylinders, 5 mL will be numbered. On others, you may need to count upward from a nearby labeled mark using the smaller divisions.
Measuring Volume Using a Graduated Cylinder
Watch “Measuring Volume Using a Graduated Cylinder” from Wisc-Online (Part of WisTech Open). It gives a quick visual demonstration of the meniscus and then uses a 10 mL cylinder as a scale-reading example.
First watch reading the meniscus to see why the liquid surface is read at eye level. Then watch the 10 mL scale. Notice how the video calculates the value of one small division instead of treating every tick mark as 1 mL.
Measure 5 mL at the bottom of the meniscus
When a water-based liquid rests in a glass or plastic graduated cylinder, its surface curves. This curve is the meniscus. For ordinary aqueous solutions such as the borax solution used in a classroom slime lab, use the lowest point of that curve as the volume reading.
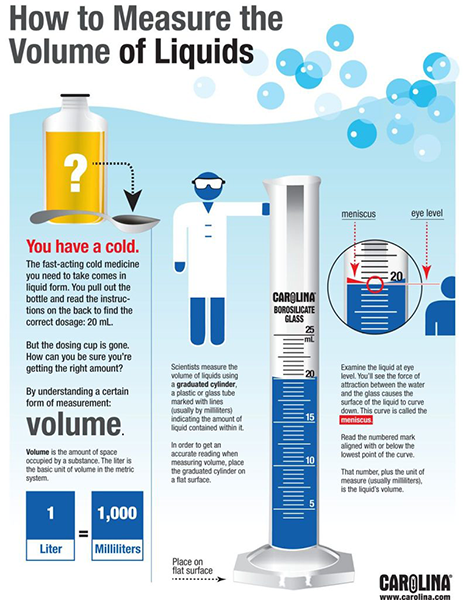
Your viewing position matters. If you look down from above, the liquid level can appear to be at a different mark than it really is. This is called parallax error. Prevent it by placing the cylinder on the bench and lowering yourself until your eyes are level with the bottom of the meniscus.
For this measurement, the correct final view is simple: the bottom of the meniscus aligns with 5 mL.
A reliable bench routine is:
- Get a clean 10 mL graduated cylinder.
- Set it upright on a flat, level surface.
- Locate the 5 mL mark on its scale.
- Add borax solution slowly as you approach that mark.
- Bring your eyes level with the liquid surface.
- Stop when the bottom of the meniscus is at 5 mL.
- Transfer the measured solution only when the class procedure directs you to do so.
Avoid trying to estimate 5 mL in a beaker, cup, or other container meant mainly for holding or mixing. Those containers can be useful during the experiment, but they are not the precise measuring tool requested in this pre-lab question.
Keep the two liquid measurements distinct
The slime lab uses two quantities that sound similar but require different graduated cylinders:
| Ingredient | Required volume | Correct measuring tool |
|---|---|---|
| Water | 100 mL graduated cylinder | |
| Borax solution | 10 mL graduated cylinder |
The important distinction is not the liquid itself; it is the volume being measured. The water amount needs a cylinder large enough to reach 95 mL. The borax-solution amount is small enough that the 10 mL cylinder provides a more readable, more appropriate scale.
Do not substitute tools merely because they are nearby. Start by identifying the requested volume, then select the smallest graduated cylinder that holds it.
You now have the second pre-lab measurement answer: measure 5 mL of borax solution with a 10 mL graduated cylinder, reading the bottom of the meniscus at eye level.
Next, the focus shifts from liquid volume in milliliters to solid mass in grams: measuring guar gum correctly on a balance using a tared weigh boat or weighing paper.
Can't find a good explanation? Sign up and we'll make it for you
Sign up