
Hello again! Last time, you gave the scene a sensible structure: clear names such as Floor and Wall_Left, plus a Room parent for the pieces that belong together. That organization now pays off. Before changing anything, you can select the exact entity you mean to edit.
In this lesson, you will learn how to travel around the PlayCanvas 3D viewport and how to change an entity’s position, rotation, and scale. These are the three controls you will use constantly when turning simple boxes into a room, a doorway, or eventually an eerie abandoned-theatre space.
The three questions behind every object placement
When you place an object in a 3D game scene, you are really answering three questions:
- Where is it? This is its position.
- Which way does it face? This is its rotation.
- How large is it? This is its scale.
Together, these are called an entity’s transform.
PlayCanvas uses three directions, called axes:
| Axis | Usual viewport color | Think of it as |
|---|---|---|
| X | Red | Left and right |
| Y | Green | Up and down |
| Z | Blue | Forward and backward, or depth |
For a theatre-like room, imagine looking at a stage floor plan from above. Moving something on the X and Z axes changes where it sits on the floor. Changing Y raises it toward the ceiling or lowers it toward the floor.
When you select an entity, PlayCanvas shows its transform in two places:
- In the viewport, as a colored control shape called a gizmo.
- In the Inspector, as editable Position, Rotation, and Scale number fields.
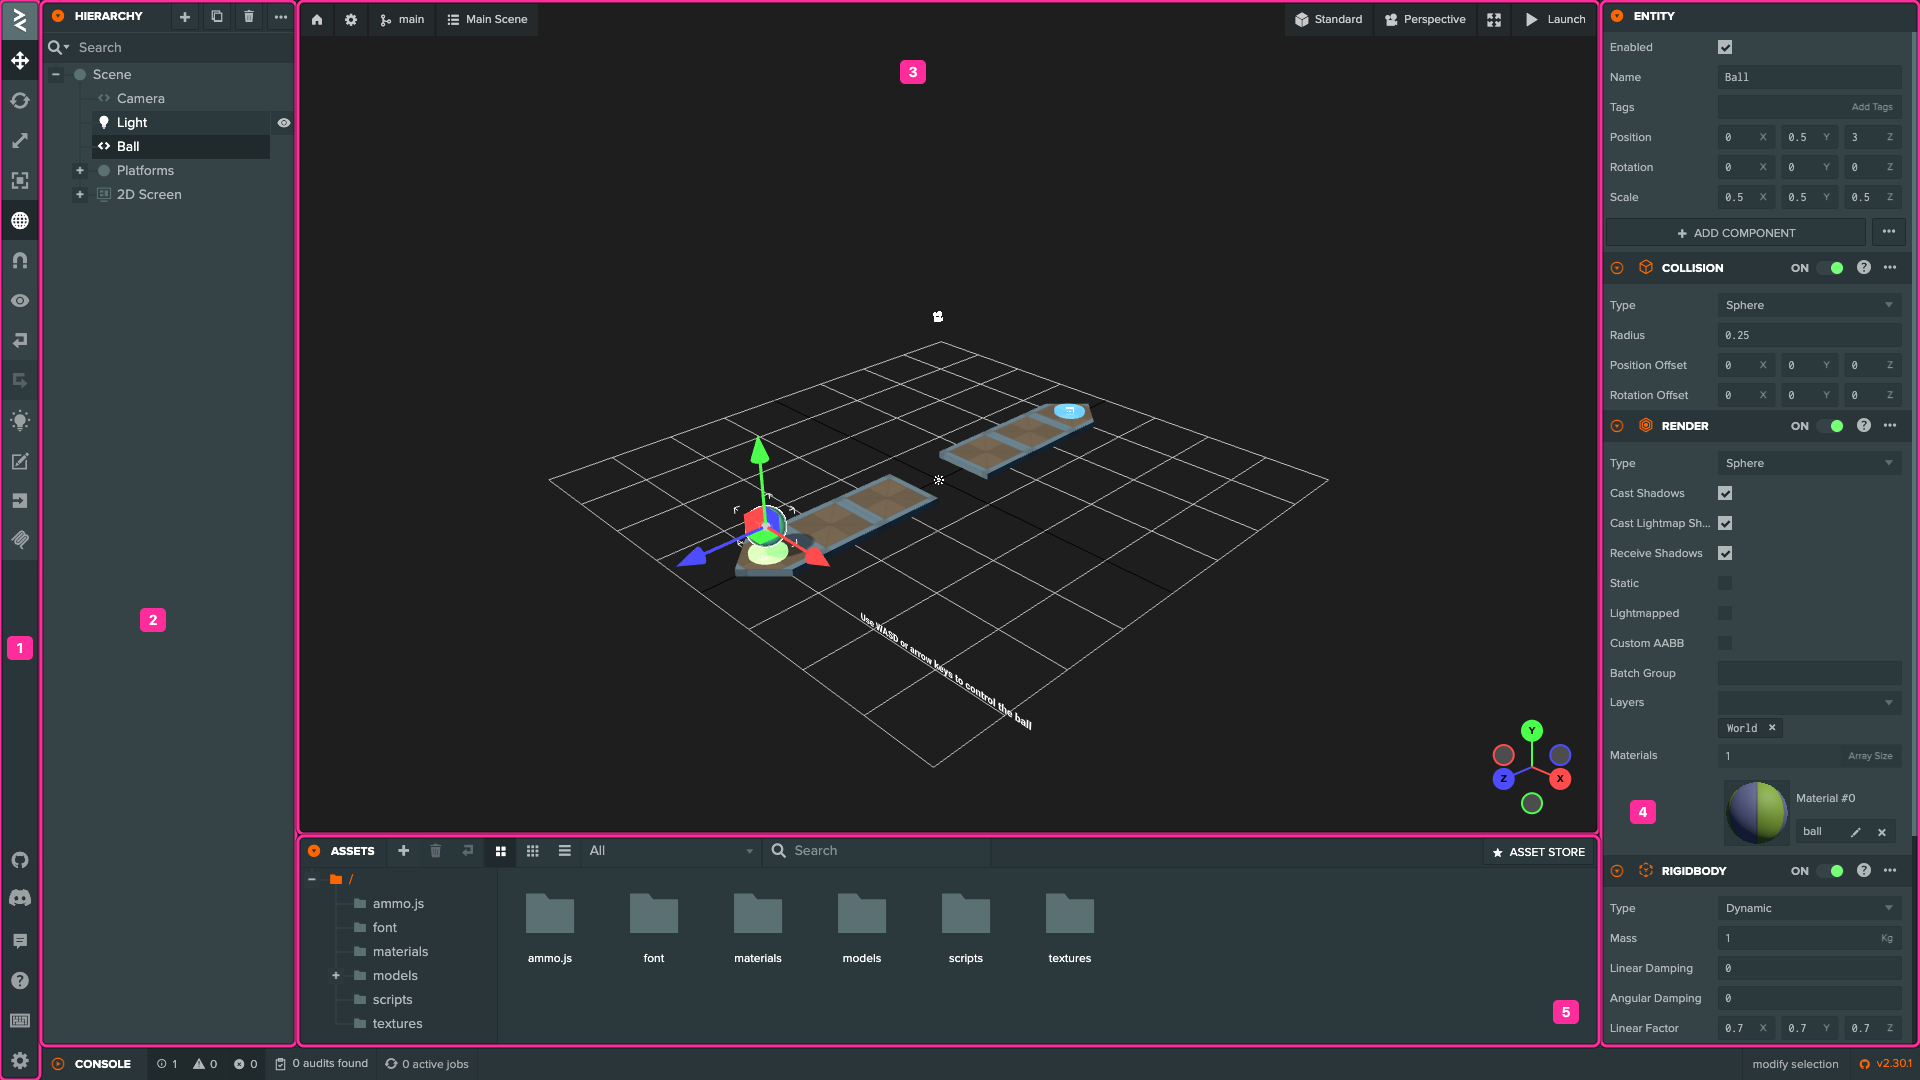
The gizmo changes shape depending on what you are editing:
| Tool | Gizmo appearance | What it changes |
|---|---|---|
| Translate | Colored arrows | Position |
| Rotate | Colored rings | Rotation |
| Scale | Colored handles with small cubes | Size |
Read the official PlayCanvas guide now for the names and purposes of these viewport tools.
Viewport | PlayCanvas Developer Site
Read “Viewport” from the official PlayCanvas Developer Site. It introduces the editor camera, useful view modes, and the three gizmos you will use to shape the test room.
In the Cameras section, read the camera overview. Notice the difference between the usual Perspective view and views such as Top and Front. Then read the Gizmos section, from the gizmo explanation. Focus on matching each gizmo shape to Translate, Rotate, or Scale.
Move around without moving the game
There are two different “cameras” to keep separate:
- The Editor camera is your view while building. Moving it only changes what you can see in the editor.
- A Camera entity is part of the actual game. It decides what the player will see when the game runs.
For now, you are mainly moving the Editor camera. You can explore the room from any angle without accidentally relocating the walls.
Try these navigation controls with the pointer over the viewport:
| What you want to do | Control |
|---|---|
| Orbit around the scene | Drag with the left mouse button |
| Pan sideways or vertically | Drag with the middle mouse button, or hold Shift while dragging with the left mouse button |
| Look around from the current spot | Drag with the right mouse button |
| Zoom closer or farther away | Scroll the mouse wheel or use your trackpad’s scroll gesture |
| Move through the scene | Use W, A, S, and D |
| Move faster | Hold Shift while using W, A, S, or D |
At first, orbiting can feel as if the entire world is spinning. It is not. You are simply walking around an imaginary model on a worktable and looking at it from another side.
If you lose sight of an object:
- Find its name in the Hierarchy.
- Select it.
- Look for its outline or gizmo in the viewport.
- Zoom or orbit until you can see it clearly.
A Perspective view makes near objects appear larger than distant ones, like a photograph or a person’s eyesight. It is the best view for getting a feeling for your future room.
An orthographic view removes that visual depth effect. Use the camera menu at the top of the viewport to choose Top, Front, Right, and other orthographic views when checking careful placement. The Top view is especially useful for checking whether walls form the outline you planned, rather than accidentally overlapping or leaving a gap.
This short video demonstrates the controls in action.
PlayCanvas Tutorial 1 - Getting started with PlayCanvas
Watch “PlayCanvas Tutorial 1 – Getting started with PlayCanvas” by Daniel Wood. The selected moments show editor navigation followed by direct examples of moving, rotating, and resizing an entity.
Watch viewport navigation first. Copy just two motions: zooming with the scroll wheel and orbiting with left-click drag. Then watch translation to see how the red, green, and blue arrows change Position values. Finish with rotation and scale, paying attention to the rings for rotation and the central scale handle for resizing evenly.
Position: placing an entity in the room
Translate means “move from one place to another.” It does not change the object’s shape or direction.
Select an entity, then use either the Translate tool icon or press 1. You should see the arrow gizmo:
- Drag the red arrow to move along X.
- Drag the green arrow to move along Y.
- Drag the blue arrow to move along Z.
For example, if a box is meant to be a floor, you would usually keep its Y position near the ground level. If it is meant to be a ceiling, you would increase its Y position.
You have two useful ways to place something:
Dragging in the viewport
Dragging is quick and visual. It is excellent when you are experimenting:
- “Would this doorway feel more unsettling if it were farther away?”
- “Does this wall make the room feel too narrow?”
- “Should the low passage be nearer the entrance?”
Watch the Inspector’s Position numbers while you drag. You will see the matching X, Y, or Z value change.
Typing in the Inspector
Typing values is better when a placement needs to be exact. Click a number in Position, type a new value, and confirm it.
For example, a position such as:
X: 2
Y: 0.5
Z: -1
means the entity is two units along X, half a unit above the ground, and one unit along Z in the opposite direction.
A strong working habit is to use both methods: drag until an object is roughly in the right place, then type numbers to make it neat.
Rotation: turning without relocating
Select the entity and press 2 to activate the Rotate tool. The arrow gizmo becomes three colored rings.
Drag a ring to turn the entity around that axis:
- Rotate around Y to turn an object left or right on the floor.
- Rotate around X to tip it forward or backward.
- Rotate around Z to lean it sideways.
Rotation values in the Inspector are measured in degrees. A Y rotation of 90 makes an object turn one quarter of a full circle.
Rotation matters even for very simple shapes. A long thin box can become:
- A wall when upright and stretched.
- A ceiling beam when turned sideways.
- A doorway lintel when placed above two vertical frame pieces.
One small trap: a perfectly even cube often looks almost the same after a rotation. If you want to see rotation clearly, first scale a cube so it is longer in one direction.
For this prototype, you will usually rotate walls around the Y axis. More complicated rotations can wait until you are building specific props later.
Scale: turning a box into a useful room piece
Select the entity and press 3 to activate Scale. You will see colored handles with small cubes on their ends.
Scale changes the entity’s size:
- Drag one colored handle to stretch or shrink along one axis.
- Drag the center handle to resize evenly in all directions.
An entity with Scale values of:
X: 1
Y: 1
Z: 1
has its original size. If you change only Z from 1 to 5, it becomes five times longer along the blue axis.
That is how a basic box can become a wall. You are not trying to make a realistic wall model yet. You are using a primitive shape to test the room’s proportions, routes, and atmosphere.
Use scale carefully:
- A thin, long box can become a wall.
- A wide, thin box can become a floor or ceiling.
- A tall, narrow box can become one side of a doorway.
- Scaling an object to zero can make it disappear or flatten completely, so avoid entering
0by accident.
Remember: scale changes the size, not the place. If your wall is the right size but in the middle of the room, use Translate next.
A short studio drill: make a stage marker
Spend about 15 minutes practising with one harmless test object before you begin building the actual room next lesson. If you already have a spare box, use that. Otherwise, add a Box entity from the Entity menu.
-
Rename the entity
Stage_Marker. Keep it at the Root level so you can easily find it. -
Select it and use the Inspector to set its Scale to approximately:
X: 1
Y: 0.5
Z: 3
It should now look like a long, low block rather than a cube.
-
Press 1. Drag the red and blue arrows a little. Notice how it moves across the ground while keeping its shape.
-
In the Inspector, set its Position to:
X: 2
Y: 0.5
Z: -1
The half-unit Y value keeps the centre of this short block above ground level.
-
Press 2. Rotate it around the green Y ring. Then type
45into its Y Rotation field. Its length should now point diagonally across the scene. -
Switch the viewport camera to Top view. Check that you can see its diagonal placement clearly.
-
Return to Perspective view. Orbit, pan, and zoom until you can see the marker from a low angle and from above.
-
Press 3 and drag only one scale handle. Observe which part of the marker stretches. Then use the Inspector to restore the values you want.
This is not a permanent room object. Its job is to teach your hands what each control does. You can delete Stage_Marker afterward, or leave it outside the Room parent as a reference object.
Be particularly careful about selection. If you select the Room parent instead of Wall_Left, moving it will also move every child inside it. The Hierarchy name and the Inspector name should always agree with the object you intended to edit.
A designer’s way to choose the right tool
When a scene looks wrong, pause before changing values and ask what kind of problem it is:
| If you are thinking... | Use... |
|---|---|
| “This wall is in the wrong place.” | Position / Translate |
| “This doorway faces the wrong way.” | Rotation |
| “This corridor is too narrow.” | Scale |
| “I cannot tell whether the parts line up.” | An orthographic viewport view |
| “I want to explore the mood and proportions.” | Perspective view, then drag transforms visually |
This turns editing from random fiddling into clear decisions. You are building the room’s space first: where a player can go, what they can see, and which areas feel open, cramped, or uncertain.
Key takeaways
You can now work in the PlayCanvas viewport rather than merely look at it:
- The Editor camera lets you inspect the scene without moving the actual game camera.
- Use orbit, pan, zoom, and W-A-S-D movement to navigate the scene.
- Use Position to place an entity, Rotation to turn it, and Scale to resize it.
- The gizmo colors match the three axes: red X, green Y, and blue Z.
- Press 1, 2, and 3 to switch quickly between Translate, Rotate, and Scale.
- Dragging is useful for experimenting; Inspector numbers are useful for precise placement.
- Select the correct named entity before transforming it, especially when your room pieces are inside the
Roomparent.
Next, you will use these tools to block out the one-room environment itself: floor, walls, ceiling, and a doorway, all made from simple primitive shapes.
Can't find a good explanation? Sign up and we'll make it for you
Sign up