
Hello! You have already practised moving, rotating, and scaling objects. Now those three tools become your building tools: instead of modelling detailed theatre scenery, you will arrange simple boxes to test the shape of one playable room.
This is called a blockout. A blockout is a quick 3D draft made from plain primitive shapes. Its purpose is to answer spatial questions early: Is the room wide enough? Can a player see the doorway? Does the ceiling feel too low? Details, colours, collision, lights, and the actual opening door will come later.
By the end of this lesson, your Room parent will contain a floor, ceiling, three solid walls, and a front wall with an empty doorway.
The room plan
We will build a compact rectangular room with these inside measurements:
- Width: 10 units, along X
- Depth: 8 units, along Z
- Height: 3 units, along Y
- Doorway: 2 units wide and 2.4 units high
The room will be centred at the world origin, which is where X, Y, and Z are all zero. The floor’s top surface will be at approximately Y = 0.
A box entity is placed by its centre, not by one of its corners. That explains a value you will use repeatedly: a wall that is 3 units tall needs its centre at Y = 1.5, so its bottom sits on the floor and its top reaches Y = 3.
Keep the Room parent itself simple:
Transform on Room | Value |
|---|---|
| Position | X 0, Y 0, Z 0 |
| Rotation | X 0, Y 0, Z 0 |
| Scale | X 1, Y 1, Z 1 |
The numbers in the build table later are local transforms for children of Room. If the Room parent is moved, rotated, or scaled, all its children move with it, which makes the plan harder to follow.
Adding visible box primitives
A primitive is a ready-made basic 3D shape. For this room, boxes are enough: a thin wide box becomes a floor; a tall thin box becomes a wall; two box sections plus a smaller box above them become a doorway opening.
The official PlayCanvas FAQ shows the two useful ways to make these shapes: create a Box directly from the Hierarchy, or add a Render component and choose a primitive type.
Common Questions | PlayCanvas Developer Site
Read the short PlayCanvas Developer Site FAQ entries to confirm how the Hierarchy creates entities and visible primitive shapes.
In the FAQ section “How do I create an Entity?”, read the entity instructions. Then find the following section, “How do I create a shape like a box or sphere?”. Read the primitive instructions, focusing on the direct Box option.
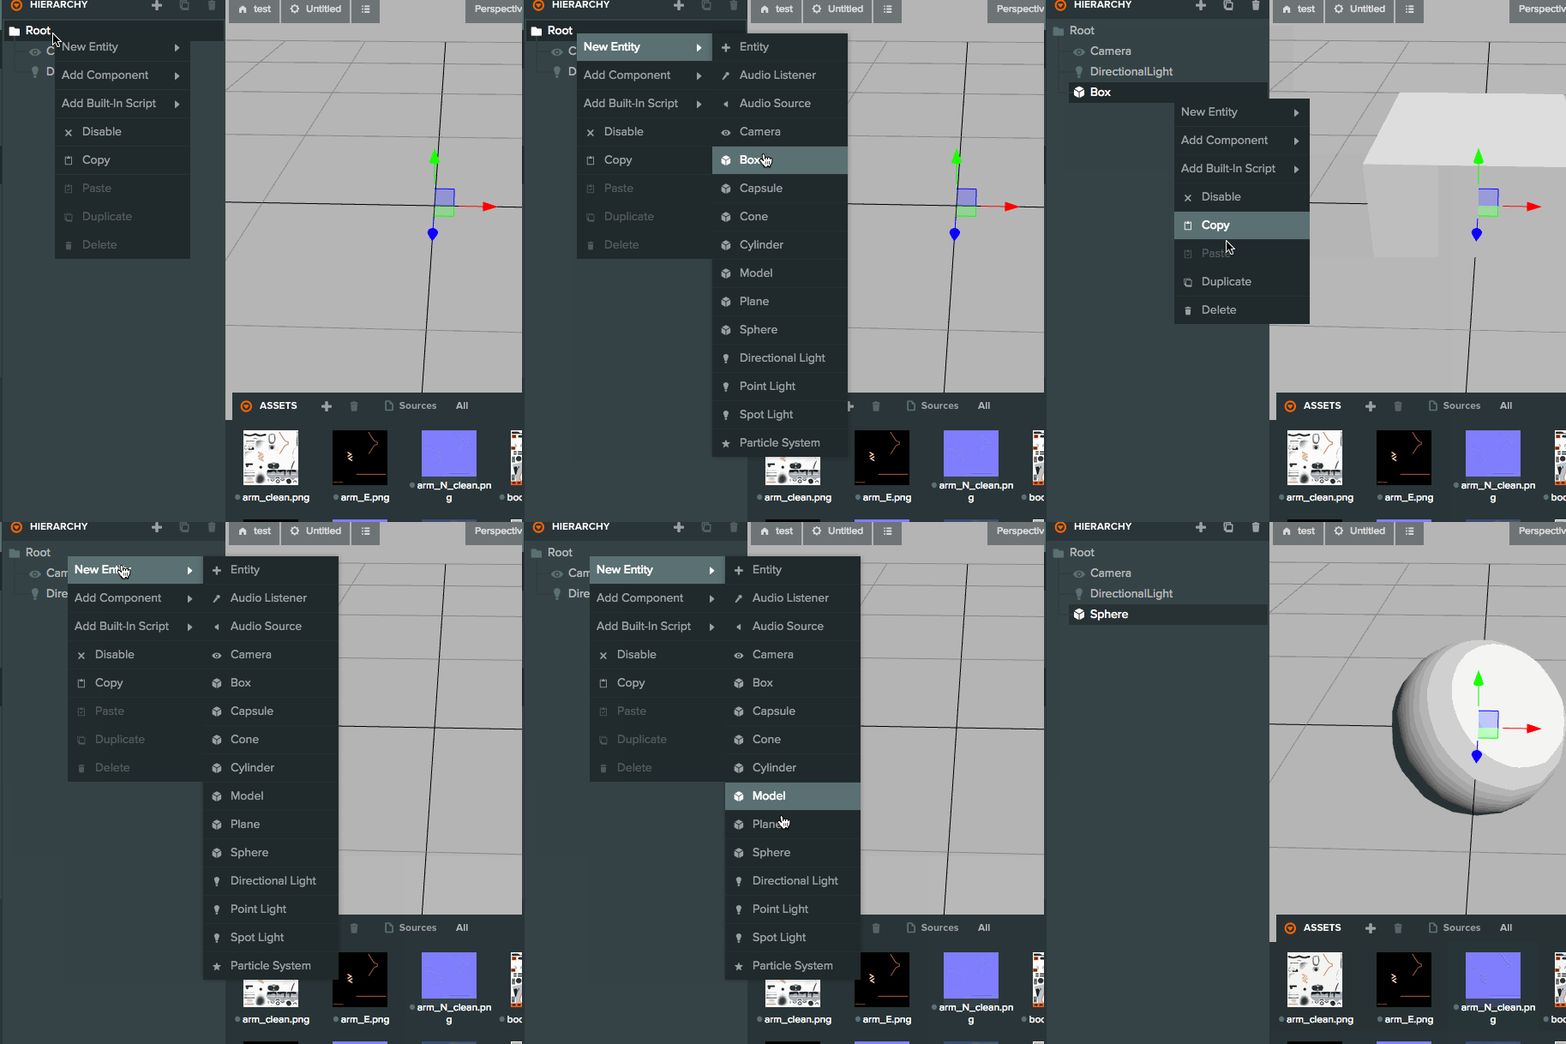
To add each room piece:
- In the Hierarchy, select
Room. This makes the new entity a child ofRoom. - Click the Add Entity plus button and choose Box.
- If you are using the right-click menu instead, right-click
Room, choose New Entity, then choose Box. Some editor versions show a Primitive submenu before you choose Box. - Rename the new box immediately in the Hierarchy.
- In the Inspector, enter its Position and Scale values from the plan below.
Do not create an empty Entity by accident. An empty entity has no visible shape until you add a Render component. Selecting Box directly is the easiest option today.
Build the floor and ceiling first
Start with the two largest pieces. This gives you a clear “container” for judging the walls.
Create a Box beneath Room, rename it Floor, and set these Transform values:
| Entity | Position | Rotation | Scale |
|---|---|---|---|
Floor | X 0, Y -0.1, Z 0 | X 0, Y 0, Z 0 | X 10, Y 0.2, Z 8 |
The floor is only 0.2 units thick. Its centre is slightly below Y = 0, so the upper surface is close to ground level. Keeping the floor thin makes it easy to see where ground level is while you work.
Next create another Box called Ceiling:
| Entity | Position | Rotation | Scale |
|---|---|---|---|
Ceiling | X 0, Y 3.1, Z 0 | X 0, Y 0, Z 0 | X 10, Y 0.2, Z 8 |
The ceiling’s bottom surface is near Y = 3, matching the walls you will create next.
Use Perspective view to orbit under and above the room. Then switch briefly to Top view. At this stage, floor and ceiling overlap perfectly from above, which is exactly what should happen.
Build the three solid walls
Now add the back wall and the two side walls. Each wall is a 0.2-unit-thick box with a height of 3 units.
Create these three Box entities under Room:
| Entity | Position | Rotation | Scale |
|---|---|---|---|
Wall_Back | X 0, Y 1.5, Z -4 | X 0, Y 0, Z 0 | X 10, Y 3, Z 0.2 |
Wall_Left | X -5, Y 1.5, Z 0 | X 0, Y 0, Z 0 | X 0.2, Y 3, Z 8 |
Wall_Right | X 5, Y 1.5, Z 0 | X 0, Y 0, Z 0 | X 0.2, Y 3, Z 8 |
Notice that Wall_Back is long along X, while the left and right walls are long along Z. You could rotate a long wall by 90 degrees, but changing the Scale values is clearer for this first blockout.
After entering the numbers, inspect the room from three useful views:
- Top view: the walls should form a rectangle around the floor.
- Perspective view outside the room: look for big accidental gaps or walls floating above the floor.
- Perspective view inside the room: check whether the ceiling feels enclosing without feeling absurdly low.
If a wall seems to vanish, do not panic. It may simply be hidden by the floor, ceiling, or another wall from your current editor-camera angle. Select its name in the Hierarchy, then orbit around the scene to find it.
Make the doorway from three boxes
A doorway is not a door yet. It is an empty passage in the front wall. Later, you will put a hinged, usable door into this opening.
Instead of making one giant front wall, make:
- A left section of wall.
- A right section of wall.
- A lintel, the short block above the opening.
Create the following three Box entities under Room:
| Entity | Position | Rotation | Scale |
|---|---|---|---|
Wall_Front_Left | X -3, Y 1.5, Z 4 | X 0, Y 0, Z 0 | X 4, Y 3, Z 0.2 |
Wall_Front_Right | X 3, Y 1.5, Z 4 | X 0, Y 0, Z 0 | X 4, Y 3, Z 0.2 |
Doorway_Lintel | X 0, Y 2.7, Z 4 | X 0, Y 0, Z 0 | X 2, Y 0.6, Z 0.2 |
Here is why these values create a doorway:
- The left wall section spans from X = -5 to X = -1.
- The right wall section spans from X = 1 to X = 5.
- The uncovered space between them spans from X = -1 to X = 1, making it 2 units wide.
- The lintel fills the space from Y = 2.4 to Y = 3, leaving a 2.4-unit-high passage below it.
Move your editor camera outside the front of the room and look through the doorway. Then go inside the room and look back toward it. The doorway should read clearly as an opening, not as an object.
For an abandoned-theatre horror idea, this plain opening is already useful. A rectangular gap can suggest an exit, backstage entrance, or uncertain route long before it has a detailed frame, texture, or animated door.
Your finished Hierarchy
When you are done, your Hierarchy should have a structure close to this:
Root
├─ Camera
├─ Light
└─ Room
   ├─ Floor
   ├─ Ceiling
   ├─ Wall_Back
   ├─ Wall_Left
   ├─ Wall_Right
   ├─ Wall_Front_Left
   ├─ Wall_Front_Right
   └─ Doorway_Lintel
Your project may include extra starter entities, such as a directional light, and that is fine. The important part is that all room pieces are clearly named and grouped below Room.
Before stopping, do this quick visual inspection:
- Look at the room in Top view: it should be a rectangle with a gap in the front wall.
- Look from the inside: floor, walls, and ceiling should surround you except at the doorway.
- Look from the outside front: the lintel should sit above the doorway rather than blocking it.
- Select
Roomonce, then select an individual wall. Notice the difference: editingRoomaffects the whole set; editing a wall changes only that piece. - Make sure all room pieces use a Scale value greater than zero on every axis.
Do not add collision components yet. The room is visually blocked out, but the game’s physics system will not know that these walls are solid until the next module.
Key takeaways
You now have a complete one-room 3D blockout made entirely from box primitives:
- The floor and ceiling define the room’s horizontal boundaries.
- Three solid walls and a split front wall define its sides.
- Two wall sections plus a lintel create a doorway without needing a special doorway model.
- Position values describe the centre of each box, so a 3-unit-tall wall belongs at Y = 1.5.
- Clear names and the
Roomparent keep the scene safe to edit.
Next, you will turn these visible room shapes into stationary game geometry by adding Render, Collision, and RigidBody components. That is the step that will eventually stop the player from walking through the floor and walls.
Can't find a good explanation? Sign up and we'll make it for you
Sign up