
Hello again! Your room blockout is now ready for an important kind of test: seeing it as a running game, not just as a construction in the editor.
In the previous lesson, you made a floor, ceiling, walls, and a doorway from box primitives. The editor let you inspect that room from any angle, like moving around a miniature stage set. Launching the project instead shows what the game’s own Camera sees. This is the view a future player will actually get.
By the end of this lesson, you will be able to launch your PlayCanvas project, place the editor and running game side by side, and make a sensible comparison between them. This finishes the visual blockout stage before the next module makes the room solid with collision and physics.
Launching is not the same as publishing
In PlayCanvas, Launch is a quick preview. It runs the current project in a new browser tab. It does not create a final shareable game build; publishing comes much later, after the prototype has been tested.
The official PlayCanvas guide calls the running browser tab the Launch Page. It has a live connection to your Editor, so changes to the scene can appear in the running version without you needing to rebuild the whole game.
Launch Page - PlayCanvas Developer Site
Read “Launch Page” from the official PlayCanvas Developer Site. It explains the difference between building in the Viewport and running the project, plus the useful Live Link connection.
Read the short opening paragraph, then the sections “Working with the Launch Page” and “Real-Time Updates.” Start at working with the page, focusing on why a side-by-side layout helps. Then read the Live Link explanation. Stop before the unrelated AI section.
The most important idea is this:
- The Viewport is your flexible building view. You can orbit, zoom, select objects, and see editing tools.
- The Launch Page is the game view. It uses the project’s Camera entity and removes the editor tools.
That difference explains why the room may look different even when nothing is wrong.
Open the Launch Page
- In the PlayCanvas Editor, find the Launch button at the top right of the 3D Viewport.
- Click Launch.
- A new browser tab should open with your running project.
- Keep the Editor tab open. Switch between the two tabs, or drag one tab into a separate window and put them side by side.
This is the kind of comparison you are aiming for:
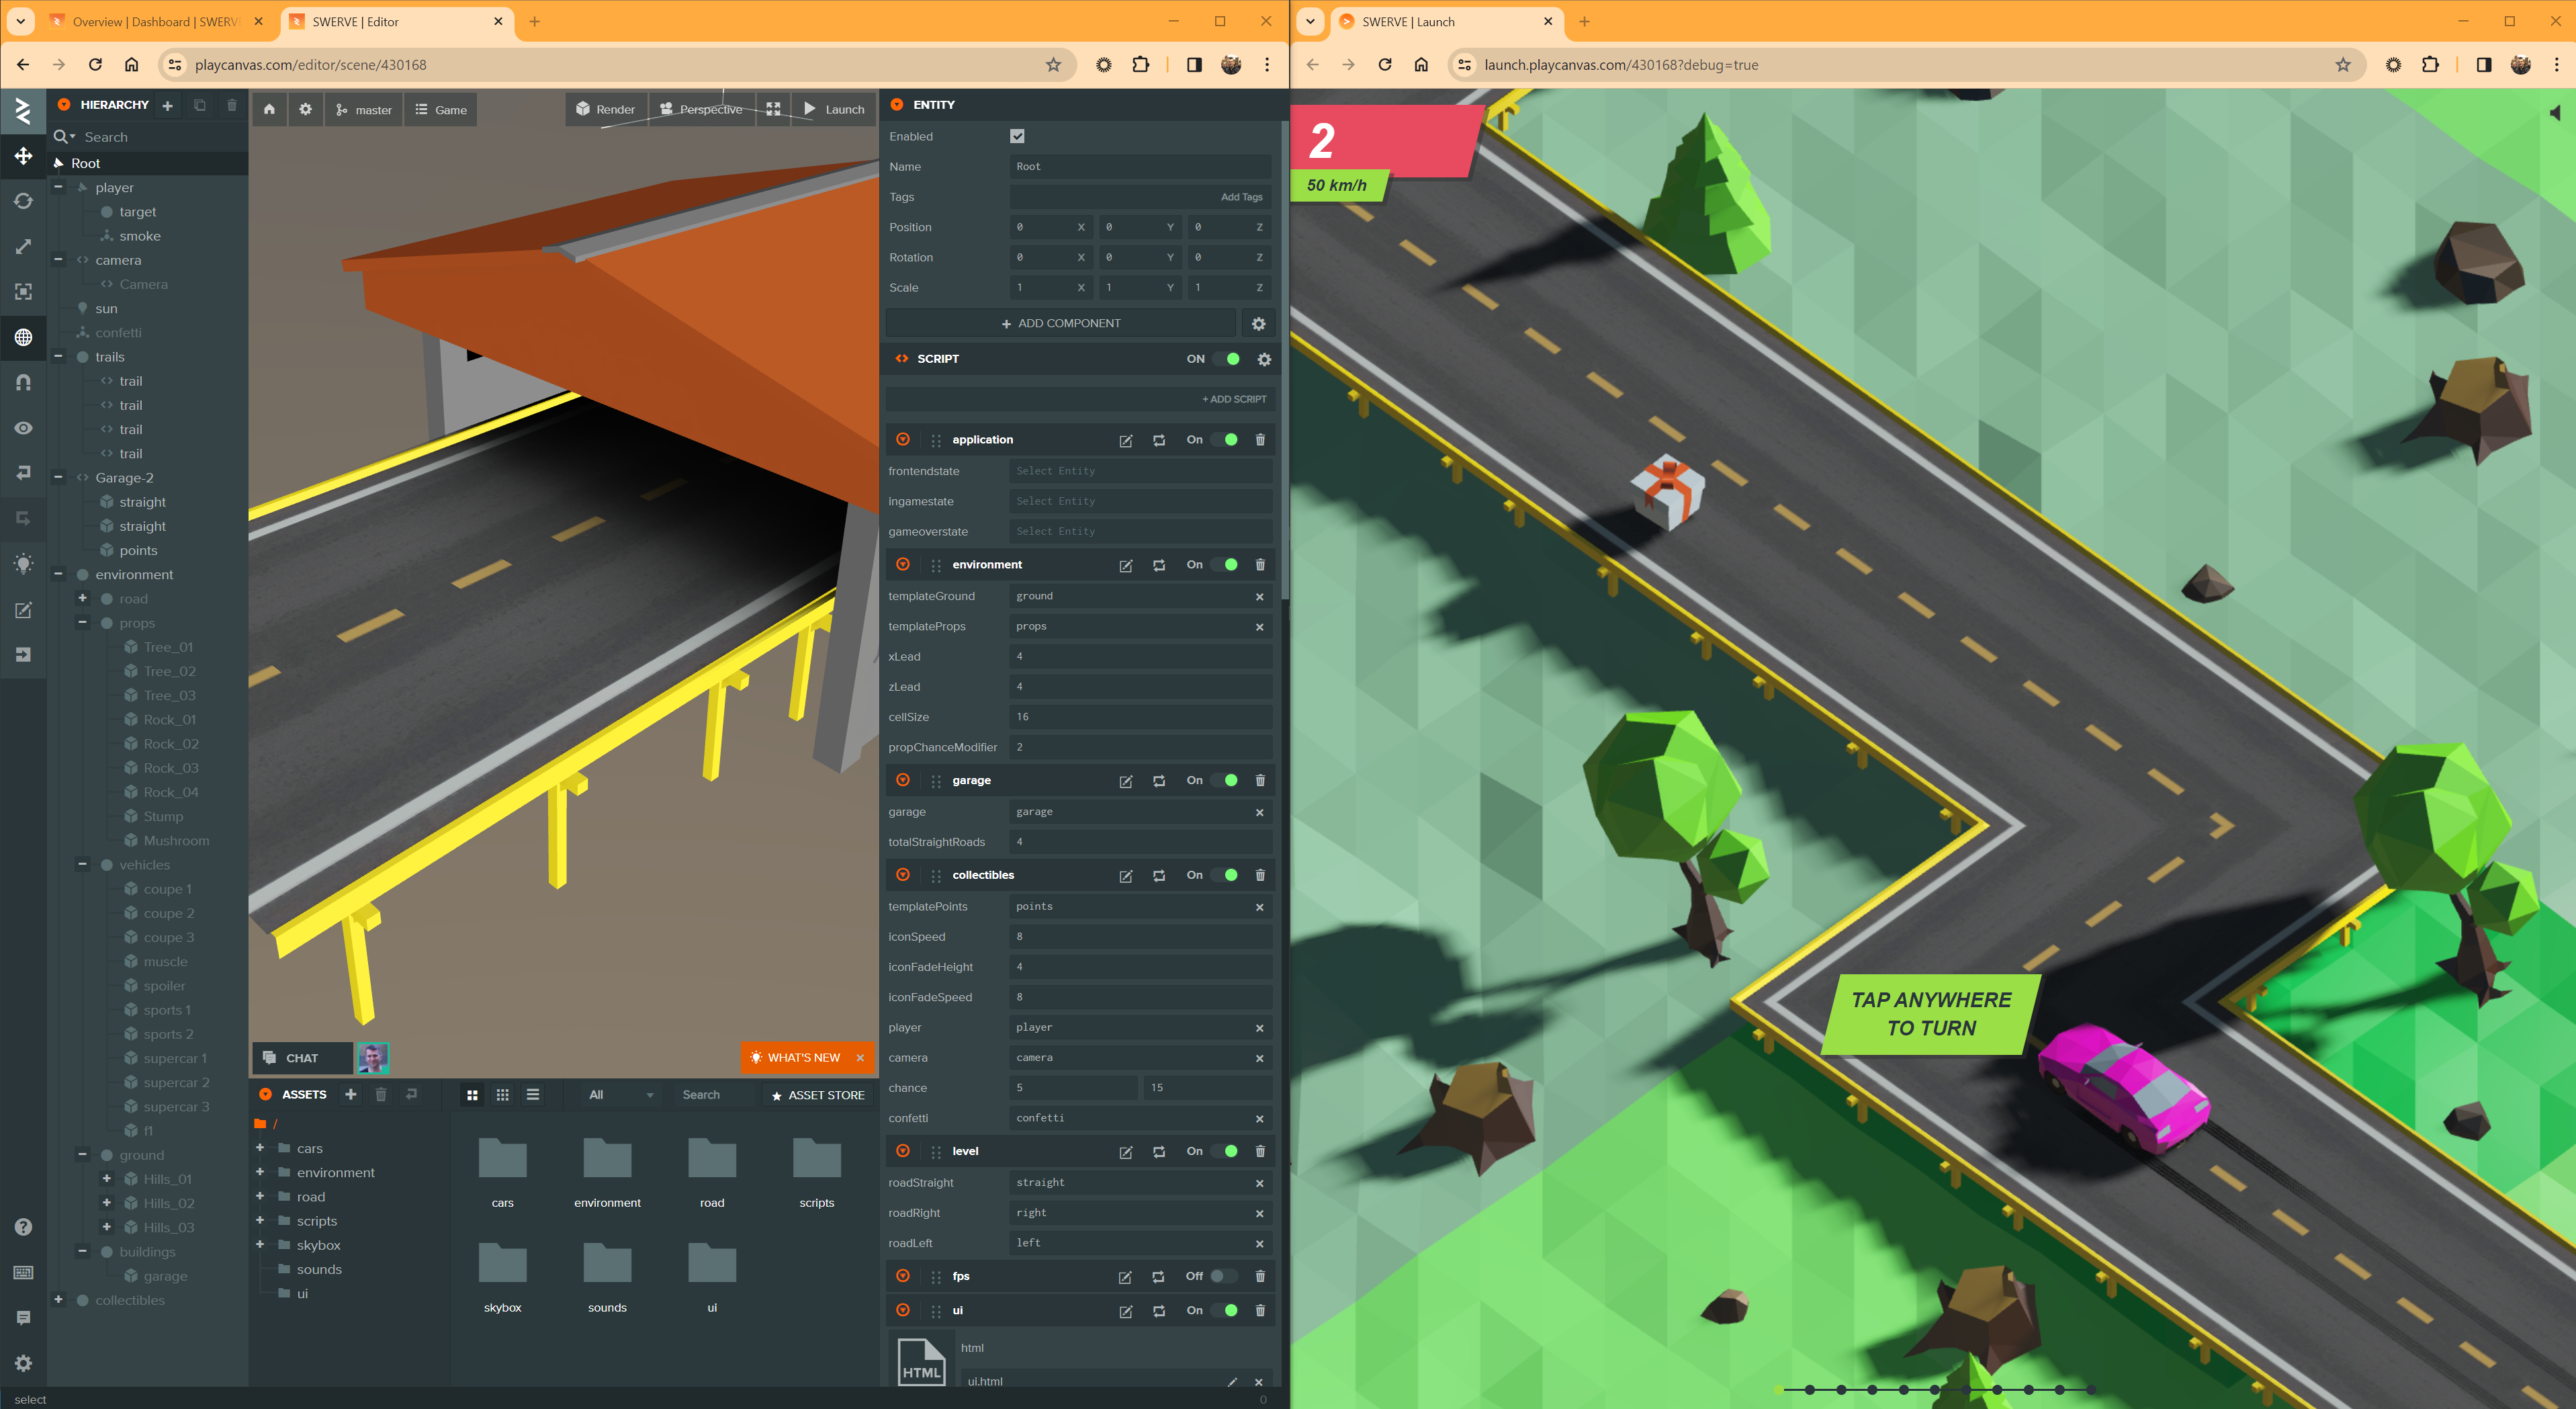
If you have only one screen, you can still switch between tabs. Before switching, make one clear observation, such as “the doorway is in the centre” or “the ceiling feels low,” so you have something specific to check in the other tab.
For a quick visual demonstration, watch this short moment from Peter Field’s tutorial:
PlayCanvas Tutorial - Part 1 - Making Things Move
Watch “PlayCanvas Tutorial - Part 1 - Making Things Move” by Peter Field. This brief clip shows that pressing Play opens a separate tab, even before the project has movement or interaction.
Watch the launch preview. Notice that the launched scene can be perfectly valid even though nothing moves yet; your current room is also a visual scene, not a playable first-person level yet.
Compare the correct things
At this point, your project has room shapes, but it does not yet have player controls, physics collision, or a working door. So judge it as a visual room test, not as a finished game.
Use the Editor to inspect the blockout, then look at the Launch Page and compare these points:
| Check | In the Editor | In the running game |
|---|---|---|
| Floor | A thin box under the room | Should look like the ground surface |
| Walls | A rectangle of box shapes | Should form clear boundaries |
| Ceiling | A flat box over the room | Should make the room feel enclosed |
| Doorway | A gap between front wall pieces | Should read as a possible exit or entrance |
| Scale | You can measure it with Transform values | You judge whether it feels roomy, narrow, low, or strange |
| Camera view | You can look from anywhere | You see only where the Camera entity points |
Some differences are expected:
- The Editor shows a grid, selection outlines, coloured transform gizmos, the Hierarchy, and the Inspector. The running game does not.
- The Editor camera can fly outside, above, or through walls. The game camera stays where its Camera entity is placed.
- Your room may look plain or evenly grey. That is normal: materials and mood-setting lighting are next-module work.
- Nothing needs to move yet. There is no first-person player entity at this stage.
- The doorway is only an empty gap. It is not a door and has no collision yet.
For the abandoned-theatre idea, ask visual design questions rather than code questions: Does the doorway catch your attention? Does the ceiling create a closed-in backstage feeling? Is the room so large that it feels empty rather than tense? A plain blockout can already answer those questions.
A careful side-by-side test
Now make a small, reversible change to prove that the running page is linked to the Editor.
- Arrange the Editor and Launch Page so you can see both.
- In the Editor Hierarchy, select
Doorway_Lintel. - In the Inspector, change its Position Y by a small amount, such as from to .
- Watch the Launch Page. The block above the doorway should move slightly upward.
- Return
Position Yto , or use Undo while the Editor is selected.
This test has a useful lesson hidden inside it: the running game is not a separate copy you must constantly re-export. While working in the Editor, the Launch Page can reflect your scene edits in real time.
Do not use this live link as a reason to make random changes, though. Treat it like a theatre rehearsal: change one thing, observe the result, then either keep the change for a reason or restore the planned version.
When the game view surprises you
If the Launch Page does not show the room the way you expect, first identify what kind of problem it is.
The room looks different from the Editor
This is often normal. You may have been looking through the Editor’s free-moving view, while the running project is looking through the scene’s Camera entity.
The key question is: Can the game camera see the room?
If the Launch Page shows only empty space or a sky colour, find the Camera entity in the Hierarchy. Its position and rotation may point away from your room. Do not rebuild the room. The boxes may be correct; the camera may simply be facing elsewhere.
For a temporary clear view inside the room, a Camera near the middle of the space, around , , , facing toward the back wall, is a reasonable starting position. You already know how to adjust position and rotation from earlier lessons. Later, this simple scene camera will be replaced by a camera attached to the first-person player.
The room is visible, but it looks very plain
That is expected. Your Box entities have visible Render components because they are primitives, but you have not designed materials or lighting yet. The next module will make the boundaries easier to read and will add the components that give the room physical solidity.
The Launch button seems not to open anything
Check your browser’s tabs first: the Launch Page may have opened in the background. If your browser blocks pop-ups, allow pop-ups for PlayCanvas and try Launch again.
The room appears, but you can pass through objects or nothing responds to keys
Also expected. At the moment, there is no player controller, no collision setup, and no door interaction script. Launching is still useful because it tests whether the scene is visible from the intended camera view.
Record one useful design observation
Before closing the Launch Page, write one short note about what you saw. Keep it concrete and based on observation, for example:
- “The doorway is easy to notice from the room centre.”
- “The ceiling looks too low from the camera view.”
- “The room feels wide enough, but the camera is not showing the doorway.”
- “The front wall hides too much of the room when viewed from outside.”
This is the beginning of a professional testing habit: observe first, then decide what should change. A note such as “the room feels wrong” is harder to act on than “the doorway is off to the side and invisible from the camera.”
Key takeaways
You can now use Launch to open a browser-based preview of your PlayCanvas project.
- The Editor Viewport is where you build and inspect the scene.
- The Launch Page is where you see what the project’s Camera shows during play.
- Differences between those views are often expected, because the Editor camera and the game Camera are not the same thing.
- PlayCanvas’s Live Link lets scene changes in the Editor update in the Launch Page.
- At this stage, test visual room shape, doorway visibility, and atmosphere—not player movement or collision.
Next, you will begin the next module by giving the room its game-physics parts: Render, Collision, and RigidBody components for stationary geometry. That is what will eventually let a player stand on the floor instead of passing through it.
Can't find a good explanation? Sign up and we'll make it for you
Sign up