
Hello. In the previous lesson, you learned to avoid treating every visible condition as proven loss damage. That same discipline applies to dimensions: a photo can support an estimate, but it does not automatically provide an exact measurement.
This lesson develops a practical method for estimating visible affected lengths and areas from photographs when a reliable reference measurement is available. The goal is not to create false precision. It is to produce a preliminary, reproducible quantity with a clear basis, a stated range where appropriate, and a targeted request for field verification when the photo cannot support more.
A photograph is a perspective view, not a plan view
A photograph flattens a three-dimensional room or exterior into two dimensions. Objects closer to the camera appear larger than identical objects farther away. This is the core reason that a tape measure visible in a photo is useful only when it is on, or very close to, the same surface plane as the material being measured.
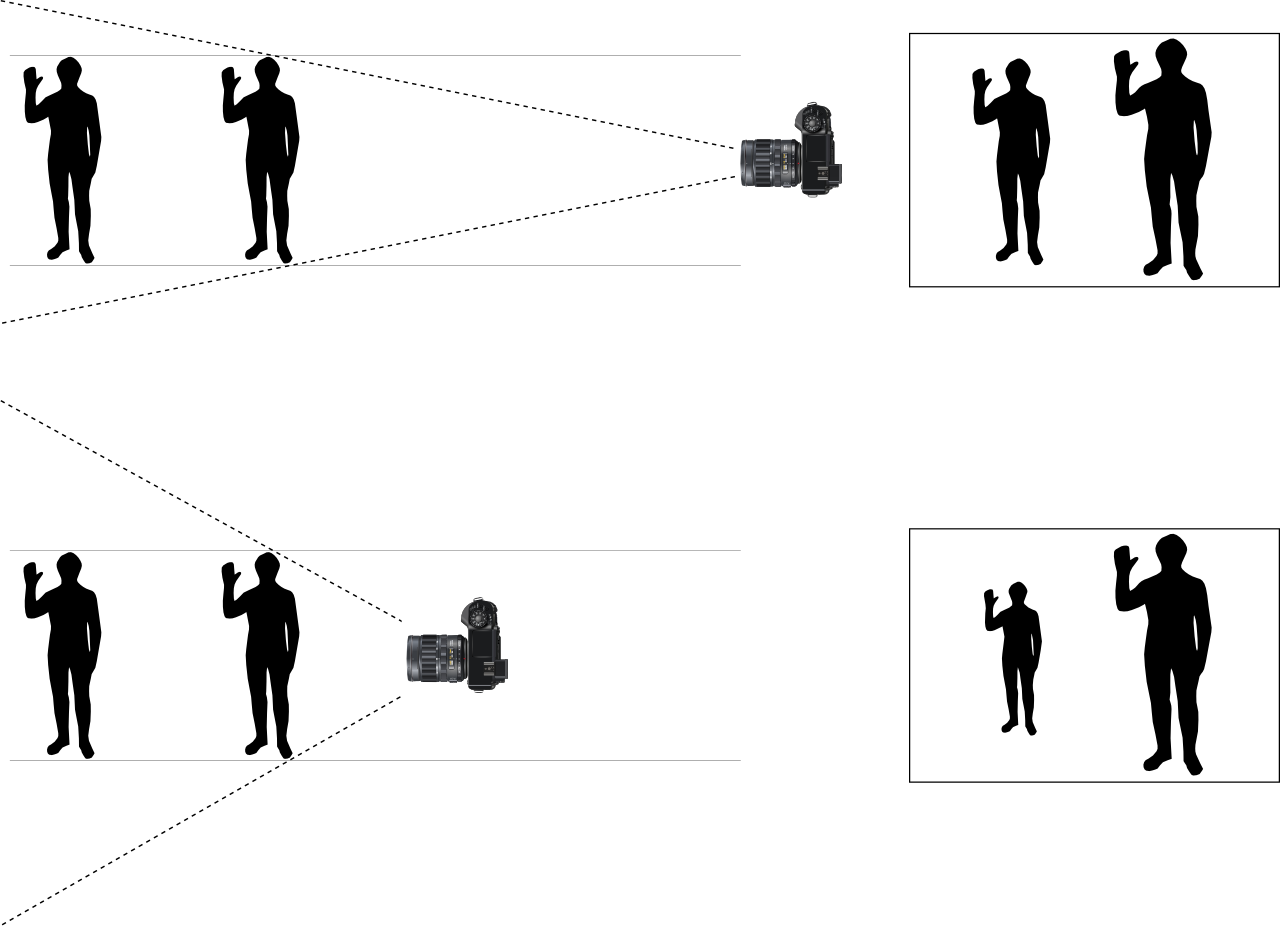
In estimating terms, consider a wet drywall area photographed down a hallway. A baseboard near the camera may occupy many more pixels than a similar baseboard at the far end of the hall. You cannot use the near baseboard as a scale reference for the far wall unless the geometry and viewpoint support it.
A dependable photo-derived dimension needs three things:
- A known reference length visible in the image, such as a taped measurement, a confirmed door opening width shown on a sketch, or a measured cabinet component.
- A shared plane between the reference and the feature being measured. A taped dimension on the same wall face is much stronger than a tape lying on the floor below it.
- A usable image with reasonably clear edges, limited camera tilt, and no major wide-angle distortion at the measured area.
The result remains an estimate, even when the photo is good. It becomes more useful when you record how you obtained it and what could change it.
Read the following sections from Bellingcat’s “Measuring Up: How to Calculate the Size of Objects in Open Source Material.” Although the examples concern digital investigation rather than restoration work, its logic maps directly to desk estimating: establish a reference, assess perspective, and corroborate rather than overstate.
Measuring Up: How to Calculate the Size of Objects in Open Source Material - bellingcat
Bellingcat explains why photographs produce dimensional estimates rather than direct measurements, then sets out the requirements for a valid reference object.
In the section “Explaining Perspective,” read the perspective introduction. Then read the section “Overcoming Perspective with an Object of Reference,” focusing on the reference criteria. In “Image Measurement Tools,” follow the two measurement steps. Finish with “Accurate Estimations and Further Verification,” especially the verification guidance. Translate “object of interest” into the damaged material and “object of reference” into the documented dimension you can defend in the claim file.
Choosing a reference you can defend
The strongest reference is a measurement intentionally captured in the loss documentation: a tape held across a wall opening, a laser measurement shown in the photo, or a technician’s annotated sketch that clearly corresponds to the photographed surface.
Other references can work, but need more caution:
| Potential reference | When it is usable | Limitation to record |
|---|---|---|
| Tape or ruler visible on the damaged surface | It lies on the same wall, floor, cabinet face, or other plane as the damage. | Confirm the tape markings and endpoints are readable. |
| Dimension from a sketch | The known element, such as an opening or wall segment, is clearly visible and on the same plane. | The photo may not show the full known element or its true endpoints. |
| Confirmed cabinet, tile, or flooring-module dimension | The exact product or component size is documented and repeated units are visible. | Do not assume a nominal product size is the installed size. |
| Door or window opening | Its actual measurement is documented, and it is on the same wall plane as the affected area. | Do not assume every interior door is inches wide. |
| Person, hand, tool, or appliance | Only if its exact dimension is independently documented. | Usually too variable and too far from the damage to be a reliable scale. |
A common mistake is using a reference that is merely near the damage. Nearness in the room is not enough. The reference must be near in the image plane.
For example:
- A -inch door opening and a water-stained drywall section on the same flat wall can be a reasonable pairing.
- A -inch door at the end of a hallway is not a reliable reference for flooring damage in the foreground.
- A tape on the floor cannot accurately scale a stain high on a wall, because the wall and floor meet at different angles and distances from the lens.
- A reference hidden by demolition, cropped from the image, or photographed at an extreme angle should not be used to create a numerical quantity.
If no suitable reference is visible, do not manufacture one from a “standard” dimension. The correct note is often: Photo confirms the affected location and visible condition; dimensions cannot be reliably estimated from available imagery. Field measurement requested.
The simple scaling calculation
Photo-measurement software performs a straightforward proportional calculation. You can apply the same logic manually in an image viewer that displays pixel coordinates or lets you draw a line.
Let:
- be the actual known reference length
- be the reference length in pixels
- be the damaged feature length in pixels
- be the estimated real-world damaged length
First calculate the scale:
Then apply it to the damaged feature:
Equivalently:
Worked example: visible wall staining
Assume the following file documentation:
- Photo 18 shows staining and softened drywall on a flat kitchen wall.
- A door opening on the same wall is confirmed by the sketch as inches wide.
- In an image-measuring tool, the opening measures pixels.
- The visible affected width measures about pixels.
- The visible affected height measures about pixels.
The scale is:
Estimated visible width:
Estimated visible height:
The visible affected area is therefore:
A weak note would state, “Drywall damage: 21.9 SF.” It looks exact, but the photograph does not justify a tenth-of-a-square-foot claim.
A stronger preliminary note would state:
Kitchen, east wall, Photo 18: Visible staining/softened drywall estimated at approximately inches wide by inches high, or about SF. Dimension derived by pixel scaling from the documented -inch door opening on the same wall plane. Photo is mildly angled and damage boundary is visually indistinct; use as preliminary visible-extent estimate pending field measurement.
Also notice what this does not establish:
- the full moisture extent behind the wall;
- the height of drywall actually requiring removal;
- the location of studs;
- whether insulation or framing is affected;
- the final demolition, replacement, texture, or paint quantity.
A photo-derived visible affected extent is evidence for scoping. It is not automatically the final repair quantity.
Turn a point estimate into a defensible range
Damage boundaries are often fuzzy. A stain fades, a swollen flooring edge is partially concealed, or the photo is slightly blurred. Instead of selecting one arbitrary pixel boundary, measure a reasonable low and high boundary.
In the example above, suppose you can mark:
- affected width between and pixels;
- affected height between and pixels.
Using the same scale of inches per pixel:
The correct record is not “ SF, exact.” It is:
Estimated visible affected wall area: approximately – SF; midpoint approximately SF. Range reflects indistinct visible boundary and mild camera angle. Verify field dimensions before finalizing repair extent.
This range does not solve uncertainty; it makes uncertainty visible and manageable. It also helps a reviewer understand whether a pending field measurement is likely to change a minor finish item or a major reconstruction quantity.
Control the errors you can control
The following practical rules will improve most photo-based estimates.
Read TechDraw AI’s “How to Get Dimensions From a Photo (the Reference Trick).” Its examples involve technical parts, but its guidance on planes, camera angle, pixel scaling, and verification is directly applicable to a photographed wall, cabinet face, roof component, or flooring field.
How to Get Dimensions From a Photo (the Reference Trick)
This short guide gives a concrete calibration routine and identifies the photo conditions that make a scaled estimate more or less reliable.
Read the opening five-step procedure, beginning with the measurement routine. In “The math: turning pixels into millimetres,” read the pixel-scale explanation, then follow the numbered calculation immediately below it. In “How accurate is it really?”, study the error sources and controls. Finish with the “Five mistakes that wreck a photo measurement” list, starting at the first mistake.
For claim-file work, apply those ideas this way:
- Use the longest reliable reference available. A full -inch opening is generally more useful than a small hardware item whose edges are hard to mark.
- Keep the target near the center of the image. Phone wide-angle lenses can bend lines near the edges of the frame.
- Prefer a square-on image. If the camera is tilted sideways or up/down, the side closer to the lens appears larger.
- Measure visible boundaries twice. Mark a conservative lower boundary and a reasonable upper boundary when the edge is unclear.
- Cross-check with a second source. Compare against a sketch dimension, an adjacent known component, a second photo, a mitigation diagram, or later field measurement.
- Do not measure through depth. A single flat image cannot reliably reveal cavity depth, hidden flooring extent, the distance to a rear wall, or the size of a concealed structural member.
Camera position creates perspective. Cropping or zooming the image after it was taken does not correct an angled viewpoint.
A field-ready workflow for preliminary dimensions
Use this routine before entering a photo-derived quantity into your working scope.
-
Name the material and plane.
For example: “north bedroom ceiling drywall,” “hallway oak flooring,” or “kitchen base-cabinet end panel.” Do not measure a vague label such as “water damage.” -
Locate a documented reference.
Record the source: photo tape, sketch dimension, field note, manufacturer information, or verified component measurement. -
Screen for geometry problems.
Check whether the reference and damage are on the same plane, whether the image is strongly angled, whether edges are visible, and whether the lens appears distorted. -
Calibrate and calculate.
Record the actual reference length, pixel reference length, pixel target length, and resulting estimated dimension. -
Measure uncertainty, not only the midpoint.
Where a boundary is unclear, document a low-to-high range rather than a single overly precise number. -
Corroborate or request verification.
Compare with other file evidence. If the quantity would materially affect demolition, drying, flooring continuity, or reconstruction cost, request a field measurement. -
Separate visible extent from repair extent.
State whether the number describes what is visible in the photo, the measured assembly, or a proposed repair area. These are not interchangeable.
A concise dimension record can use this format:
| Record element | Example |
|---|---|
| Location/material | Kitchen east wall drywall |
| Evidence | Photo 18; sketch SK-1 |
| Known reference | Door opening, inches per SK-1 |
| Photo calculation | px reference; px visible width; px visible height |
| Estimated dimension | Approx. inches by inches |
| Estimated visible area | Approx. – SF |
| Confidence/limitations | Moderate; same wall plane, but mild angle and indistinct stain boundary |
| Required follow-up | Field verify removal height, stud layout, insulation condition, and final repair extent |
This kind of note lets another estimator reproduce the calculation without guessing what you did.
A short desk practice routine
Using permitted loss photos, choose one flat, visible surface with a documented reference measurement. Work from the original-resolution image if available, rather than a compressed report screenshot.
Create one calculation record using the format above. Your objective is not to arrive at the “right” repair quantity yet. The objective is to produce an estimate that clearly distinguishes:
- what the photo visibly supports;
- what reference you used;
- what geometry limits the result;
- what needs field confirmation before the number can control the scope.
Key takeaways
Photo-based dimensions are useful preliminary evidence when they are treated as estimates rather than exact field measurements.
- Use a known reference that is visible, documented, and on the same plane as the damaged feature.
- Convert pixels to real dimensions with proportional scaling, then calculate an area only when both dimensions are supportable on that same plane.
- Perspective, camera angle, lens distortion, blur, unclear boundaries, and hidden conditions all limit the result.
- Record a range when the boundary is uncertain; do not hide uncertainty behind decimal precision.
- Clearly label whether the figure represents visible affected extent or a proposed repair quantity.
- When the quantity has material cost or scope consequences, corroborate it or request field verification.
Next, you will organize this evidence into a room-by-room damage matrix that links each material condition to its photo evidence, estimated dimensions, proposed action, and outstanding information.
Can't find a good explanation? Sign up and we'll make it for you
Sign up