
Welcome back. So far, you have practiced separating what the file shows from what it merely reports, suggests, or leaves unknown, and you have learned to record photo-derived dimensions without pretending they are field-verified measurements.
Now you will turn scattered photos, sketches, notes, and measurements into a working document a reviewer can actually follow: a room-by-room damage matrix. Its job is simple but demanding: for every potentially affected material, show where it is, what condition is documented, what evidence supports it, how extensive it appears to be, what action is proposed, and what still needs confirmation.
This is not yet the Xactimate estimate. It is the evidence-led bridge between the claim file and the preliminary scope.
The damage matrix: a decision record, not a list of line items
A damage matrix is a structured inventory of affected—or potentially affected—materials. It prevents a common desk-estimating failure: moving directly from a photo to a line item without preserving the reasoning in between.
For each row, a reviewer should be able to answer six questions:
-
Where is it?
Identify the structure, floor, room, and specific element, such as “Kitchen, east wall, lower drywall.” -
What material or component is involved?
Use a physical description: drywall, oak baseboard, cabinet toe kick, engineered wood flooring, ceiling insulation, and so on. -
What is actually documented?
State the visible condition or recorded finding, not an unsupported conclusion. -
What supports that statement?
Link photos, sketch references, moisture records, field notes, reports, or documented measurements. -
What action is proposed?
State the preliminary response: inspect, protect, clean, dry, selectively remove, repair, replace, detach and reset, refer, or take no loss-related action. -
What remains unresolved?
Record uncertainty rather than burying it in an overly broad scope.
A good matrix lets someone trace the logic in either direction:
- Starting with a photo, they can find the relevant material row and proposed work.
- Starting with a scope item later, they can find the room, condition, evidence, and quantity basis behind it.
The matrix is therefore a technical scoping document, not a coverage decision. You can document that a condition is technically consistent with the reported loss while still leaving coverage, causation, and authorization to the responsible party.
Start with location control
Before judging materials, establish a reliable map of the property. Use the room names shown in the sketch or floor plan, and use those exact names throughout the photo log, notes, matrix, and eventual estimate.
For example, do not alternate between:
- “Master Bath”
- “Primary Bathroom”
- “Upstairs Bathroom”
- “Bath 2”
unless the file explicitly distinguishes them. Pick the documented room name, such as Second Floor Primary Bathroom, and retain it consistently.
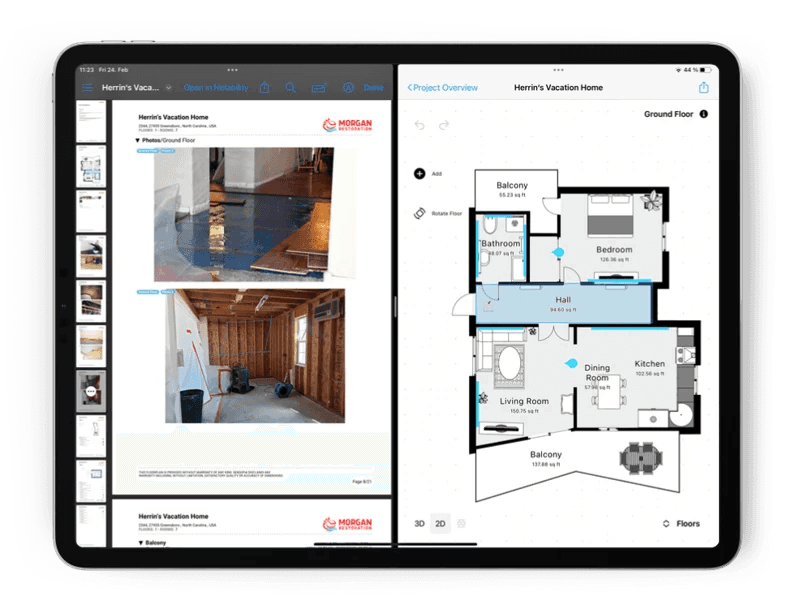
A floor plan gives isolated photos their context. It also helps you check relationships that may matter to the loss: a bathroom over a kitchen, an exterior wall adjacent to a stained ceiling, or a shared wall between a wet room and a finished room.
Water Damage Inspection: How to Document a Three-Level ...
Read Magicplan’s practical discussion of multi-level water-loss documentation. It shows why floor plans, room-specific photo placement, and clear notes are the foundation for a traceable damage matrix.
In the section “What should a multi-level water damage inspection include?”, read the inspection record. Focus on how plans, photo locations, notes, moisture information, and final review work together. Then, in “Step 4: Record damage where you find it,” read the location note model. Notice that a useful note includes location, condition, relationship to the reported source, downstream checks, and a next action. Finally, in “Step 5: Follow the water path into the basement,” read the fact-versus-conclusion reminder. Apply that distinction in every matrix row.
A practical location identifier can follow this pattern:
[Floor] | [Room] | [Building element] | [Orientation or position]
Examples:
- Ground Floor | Kitchen | East wall | Lower section behind base cabinets
- Second Floor | Primary Bathroom | Floor assembly | Area adjacent to toilet flange
- Basement | Mechanical Room | Ceiling drywall | Below primary bathroom
- Exterior | Rear elevation | Roof slope | Right side of chimney
You do not need perfect compass orientation if it is not available. “Wall containing patio door” or “ceiling area below upstairs bathroom” is better than a vague “damaged wall.”
Build rows around materials, not around photos or trades
A photo is evidence; it is not the unit of scope. Likewise, “carpentry” or “painting” is a trade category, not a damaged condition.
The most useful row unit is:
One material or component, in one location, with one reasonably consistent condition and one proposed action.
For instance, a kitchen water loss could require separate rows for:
- lower drywall;
- baseboard;
- laminate flooring;
- cabinet toe kick;
- cabinet end panel;
- insulation behind an opened wall;
- ceiling drywall in the room below.
Although these components may arise from the same reported event, they differ in evidence, quantity basis, repairability, and likely work method.
When to split a row
Create separate rows when any of the following changes:
- the room or distinct location changes;
- the material changes;
- the condition changes materially;
- the evidence strength changes;
- the loss relationship is different or uncertain;
- the proposed action is different;
- the quantity uses a different unit, such as square feet for drywall and linear feet for baseboard.
For example, do not use one row that says:
Kitchen: water damage to walls, flooring, and cabinets.
That sentence does not identify materials, quantities, evidence, or repair methods. It cannot be checked or cleanly converted into a scope.
When not to split a row
Do not create a row for every individual Xactimate line item. At this stage, the matrix should preserve the physical repair logic, not reproduce estimating software categories.
For example, “Kitchen east wall lower drywall” can remain one row even if the final estimate eventually needs separate demolition, insulation, drywall installation, texture, primer, and paint activities. The matrix identifies the damaged assembly and the preliminary repair direction; the later scope translates that direction into detailed work.
Keep the evidence statement factual
The “condition” cell should describe what the file supports. Use the evidence labels from the prior lessons:
- Observed: visible in photos, measured in a record, or documented by an inspection note.
- Reported: stated by an insured, contractor, technician, or other party.
- Inferred: a reasoned interpretation based on evidence, clearly labeled as such.
- Unknown: not established by the available file.
Compare these entries:
| Weak matrix language | Stronger matrix language |
|---|---|
| Water-damaged drywall | Observed: staining and apparent softening at lower drywall; moisture condition not confirmed in available photos. |
| Kitchen leak ruined cabinets | Reported: supply-line leak at kitchen sink. Observed: swollen toe kick and delaminated end panel. Cabinet-box condition behind finished surfaces unknown. |
| Mold in wall cavity | Unknown: cavity not visible. No protocol, laboratory result, or documented field observation provided. |
| Ceiling damage from bathroom leak | Observed: circular ceiling staining in room below bathroom. Inferred: location is vertically aligned with reported bathroom event; source and concealed conditions require confirmation. |
The difference is not merely stylistic. The stronger language limits the estimate to what can be defended and makes the next information request obvious.
A useful pattern is:
Observed condition + evidence source + limitation
For example:
Observed: approximately SF of visible staining and softened lower drywall on kitchen east wall, supported by Photos P-18 and P-19. Extent behind base cabinets and final removal height are unknown pending field verification.
This statement gives the reader a condition, location, evidence reference, preliminary extent, and boundary of uncertainty.
Use an evidence bundle, not a single close-up
A close-up can show swelling, staining, delamination, cracking, or residue. But it may not show where the condition is. Conversely, a wide room photo shows location but may not reveal the material condition.
For each significant material row, aim to connect an evidence bundle:
| Evidence type | What it establishes |
|---|---|
| Wide/context photo | Room identity, wall or floor location, relationship to openings and fixtures |
| Mid-range photo | The affected portion of the assembly |
| Close-up photo | Material condition, such as swelling, staining, separation, residue, or deterioration |
| Sketch/floor plan | Room boundaries, dimensions, vertical relationship, and orientation |
| Measurement or moisture record | Quantity basis or documented material condition |
| Note or report | Reported source, inspection observation, prior repair history, or follow-up requirement |
The tablet workflow below illustrates the principle: damage images become much more useful when they remain connected to the location shown on a floor plan.
You do not need specialized documentation software to apply this method. A consistent photo naming convention plus a floor plan and matrix can accomplish the same core task. For example:
- P-01 to P-04: Kitchen overview and source-area context
- P-05 to P-08: Kitchen east wall and base cabinets
- P-09 to P-11: Dining room shared wall
- P-12 to P-14: Basement ceiling below kitchen
The important point is that “Photo 12” alone is not enough. Your row should identify what that photo proves.
The minimum viable damage matrix
Use the following fields in your working matrix. You can build it in a spreadsheet, within your estimating notes, or in a company template.
| Matrix field | What belongs there |
|---|---|
| Room / element | Exact room name plus wall, ceiling, floor, fixture, or assembly location |
| Material / component | Specific material, such as painted drywall, laminate plank flooring, MDF baseboard, or cabinet toe kick |
| Condition and information type | A factual observed condition, plus reported, inferred, or unknown details where relevant |
| Evidence references | Photo IDs, sketch references, measurement records, reports, notes, or bids |
| Extent / quantity basis | Measured quantity, photo-derived range, known room dimension, or “quantity not supportable” |
| Technical status | Appears loss-related, potentially pre-existing, unrelated deterioration, or undetermined |
| Proposed action | Preliminary inspection, protection, cleaning, drying, selective demolition, repair, replacement, referral, or no loss action |
| Assumptions / follow-up | What must be verified, measured, opened, tested, documented, or decided before final scope |
The wording technical status is deliberate. It keeps you from implying a coverage determination. Your role is to state whether available evidence supports including a condition in the technical scope, excluding it as unrelated, or holding it pending further information.
A worked example: turning a small file into matrix rows
Assume a preliminary desk file contains the following:
- The insured reports a kitchen sink supply-line leak.
- Sketch K-1 identifies the kitchen and adjacent dining room.
- Photos P-12 and P-13 show staining and apparent softening on the kitchen east wall.
- Photo P-14 shows swollen baseboard below that wall.
- Photo P-15 shows a swollen cabinet toe kick.
- The sketch documents a -inch opening on the same wall; a prior photo-based calculation estimates the visible drywall condition at approximately – SF.
- Dining room Photo P-20 shows an intact painted wall, but a field note reports an elevated meter reading at the shared wall.
- The available photos do not show the cabinet interior, insulation, or subfloor.
A preliminary matrix could look like this:
| Room / element | Material / component | Condition and evidence | Extent / basis | Technical status | Proposed action | Follow-up needed |
|---|---|---|---|---|---|---|
| Ground Floor Kitchen, east wall lower section | Painted drywall | Observed: staining and apparent softening. P-12 provides room context; P-13 shows affected wall condition. | Visible extent approx. – SF from documented photo scaling; final removal extent not established. | Potentially loss-related; location is consistent with reported sink-area leak. | Field verify moisture and removal height; preliminarily allow for selective drywall removal and replacement only after confirmation. | Confirm meter readings, wall-cavity condition, insulation condition, and stud layout. |
| Ground Floor Kitchen, east wall base | Painted MDF baseboard | Observed: swelling and finish separation in P-14 directly below affected drywall. | Approx. LF visible; verify field dimension. | Potentially loss-related. | Remove and replace affected baseboard if removal of wallboard or documented swelling requires it. | Confirm continuity, profile, paint extent, and whether adjacent sections match. |
| Ground Floor Kitchen, base cabinet at east wall | Cabinet toe kick | Observed: swelling/delamination in P-15. Cabinet box and interior condition not visible. | Approx. inches visibly affected; photo-based preliminary only. | Potentially loss-related; concealed impact undetermined. | Document visible condition; inspect cabinet box, end panel, and flooring interface before selecting repair or replacement method. | Obtain interior/cabinet-base photos and field assessment of salvageability. |
| Ground Floor Dining Room, shared wall | Painted drywall | Reported: elevated moisture reading in field note. Observed: no visible staining or distortion in P-20. | No supported repair quantity. | Undetermined; may be affected but material damage is not established. | Investigate and document moisture condition; do not include demolition or replacement from current evidence alone. | Obtain meter record, affected-area map, and photos after any investigation. |
| Ground Floor Dining Room, shared wall | Painted drywall | Observed: wall finish appears intact in P-20. | Not applicable. | No visible loss condition documented. | No present repair action. | Reassess only if investigation records establish material impact. |
Notice several important choices:
- The cabinet toe kick and drywall are separate rows because they are different materials with different repair decisions.
- The dining room is not automatically scoped merely because it adjoins the kitchen.
- “Potentially loss-related” is not presented as proven cause or coverage.
- The quantity for drywall is explicitly identified as a visible, photo-derived preliminary range, not final removal quantity.
- The unknown cavity and cabinet-box conditions produce follow-up requests, not speculative line items.
This is the discipline that makes a preliminary estimate defensible: the file’s gaps remain visible.
Proposed action should be specific, but proportionate to the evidence
Your “proposed action” column should tell the next estimator, project manager, or field representative what the documentation supports doing next. It should not leap beyond the evidence.
Useful action language includes:
| Evidence level | Suitable proposed action |
|---|---|
| Visible cosmetic staining; material condition uncertain | Inspect, test, document, and determine repairability |
| Visible swelling, delamination, or material failure | Verify extent; plan selective removal and replacement if confirmed |
| Documented material removal already completed | Reconstruct removed assembly, subject to documented dimensions and finish requirements |
| Moisture record without visible damage or documented demolition | Investigate and obtain condition documentation; do not assume replacement |
| Possible code, structural, electrical, plumbing, or environmental issue | Refer for qualified inspection or obtain governing documentation before final scope |
| Condition appears unrelated or pre-existing | Document basis; no loss-related action currently proposed |
Avoid unsupported statements such as:
- “Replace all cabinets.”
- “Remove entire floor.”
- “Mold remediation required.”
- “Roof leak caused all ceiling damage.”
- “Paint whole house for matching.”
Each may eventually be appropriate in a particular file, but each requires evidence and a documented rationale beyond a broad preliminary photo observation.
Read the matrix as a quality-control tool
Encircle’s documentation guidance is useful here because it treats room-level records as the source material for a reliable scope: materials present, materials impacted, salvageability, hazards, and proposed work all need to be captured deliberately.
Optimizing Scope Outputs – Encircle
Read Encircle’s guidance on the relationship between room-specific documentation and usable scope output. The software context is secondary; focus on the information an estimator needs before proposing work.
Start with the opening of “The TL;DR Version” and read the documentation principle. This is the operating rule for a matrix: missing data should produce a follow-up item, not an invented scope. Then read the “Photo Documentation” subsection, especially the photo documentation section. Focus on the distinct roles of photos: material identification, visible-condition confirmation, layout context, and cross-reference to measurements. Continue into “Room Specific Information” and review the room information checklist. Compare each bullet with the columns in your own matrix template.
When reviewing a completed matrix, perform three quick checks.
1. Room completeness check
Compare the matrix to the sketch and photo log:
- Are all documented affected rooms represented?
- Were adjacent rooms, rooms below, and shared assemblies considered where the evidence calls for it?
- Are room names consistent with the plan?
- Did you record inspected areas with no visible loss condition when that finding prevents scope creep?
2. Material completeness check
Within each affected room, ask whether the record distinguishes the components actually visible or documented:
- wall finish versus baseboard;
- flooring versus underlayment;
- cabinet toe kick versus cabinet box;
- ceiling drywall versus insulation or framing;
- fixture damage versus the surrounding assembly.
Do not assume every layer is affected. But do not let a visible finish condition distract you from a documented need to inspect adjacent layers.
3. Traceability check
For each material row, verify:
- Does the evidence reference lead to a usable photo, note, sketch, or record?
- Does the evidence actually support the condition wording?
- Is the quantity tied to a measurement source or clearly marked as unverified?
- Does the proposed action fit the condition and stated uncertainty?
- Does the follow-up item identify exactly what information is missing?
If any answer is “no,” the row is not ready to guide a preliminary scope.
A practical workflow for your permitted practice files
Use this method on a small two- or three-room loss before attempting a large reconstruction file.
-
Set up the room list from the sketch.
Copy room names exactly as they appear on the available plan. -
Review the file room by room.
Start with wide photos for orientation, then review mid-range and close-up images for material conditions. -
List materials before proposing work.
Record every damaged or potentially affected component separately enough to support a repair decision. -
Write factual condition statements.
Use “observed,” “reported,” “inferred,” and “unknown” where needed. Keep unsupported conclusions out of the condition field. -
Attach evidence references.
Identify the specific photo numbers, sketch labels, notes, and measurement records that support the row. -
Enter a quantity or quantity limitation.
Use documented measurements where available. Use your photo-derived ranges only when the geometry supports them. Otherwise state that a field measurement is required. -
State a preliminary action and follow-up.
Make the action appropriately conditional when the material condition, extent, or repair method remains uncertain. -
Sort by floor, room, and assembly.
A reviewer should be able to move through the property logically without hunting through unrelated entries.
For practice, aim for a concise matrix of roughly six to ten material rows. A smaller, well-supported matrix is more valuable than a large list of assumptions.
Key takeaways
A room-by-room damage matrix is the bridge between raw claim documentation and a defensible preliminary scope.
- Build rows around specific materials in specific locations, not around photos, vague damage labels, or estimate trades.
- Keep condition statements factual and clearly distinguish observed, reported, inferred, and unknown information.
- Link each row to an evidence bundle: context photos, close-ups, sketches, measurements, notes, and reports as available.
- Record quantity sources and limitations honestly; visible extent is not automatically final repair extent.
- Treat the proposed action as a preliminary technical response, not a coverage decision or an unsupported final scope.
- Use follow-up items to expose missing measurements, concealed conditions, salvageability questions, and specialist needs.
Next, you will use the gaps identified in the matrix to draft targeted requests for missing photographs, measurements, reports, and field observations.
Can't find a good explanation? Sign up and we'll make it for you
Sign up