
Hello! Welcome to your next lesson in the "Digital DJ Toolkit" module.
In our last session, we demystified the 'Sync' button, treating it as a powerful tool that relies on the accurate beat grids you prepared. We concluded that mastering manual fundamentals is key, but using automation strategically can unlock new creative possibilities.
Today, we'll explore another feature that transforms a track from a linear recording into an interactive instrument. The learning outcome is to set and trigger 'Hot Cues' on the CDJ-3000 to jump to pre-defined points in a track. This skill is fundamental to modern digital DJing and opens the door to live remixing, creative transitions, and precise mix execution.
1. What Are Hot Cues?
In the first module, you learned to set the main 'Cue' point, which is the primary starting position for a track. Think of Hot Cues as a set of secondary, instantly accessible cue points. They are digital markers that allow you to jump to and play from any pre-defined point in a track, on demand.
If the main Cue is the entry point of your program (main()), Hot Cues are like named functions or bookmarks you can call at any time to start execution from a specific line. This gives you non-linear control over the track's playback.
On the CDJ-3000, you have eight dedicated Hot Cue buttons, labeled A through H.
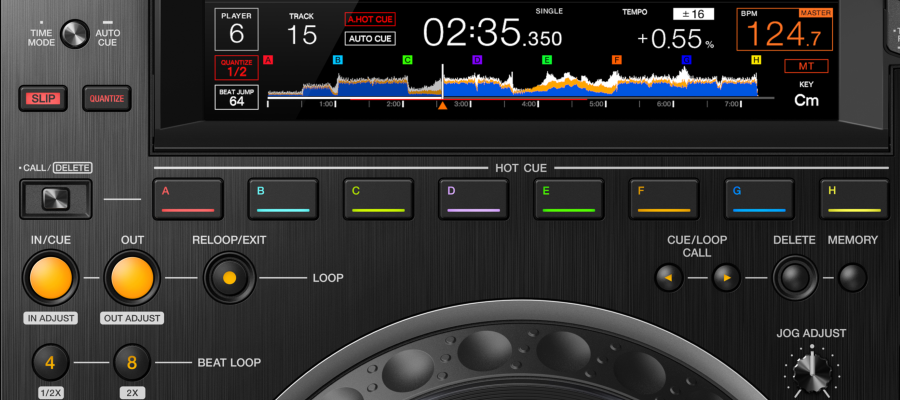
2. Setting, Triggering, and Deleting Hot Cues
The process of managing Hot Cues is straightforward. Let's get the core mechanics down.
DJ: CDJ-3000 Full Tutorial & Features
The following resource from Pirate.com's support section provides a very clear and concise guide on the three fundamental Hot Cue operations. We'll use this as our primary reference for the mechanics.
Please read the short section titled 'Hot Cues'. It clearly explains how to set, start playback from (trigger), and delete a Hot Cue.
To summarize and structure the information from the reading:
To Set a Hot Cue:
- Navigate to the desired point in the track using the jog wheel.
- Press one of the unlit [HOT CUE] (A-H) buttons.
- The button will light up, and a marker will appear on the waveform. The cue is now stored.
To Trigger a Hot Cue:
- At any time (whether the track is playing or paused), press a lit [HOT CUE] button.
- Playback will immediately jump to that point and begin playing.
To Delete a Hot Cue:
- Press and hold the [CALL/DELETE] button (located to the left of the Hot Cue buttons).
- While holding it, press the lit [HOT CUE] button you wish to remove.
- The button's light will turn off.
Practice Session (10 minutes)
Now it's time for some hands-on practice.
- Load a DnB track you know well onto a deck.
- Set Hot Cue A on the very first beat of the track (the drop).
- Play the track for about 30 seconds, then press Hot Cue A. Notice how it instantly jumps back to the beginning.
- Find another distinct point in the track, like the start of a vocal phrase or a breakdown. Set Hot Cue B there.
- Practice jumping between Hot Cue A and Hot Cue B.
- Finally, practice deleting Hot Cue B using the [CALL/DELETE] button.
3. Strategic Hot Cue Placement for DnB
Knowing how to use Hot Cues is one thing; knowing where and why to place them is what makes them a powerful tool for a DnB DJ. While you can set them on the fly, the real power comes from preparing them in Rekordbox before your set. This is analogous to writing and organizing your code before compiling and running it.
Here are some common and effective places to set Hot Cues in a DnB track:
- Cue A: The First Beat (The "1"): This is your primary drop point. Having it as Hot Cue 'A' provides a consistent, reliable way to start or re-trigger the track, even if you've moved the main cue point.
- Cue B: Start of the First Major Phrase: Often 16 or 32 beats after the drop. This gives you a secondary mix-in point if you don't want to start from the very beginning.
- Cue C: Before the Breakdown: Placing a cue on the beat just before the energy drops out is useful for performing a quick cut or starting a loop before transitioning.
- Cue D: Start of a Key Vocal or Riff: This allows you to "tease" a recognizable sound from the incoming track over the outgoing one, creating anticipation.
- Cue E: The Second Drop: Many DnB tracks have two distinct drops. A Hot Cue here lets you jump directly from the first section to the second, skipping the main breakdown to maintain high energy.
- Cue F: A Clean Percussion Section: Find a bar or two with just drums. This is your "utility" section, perfect for layering over another track or extending a mix.
- Cue G: Start of the Outro: A reliable marker for when you need to start mixing the next track in.
- Cue H: Your "Emergency" Loop: Find a clean 8-beat section that loops well. If a mix is going wrong or you need more time, you can jump here and activate a loop (which we'll cover in the next lesson).
By setting these points in advance, you create a toolkit for each track, enabling you to manipulate its structure live and mix in more creative and dynamic ways than a simple linear blend would allow.
Conclusion
You've now added another essential digital tool to your arsenal. Hot Cues are a gateway to more active and creative DJing, allowing you to deconstruct and reconstruct tracks on the fly.
Key Takeaways:
- Hot Cues are up to eight user-defined digital markers (A-H) in a track that you can instantly jump to.
- They are managed using the eight [HOT CUE] buttons and the [CALL/DELETE] button on the CDJ-3000.
- Setting them in advance (in Rekordbox) is key for a polished performance.
- Strategic placement in DnB includes marking drops, phrases, breakdowns, and outros to give you non-linear control over the track's energy and structure.
Next Lesson Preview:
In our next lesson, we will explore another powerful feature for manipulating track structure: looping. We will learn how to create a 4 or 8-beat loop on the CDJ-3000 and use it to extend a track's intro or outro for mixing. You'll see how loops and Hot Cues can be used together to give you even more creative control during your sets.
Can't find a good explanation? Sign up and we'll make it for you
Sign up