
Welcome to the first lesson in our module on store distribution. Having established a robust Over-the-Air update system, your application is now functionally ready for its first release candidate. Our focus now shifts from development and feature implementation to the formal process of preparing the app for public release on the iOS App Store and Google Play Store.
This lesson marks the beginning of that journey by tackling the essential setup on Apple's platform. You will learn how to create a unique identity for your application and establish its official record in App Store Connect. This process is a non-negotiable prerequisite for testing, uploading, and eventually submitting your app for review.
By the end of this lesson, you will have successfully created an app record in App Store Connect, configured its unique Bundle ID, and populated the initial metadata required by Apple.
1. Prerequisites: The Apple Developer Program
Before you can interact with Apple's distribution ecosystem, you must have an active Apple Developer Program membership. This is a mandatory requirement that grants you access to the necessary tools, including App Store Connect (for managing your app listing) and the Developer Portal (for managing certificates and identifiers).
The video below provides a good overview of the developer program and a tour of the App Store Connect dashboard.
App Store Submission Guide (2025): Publish Your iOS App to the Store (Xcode & App Store Connect)
This video from the NDC channel, "App Store Submission Guide (2025)", opens with a clear explanation of the developer program requirements.
Watch the segment from the beginning which covers the necessity of the developer account, its cost, and the distinction between individual and organization accounts. Given your professional background, this distinction is important if you were publishing on behalf of a company.
As the video mentions, membership costs $99 USD per year and is the key to unlocking the entire distribution and testing toolchain. Once enrolled, you will use two primary websites:
developer.apple.com: For managing technical assets like App IDs, certificates, and provisioning profiles.appstoreconnect.apple.com: For managing the app's store listing, metadata, builds, pricing, and analytics.
2. Step One: Registering Your App ID
The first concrete step is to create a unique identifier for your application. Apple calls this an App ID, but it is more commonly known as the Bundle Identifier. This is a reverse-domain name string (e.g., com.yourcompany.yourapp) that uniquely identifies your app across Apple's entire ecosystem.
Crucially, this App ID must exactly match the appId you configured in your capacitor.config.ts file earlier in this course. Any mismatch will prevent you from successfully uploading your build.
The process of registering this identifier happens in the Apple Developer Portal.
Deploying Capacitor Applications to iOS (Development & Distribution)
This article by Josh Morony provides a concise, step-by-step guide for this process, tailored for Capacitor developers.
Log into your Apple Developer account and navigate to the "Certificates, IDs & Profiles" section. Follow the steps outlined in the article's first section, "Create an Identifier".
As you follow the guide, you will encounter a form like the one shown below.
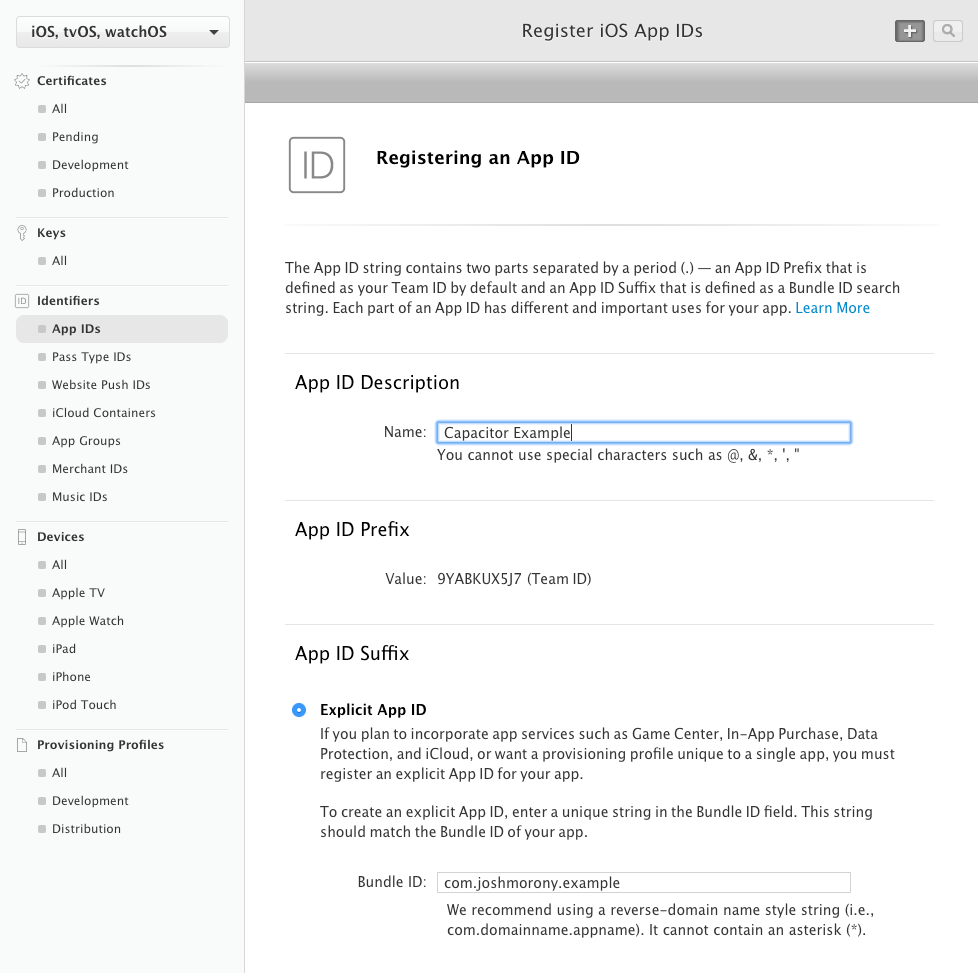
Let's break down the key fields on this screen:
- App ID Description: This is a human-readable name for your own reference within the portal (e.g., "My Awesome App"). It is not shown on the App Store.
- App ID Prefix: This is your unique Team ID, assigned by Apple. It is usually pre-filled and locked.
- App ID Suffix (Bundle ID): This is the most important field. Select "Explicit App ID" and enter the exact reverse-domain string from your
capacitor.config.ts. A "Wildcard App ID" (using an asterisk*) is not suitable for production apps as it cannot support services like Push Notifications or In-App Purchases.
After registering the ID, you can also enable any capabilities (Apple services) your app will use, such as Push Notifications, HealthKit, or Sign in with Apple. We will revisit this when we configure push notifications in a later module.
3. Step Two: Creating the App Record in App Store Connect
With your unique App ID registered, you can now create the actual app listing in App Store Connect. This record will house all your app's metadata (description, screenshots, pricing) and serve as the destination for the builds you will eventually upload from Xcode.
The following video provides a clear, visual walkthrough of this process.
App Store Submission Guide (2025): Publish Your iOS App to the Store (Xcode & App Store Connect)
The same "App Store Submission Guide (2025)" video continues to demonstrate the next logical step: creating the new app record.
Watch the segment from creating a new app. The presenter walks through the "New App" dialog box, explaining each field. This will prepare you for the form you are about to fill out.
Now, navigate to App Store Connect, go to the "My Apps" section, and click the '+' icon to add a "New App". You will be presented with this form:

Here is a breakdown of what to enter in each field:
- Platforms: Check "iOS". You can add other platforms like macOS later if needed.
- Name: This is the name that will appear on the App Store. It is limited to 30 characters and must be unique. Choose this carefully, as it's a key part of your app's branding.
- Primary Language: The default language for your App Store listing. You can add localizations for other languages later.
- Bundle ID: Use the dropdown menu to select the explicit App ID you created in the previous step. If it doesn't appear, double-check that you successfully registered it in the Developer Portal.
- SKU (Stock Keeping Unit): This is a unique, internal identifier for your app that is not visible to users. You can use any string you like; a common convention is to use the bundle ID or a hyphenated version of the app name (e.g.,
daily-devotions-2024). - User Access: If you are working on a team, you can restrict which team members can see this app record. For a solo developer, "Full Access" is the standard choice.
Once you click "Create", App Store Connect will generate the app record and take you to its dashboard.
4. Configuring Initial Metadata
Creating the record is just the beginning. The app dashboard will have several sections requiring information before you can submit. While we will cover assets like screenshots and privacy details later, you can fill out some of the initial textual metadata now.
How to Submit Your App to the App Store [ 2026 Best Guide ]
This comprehensive guide provides detailed explanations for the metadata fields you will see after creating the app record.
Skim through the sections on creating the record to reinforce what you've just done. Then, review the sections covering Pricing and Availability and App Store Optimization fields. This will give you context on the purpose of fields like Subtitle, Description, and Keywords.
On the app's dashboard in App Store Connect, you will typically see placeholders for a version (e.g., "1.0 Prepare for Submission"). Clicking this takes you to the page where you will add:
- Subtitle: A short, catchy phrase under your app's name (30 characters).
- Promotional Text: A short text (170 characters) that appears at the top of your description and can be updated without a new app release.
- Description: A detailed description of your app's features and functionality.
- Keywords: A comma-separated list of up to 100 characters of keywords to help users find your app via search.
- Support URL & Marketing URL: Links to your app's support page and optional marketing website.
You don't need to finalize all of this information right now, but it's useful to know where these critical pieces of metadata reside.
Conclusion
In this lesson, you took the first critical step in the distribution process by establishing your app's identity within Apple's ecosystem. This administrative groundwork is essential before any code can be submitted.
Here are the key takeaways:
- An Apple Developer Program membership is the entry ticket to the App Store.
- You must first register a unique, explicit App ID (Bundle Identifier) in the Apple Developer Portal. This ID must match the
appIdin yourcapacitor.config.ts. - You then use that App ID to create an app record in App Store Connect, where you define the initial metadata like the app's public name, SKU, and primary language.
You have now laid the foundation for the iOS version of your application. In the next lesson, we will perform the parallel process for the Android platform by creating an application record in the Google Play Console and preparing it for your first build.
Can't find a good explanation? Sign up and we'll make it for you
Sign up