In our last lesson, we established the fundamental distinction between utility and security tokens, concluding that the regulatory landscape demands a "permissioned" design for securities. This is not just a legal requirement but a technical one, forcing us to build compliance directly into the token's DNA. Today, we will explore a powerful, standardized framework designed for precisely this purpose.
This lesson analyzes the ERC-3643 (T-REX) standard's components for managing identity and compliance. Instead of a single, monolithic contract, you will see that ERC-3643 is a sophisticated suite of interconnected smart contracts. Given your background in designing data systems and software for investment management, you'll likely recognize the design pattern here: a modular architecture that separates concerns, much like how a data pipeline separates extraction, transformation, and loading, or how enterprise software separates the data layer, business logic layer, and presentation layer.
What is ERC-3643?
At its core, ERC-3643 provides a standardized way to build ERC-20 tokens that can enforce rules about who can hold and transfer them. It was originally created by Tokeny Solutions as the T-REX (Token for Regulated EXchanges) protocol and has since been formalized as an official Ethereum standard.
To understand its architecture, it's useful to first clarify the difference between a standard and a protocol in this context.
[PDF] Demystifying ERC-3643: A Deep Dive into Compliant RWA ...
This report provides an excellent clarification on the relationship between the ERC-3643 standard and the T-REX protocol, which is a specific implementation of that standard.
Please read the section titled "How T-REX Protocol Relates to the ERC-3643 Standard" (page 23). Focus on the distinction it makes between the standard as the blueprint and the protocol as the implementation.
Essentially, ERC-3643 defines the "what" (the interfaces and rules), while T-REX is a concrete implementation of the "how." For the rest of this lesson, we will analyze the components as defined by the standard.
A Modular Architecture for Compliance
ERC-3643's power comes from its modularity. It breaks down the complex problem of compliance into several manageable, interacting components. This design promotes reusability and flexibility, allowing different security tokens to share identity systems while having their own unique compliance rules.
The diagram below provides a high-level overview of the four main functional areas that work together.

We will now examine each of these components in detail. The Quicknode guide on ERC-3643 provides a clear breakdown of the core contracts that implement this architecture.
What is ERC-3643? | Quicknode Guides
This guide offers a concise summary of the different smart contracts that make up an ERC-3643 implementation.
Please read the section "ERC-3643 Architecture". Pay close attention to the table that lists the core components and their summaries. This will serve as our map for the deep dive that follows.
Deep Dive: The Core Components
Let's dissect the primary smart contracts involved. The following diagram illustrates how they interact with one another.
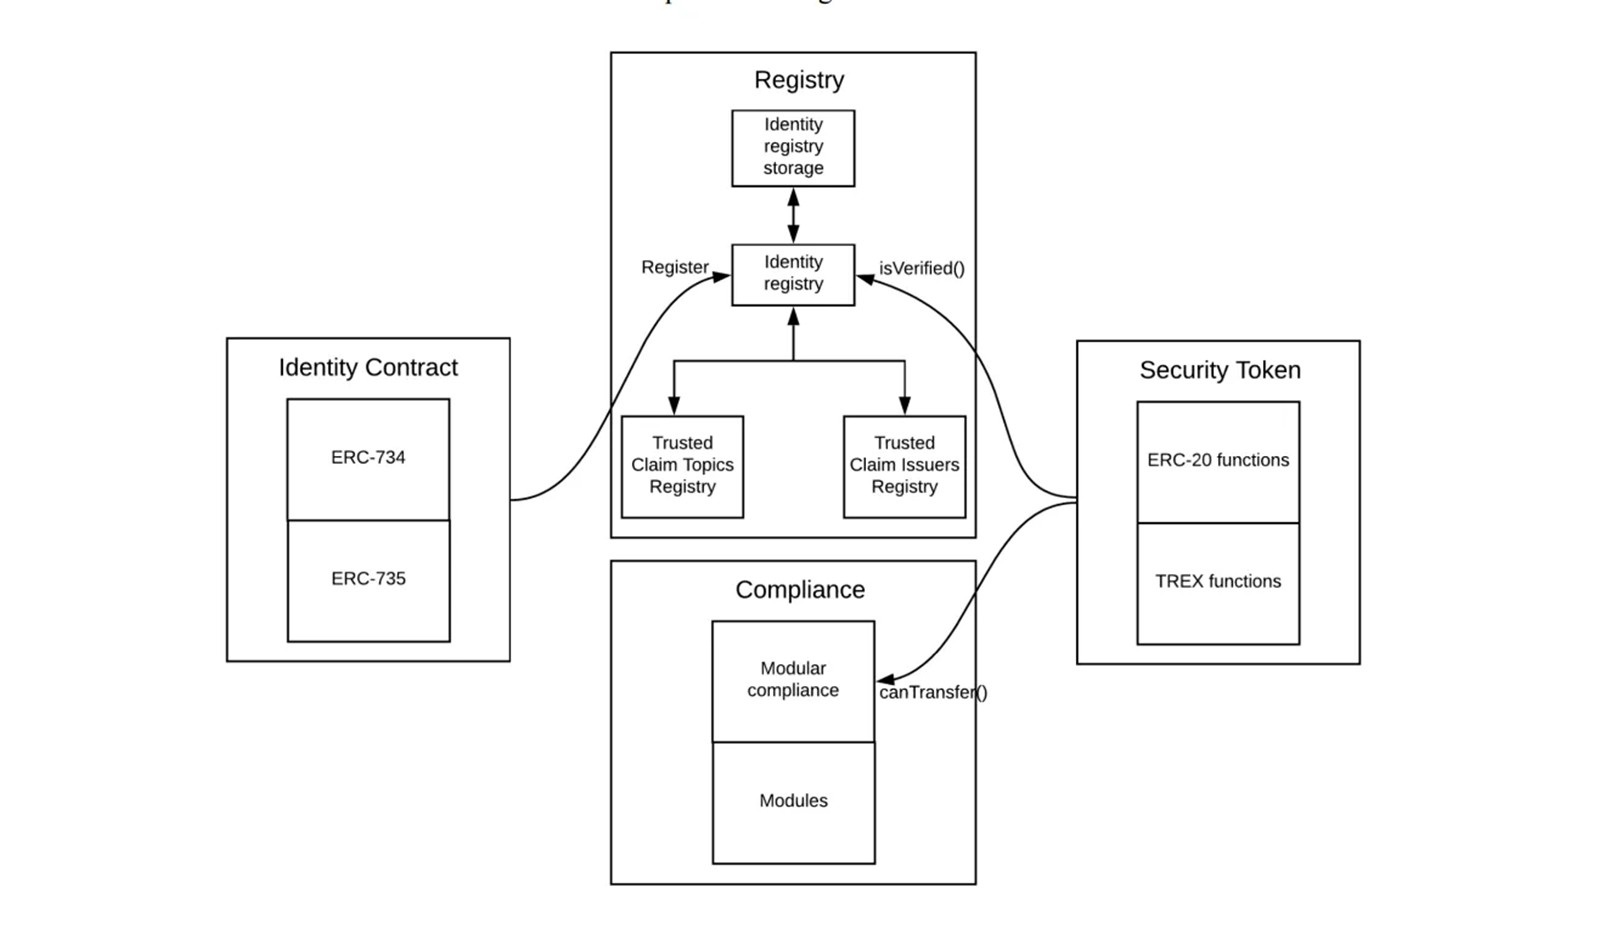
1. The Identity Layer: ONCHAINID and Claims
The foundation of the entire system is a verifiable, on-chain identity. This is handled by a separate identity contract based on two precursor standards:
- ERC-734: Manages cryptographic keys associated with an identity.
- ERC-735: Allows trusted third parties to attach cryptographically signed "claims" to an identity.
ONCHAINID is an implementation of these standards. It acts as a universal, self-sovereign identity for a user. Crucially, it does not store personally identifiable information (PII) on the blockchain. Instead, it stores attestations or "claims."
A claim is a statement made by a trusted issuer about an identity. For example:
- "Claim: KYC/AML Cleared. Issuer: A trusted KYC provider."
- "Claim: Accredited Investor. Issuer: A regulated financial institution."
This system separates the identity from the wallet address, allowing a single legal entity to use multiple wallets while maintaining one persistent, verifiable identity.
2. The Registries: The Verification and Gatekeeping Layer
The registries work together to define who can issue claims and which claims are necessary to hold a particular token. You can think of this layer as the data validation and access control list for the entire system.
- Claim Topics Registry: A simple list of required claim types. It defines what claims are needed. For example, it might list
KYC_VALIDATED(ID: 1) andACCREDITED_INVESTOR(ID: 2) as required topics. - Trusted Issuers Registry: A list of addresses that are trusted to issue specific claims. It defines who can validate the required claims. For example, it might state that
0xabc...(a KYC provider) is trusted to issue claims for theKYC_VALIDATEDtopic. - Identity Registry: This is the primary gatekeeper. It maintains a list of wallet addresses that are authorized to hold the token. To get on this list, a user's ONCHAINID must possess all the required claims from the trusted issuers. The token contract will call the
isVerified(address)function on this registry to check if a recipient is eligible.
3. The Compliance Contract: The Rule Engine
While the Identity Registry verifies who can hold the token, the Compliance contract enforces rules about how it can be transferred. This is the business logic layer for transfers. Its rules can be updated without redeploying the token itself, providing significant flexibility.
The Compliance contract is responsible for checking rules like:
- Jurisdictional restrictions (e.g., no transfers to wallets in sanctioned countries).
- Offering-specific limits (e.g., a maximum of 99 investors in a given jurisdiction).
- Lock-up periods or vesting schedules.
- Maximum ownership percentages.
The central function here is canTransfer(address from, address to, uint256 amount), which the token contract calls before every transfer.
4. The Permissioned Token Contract
Finally, we have the token contract itself. It is fully ERC-20 compatible, meaning it can be held in standard wallets and integrated with other DeFi protocols. However, it overrides the standard transfer logic.
Instead of simply changing balances, a transfer in an ERC-3643 token follows a strict sequence of checks.
The ERC-3643 Transfer Flow
Let's put all these pieces together and trace the lifecycle of a single transfer request.
What is ERC-3643? | Quicknode Guides
This guide provides an excellent step-by-step walkthrough of how the different components interact during a token transfer.
Please read the entire section "How RWA Token Transfers Work". This section clearly explains the four main steps: initiation, eligibility checks, compliance evaluation, and the final transfer. Focus on how the token contract delegates checks to the Identity Registry and the Compliance contract.
To summarize the flow:
- Initiation: An investor (Alice) calls
transfer(Bob's address, amount)on the token contract, just like a normal ERC-20 transfer. - Eligibility Check: The token contract first calls the
IdentityRegistry. It checks if the token is paused, if either address is frozen, and most importantly, it callsisVerified(Bob's address). The Identity Registry checks its list to see if Bob's wallet is linked to a valid ONCHAINID that has all the required claims. If not, the transfer reverts. - Compliance Check: If Bob is eligible, the token contract then calls
canTransfer(Alice's address, Bob's address, amount)on theCompliancecontract. This contract runs through its rule set (jurisdiction, holder limits, etc.). If any rule is violated, it returnsfalse, and the transfer reverts. - Execution: Only if both the eligibility and compliance checks pass does the token contract execute the standard ERC-20 balance update.
- Post-Transfer Hook: After the transfer, the token calls
transferred(Alice's address, Bob's address, amount)on theCompliancecontract. This allows the Compliance contract to update its internal state, for example, by incrementing a counter for the number of holders in Bob's country.
This "check-then-act" pattern, mediated by external, modular contracts, is the technical heart of ERC-3643. It provides a robust and auditable framework for enforcing complex, real-world rules on-chain.
Conclusion
In this lesson, we dissected the architecture of the ERC-3643 standard. We moved beyond the general concept of a "permissioned token" to analyze the specific, modular components that make on-chain compliance possible.
Key Takeaways:
- Modular Design: ERC-3643 is not one contract but a suite of contracts that separate concerns: identity, registries, compliance rules, and the token itself.
- On-Chain Identity (ONCHAINID): Identity is anchored to a persistent, on-chain contract (not a wallet address), which holds verifiable claims from trusted issuers without storing sensitive personal data.
- Two-Level Verification: A transfer is validated at two levels. First, the Identity Registry checks who is involved (eligibility). Second, the Compliance contract checks the transaction against dynamic business rules (the how).
- ERC-20 Compatibility: The token remains compatible with the standard ERC-20 interface, but its core transfer functions are wrapped with these crucial compliance checks.
You now have a solid theoretical understanding of how a production-grade security token framework is designed. In the next lesson, we will transition from theory to practice. We will begin designing our own simplified identity and compliance system, borrowing the core principles you learned today to build a basic on-chain allowlist.