
Welcome to the next step in our journey to bring your React application to iOS. In the previous lesson, you became familiar with the Xcode IDE, learning how to build and launch your app on the iOS Simulator directly. This gave you a more granular level of control compared to using the Capacitor CLI alone.
Now, we'll bridge the gap between simulation and reality. This lesson focuses on running your application on a physical iOS device. To do this, we must engage with Apple's security and identity ecosystem. You will learn how to configure your project with an Apple Developer team account, set a unique Bundle Identifier, and use Xcode's automatic signing feature. This process is a fundamental requirement for all iOS development and a critical milestone on the path to distributing your app.
App Identity and Security: The Core Concepts
Before we dive into the "how," let's briefly touch on the "why." Apple maintains a strict security model to protect users. To deploy an app, even just for development on your own device, you must prove your identity to Apple and establish a unique identity for your application.
-
Apple Developer Program: This is your identity as a developer. You can start with a free Apple ID, which is sufficient to deploy apps to your own devices for testing. However, to distribute apps via TestFlight or the App Store, you'll need to enroll in the paid program ($99/year). For this lesson, a free account is all you need.
-
Bundle Identifier: This is your app's unique identity. It's a string, typically in reverse domain name notation (e.g.,
com.yourcompany.yourapp), that uniquely identifies your application across the entire Apple ecosystem. In our Capacitor project, this corresponds to theappIdyou set in thecapacitor.config.tsfile. -
Code Signing: This is the cryptographic process that links your developer identity to your app's identity. It assures iOS that the app was created by a known developer and hasn't been tampered with since it was signed. While the underlying mechanics are complex (involving certificates and provisioning profiles), Xcode's "Automatic Signing" feature handles almost all of the work for us.
Part 1: Preparing Your Physical iOS Device
Before Xcode can communicate with your iPhone or iPad, the device itself must be configured for development. This involves a few security steps, which have become mandatory since iOS 16.
The following video provides a clear, visual walkthrough of this process.
How to Connect Your iPhone/iPad to Xcode for Testing
This video from NDC demonstrates how to connect your device and enable the necessary settings.
First, watch the segment on connecting and trusting your computer. You'll physically connect your device to your Mac and tap "Trust" on the device's pop-up. Next, focus on the crucial step of enabling Developer Mode. Follow the instructions to navigate to Settings > Privacy & Security on your device, enable Developer Mode, and restart the device as prompted. This is a non-skippable step.
With your device prepared, it's now ready to receive builds from Xcode.
Part 2: Configuring Code Signing in Xcode
Now we return to Xcode to configure the project's identity and signing credentials.
First, ensure your project is open in Xcode. If it's not already, run bunx cap open ios from your project root.
Select the App project in the Project navigator on the left, then click on the App target, and navigate to the Signing & Capabilities tab. This screen is the command center for your app's identity.
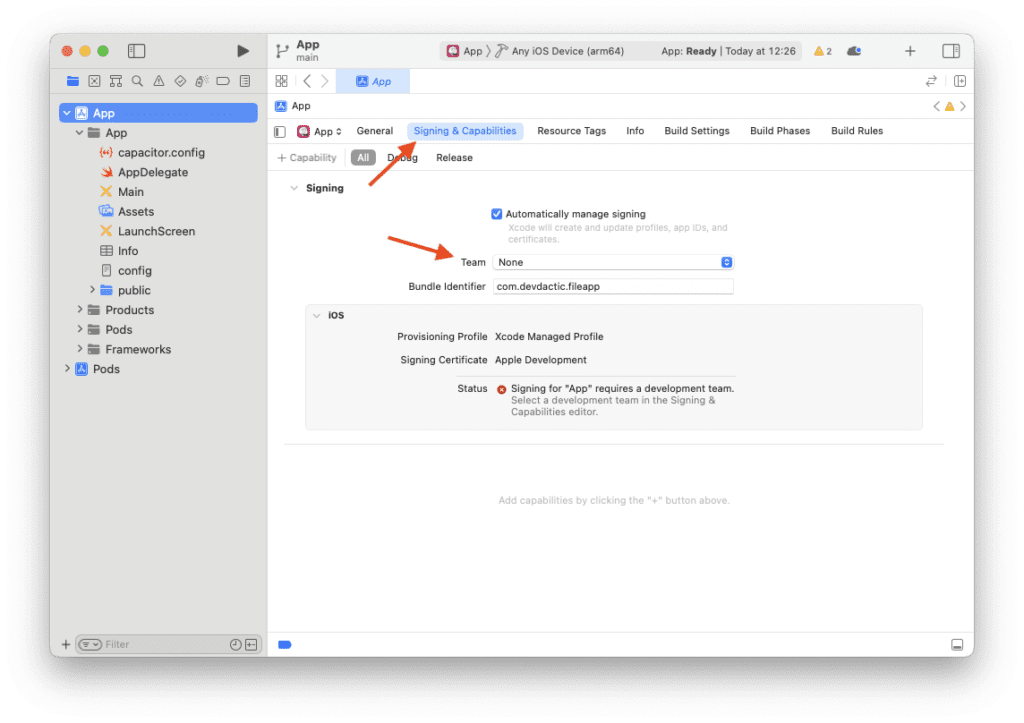
The following blog post from Ionic provides a great summary of the steps we're about to take.
Building And Releasing Your Capacitor iOS App - Ionic Blog
This article explains the code signing process within Xcode, which is exactly what we need to do.
Please read the section under the heading Build your App with Xcode. The text and the accompanying image visually lay out the steps for setting up automatic signing.
Let's walk through this process, which is also demonstrated in the video resource:
-
Enable Automatic Signing: As recommended in the article, check the "Automatically manage signing" box. This instructs Xcode to handle the creation and management of development certificates and provisioning profiles for you.
-
Add Your Apple ID: If you haven't already added your Apple ID to Xcode, the "Team" dropdown will be empty.
- Click the "Team" dropdown and select "Add an Account...".
- A dialog box will appear. Sign in with the Apple ID you wish to use for development. This can be a standard, free Apple ID. The video demonstrates this step visually between
selecting the team and signing in.
-
Select Your Team: Once your account is added, return to the "Signing & Capabilities" tab. Select your name (or your organization's name if you're part of a larger team) from the "Team" dropdown. Xcode may take a moment to communicate with Apple's servers, after which it should confirm that signing is correctly configured for development.
-
Verify the Bundle Identifier: The "Bundle Identifier" field on this screen should match the
appIdfrom yourcapacitor.config.ts. This confirms that Capacitor has correctly configured the native project. If you ever need to change your app's ID, thecapacitor.config.tsfile is the source of truth; you'll change it there and then runbunx cap sync iosto propagate the change to Xcode.
Part 3: Deploying and Running on Your Device
With signing configured, the final step is nearly identical to running on the simulator.
-
Select Target Device: Go to the scheme/device selector at the top of the Xcode window. Your connected iPhone or iPad should now appear at the top of the list, under the "iOS Devices" section. Select it.
-
Run the App: Click the "Run" (play) button.
Xcode will build the project, sign the resulting app bundle, and install it on your device. The app should then launch automatically.
A Common Hurdle for Free Accounts: Trusting the Developer
If you are using a free Apple Developer account, the first time you run the app, you will likely see an error in Xcode, and the app will not launch on your device. On your device, you might see an "Untrusted Developer" alert if you try to open the app manually.
This is expected. You just need to manually establish trust for your own developer certificate.
How to Connect Your iPhone/iPad to Xcode for Testing
The same video resource explains how to resolve this exact issue.
Watch the short segment from "building without a paid Apple Developer account". It shows you how to navigate to Settings > General > VPN & Device Management on your iOS device. Under the "Developer App" section, you will see your Apple ID. Tap on it, and then tap "Trust".
After trusting your certificate, you can return to Xcode and click the "Run" button again. This time, the app should launch successfully. You only need to perform this trust step once per device for a given developer account.
Conclusion
Congratulations! You have successfully navigated one of the most crucial and often confusing parts of iOS development. Moving from a simulator to a real device is a significant step, validating that your app can be properly signed and installed in a secure iOS environment.
Here are the key takeaways from this lesson:
- Running on a physical device requires code signing to establish your identity and your app's identity.
- The
appIdincapacitor.config.tsbecomes the Bundle Identifier in Xcode. - Enabling Developer Mode on your iOS device is a mandatory prerequisite.
- Using Xcode's "Automatically manage signing" feature is the simplest way to handle development signing.
- With a free developer account, you must manually trust your developer certificate on your device via the Settings app.
In our next lesson, we will continue refining the native aspects of your app by customizing its appearance. You will learn how to use Capacitor's asset generation tools to create and apply custom app icons and splash screens.
Can't find a good explanation? Sign up and we'll make it for you
Sign up