
Welcome to the next lesson in crafting your custom bodice block. In our last session, you meticulously "walked" and "trued" your pattern pieces. This ensured that the stitch lines of your front and back bodice match perfectly in length and that the curves flow smoothly across the seams. You now have a technically sound blueprint of your garment's stitching lines.
This lesson is about creating the cutting lines. To do this, we need to add a crucial element called seam allowance. Think of this as the built-in margin for error and assembly in manufacturing—a necessary buffer that allows separate components to be joined together. Here, it's the area between your stitch line and the raw edge of the fabric that will be taken up by the seam itself.
By the end of this lesson, you will have added the correct seam allowances to all edges of your front and back pattern pieces, transforming your trued block into a complete and functional pattern ready for the final marking stages.
What is Seam Allowance?
Before we start drawing, let's clarify what seam allowance is and why we use different amounts for different areas. At its simplest, it's the fabric needed to actually sew a seam. Without it, the finished garment would be smaller than intended.
The width of the seam allowance is a design decision. It can affect the garment's finish, durability, and bulk. For example, a curved neckline often uses a narrow seam allowance to help it lie flat, while a side seam might have a wider one for strength and potential fit adjustments.
Ralph Pink, Author at PatternLab
This article from PatternLab provides a concise explanation of seam allowance and its role in creating basic blocks.
Read the introductory sections, What is Seam Allowance? and "Its Use in Basic Blocks," to solidify your understanding of this concept.
Standard Seam Allowances for a Bodice Block
For a toile (a test garment made from muslin), we use a set of standard seam allowances that provide enough room for sewing and for making small adjustments during a fitting. Here are the industry-standard measurements we'll be using for your bodice block:
- Side Seams & Center Back (if seamed): 1.5 cm (or 5/8 inch). This is a common standard, providing strength and room for adjustment.
- Shoulder Seams & Armholes: 1 cm (or 3/8 inch). A slightly narrower allowance reduces bulk in these curved areas.
- Neckline: 1 cm (or 3/8 inch). We'll keep this consistent, but for finer fabrics, it could be as narrow as 0.6 cm (1/4 inch).
- Waistline/Hem: 1.5 cm (or 5/8 inch).
- Center Front: 0 cm. This edge will be placed on the fold of the fabric to create a single, symmetrical front piece, so it requires no seam.
Throwback Thursday: How to add seam allowance to a sewing pattern
The In the Folds blog offers practical advice and a useful reference chart.
Read the sections "How do I add seam allowance?" and "Before getting started." Then, take a look at the downloadable chart under the heading "Standard seam allowances" for a broader overview of how allowances can vary.
The Method: Adding Seam Allowance
You will need a sharp pencil, your pattern paper, a clear ruler, and a French curve ruler. The process involves measuring out from your stitch line and drawing a new, parallel line which will become your cutting line.
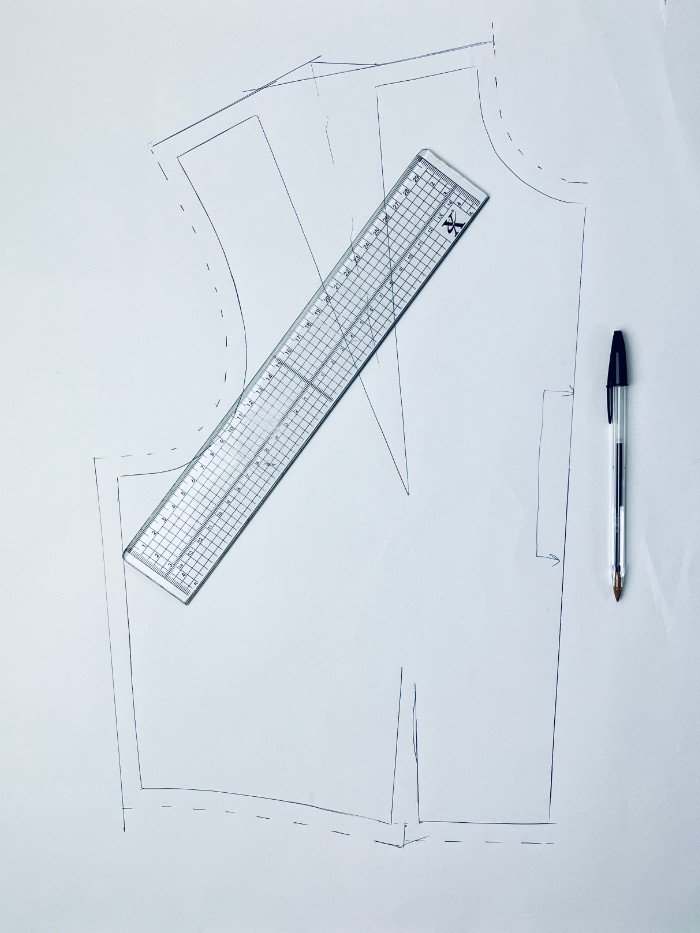
1. Adding to Straight Edges
For straight lines like the shoulder seam and parts of the side seam, the process is straightforward.
Throwback Thursday: How to add seam allowance to a sewing pattern
This section demonstrates the basic technique using a ruler.
Follow the three images in this section, starting from this description, to see how to align your ruler with the stitch line and draw the new cutting line.
2. Adding to Curved Edges
For curves like the neckline and armhole, you'll use a pivot-and-connect technique.
Throwback Thursday: How to add seam allowance to a sewing pattern
This guide shows you how to handle curves accurately.
First, read the section that begins after the heading "After marking the side seam...", which explains how to mark points along a curve. Then, skip to the section starting with "Now to do something about those broken lines," which explains how to use a French curve to connect your marks into a smooth, continuous line.
3. Handling Darts
Darts require special attention to ensure the pattern pieces will meet correctly after sewing.
- Waist Darts: The seam allowance simply follows the waistline, creating a V-shape over the dart opening. The In the Folds article you just reviewed shows this clearly in its section on adding seam allowance to the waistline.
- Side Bust Dart: This is the most critical one. You must fold the dart closed before adding the seam allowance to the side seam. This ensures that when the dart is sewn, the side seam will be a straight line.
How To Add Seam Allowance | Pattern Cutting | Fashion Design
This video from The Design Diary shows the essential technique for handling a dart before adding seam allowance. Although it demonstrates a shoulder dart, the principle is identical for your side bust dart.
Watch the segment from the beginning, where the presenter folds the paper dart closed and uses a tracing wheel to mark the true cutting line. You can achieve the same result by pressing hard with a pencil. When you unfold the paper, you'll see a V-shape at the top of the dart. This is the correct shape for your cutting line.
Applying Seam Allowance to Your Bodice
Now, let's apply these techniques to your front and back sloper pieces.
Front Bodice Block:
- Center Front: Write "CUT ON FOLD" along this edge. Do not add any seam allowance.
- Neckline & Armhole: Add a 1 cm (3/8") seam allowance using the pivot-and-connect method for curves.
- Shoulder Seam: Add a 1 cm (3/8") seam allowance using the straight-line method.
- Side Seam:
- First, fold your side bust dart closed, folding the excess paper downwards towards the waist.
- Add a 1.5 cm (5/8") seam allowance to the entire side seam, drawing the line straight across the folded dart.
- Unfold the dart. You will now have the correct V-shape at the cutting line.
- Waistline: Add a 1.5 cm (5/8") seam allowance, following the shape of your waistline and waist dart.
Back Bodice Block:
- Neckline, Armhole, Shoulder, Side Seam, Waistline: Add the same seam allowances as you did for the front piece.
- Center Back: You have a design choice here. For a test garment, it's most useful to have a center-back opening for a zipper.
How to Add Seam Allowance to a Bodice Block with a Zip (TIPS and HACKS) | Pattern Making #CreatedIAm
This video from CreatedIAm clearly explains the options for the center back seam.
Watch the segment from this section. The presenter details three scenarios for the center back: Cutting on the fold (no seam allowance). Adding a standard seam (1 cm). Adding a wider seam for a zipper (1 inch / 2.5 cm).
For your toile, I recommend adding a 2.5 cm (1 inch) seam allowance to the center back edge. This wider allowance provides more flexibility when fitting and makes it easier to install a test zipper.
Conclusion
You have now transformed your perfected stitch lines into a complete, usable pattern by adding cutting lines. This step, while technical, is what makes sewing possible, bridging the gap between the 2D pattern and the 3D garment.
Key Takeaways:
- Seam allowance is the crucial margin between your stitching line and the fabric's cut edge.
- Standard widths vary by seam type to manage bulk and provide strength (e.g., 1 cm for armholes, 1.5 cm for side seams).
- The technique involves measuring out from the stitch line and drawing a parallel cutting line, using a pivoting method for curves.
- For darts that end in a seam (like your side bust dart), you must fold the dart closed before adding the seam allowance to true the cutting line.
- The center back seam allowance can be varied depending on whether you plan a seam, a zipper, or no opening at all.
Your pattern pieces are nearly complete. In our final lesson, you will add the essential pattern markings—grainlines, notches, and labels. These markings are the "instructions" on the blueprint, guiding you on how to correctly place, cut, and assemble the fabric pieces.
Can't find a good explanation? Sign up and we'll make it for you
Sign up