
Good to see you again. In the previous lesson, you installed Visual Studio Community and the Desktop development with C++ workload. Now you will use that setup for its first practical purpose: creating a ready-made C++ console project, confirming that it builds successfully, and running it.
A console application is a program that communicates through a text-based terminal window. It is an ideal starting point because you can focus on the program’s behavior without also managing buttons, windows, or graphics. By the end of this lesson, you will have a small project on your computer that displays its first message.
Create your first console project
Open Visual Studio Community. On the start window, select Create a new project.
If Visual Studio is already open with no project loaded, you can also use File > New > Project.
In the Create a new project dialog:
- Set Language to C++.
- Set Platform to Windows if that filter is available.
- Find and select Console App.
- Confirm that the selected template has the tags C++, Windows, and Console.
- Select Next.
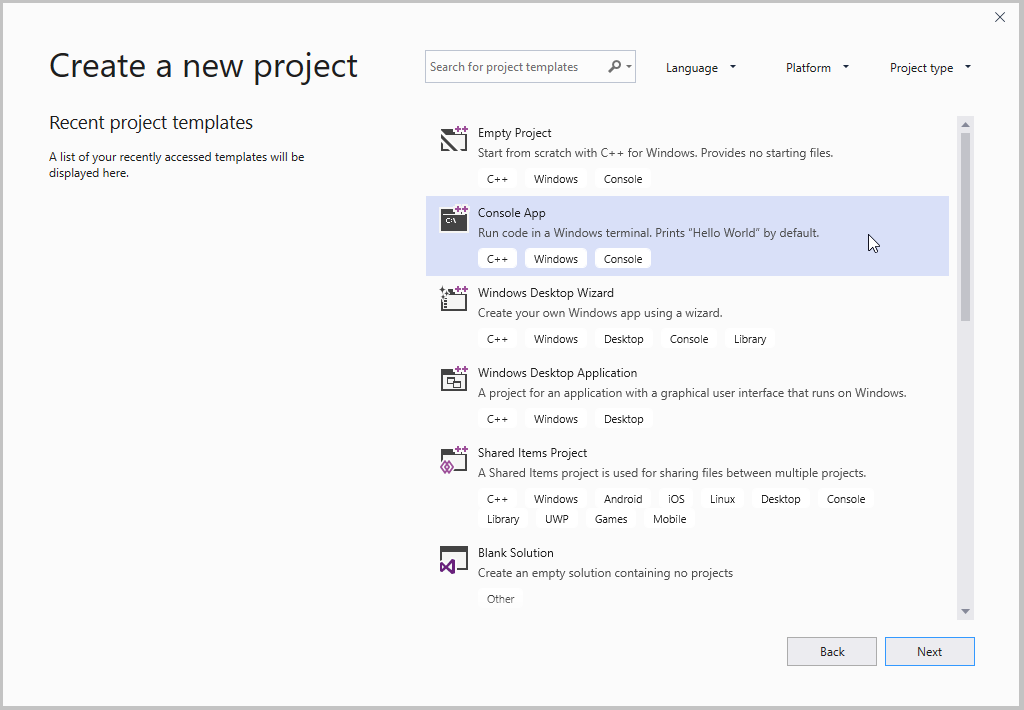
Be careful not to choose Empty Project for this lesson. An empty project is useful later, but it begins without a source file or starter program. The Console App template creates those pieces for you, which lets you verify your environment immediately.
Create a C++ console app project
Read Microsoft Learn’s project-creation walkthrough to see the same Visual Studio choices in context. It also introduces the distinction between a project and a solution.
In the section “Create your app project,” follow the instructions from opening File > New > Project through choosing Create. Use the C++ Console App, rather than the alternative Empty Project route described later. After creating your own project, read the generated-project explanation to recognize what Visual Studio has set up for you.
Name and locate the project
Visual Studio next shows Configure your new project. Enter the following name:
FirstConsole
You may choose another name, but use letters and numbers only for now. Avoid spaces and punctuation until project naming feels more familiar.
The Location field determines where Visual Studio stores your work. Choose a location you can find again, such as the default Visual Studio projects folder under your Documents folder. Do not save projects in temporary folders such as Downloads.
Select Create.
Visual Studio creates two related organizational units:
- A project holds the source files and settings needed to build one program.
- A solution is a container that can hold one or more projects.
For now, your solution contains exactly one project: FirstConsole. Later, when programs become larger, the project and solution structure will make it easier to manage files and settings.
After a short wait, the main Visual Studio window opens. You should see a C++ source file in the editor, commonly named FirstConsole.cpp. The precise comments and formatting can vary by Visual Studio version, but the template supplies a small program that prints a greeting.
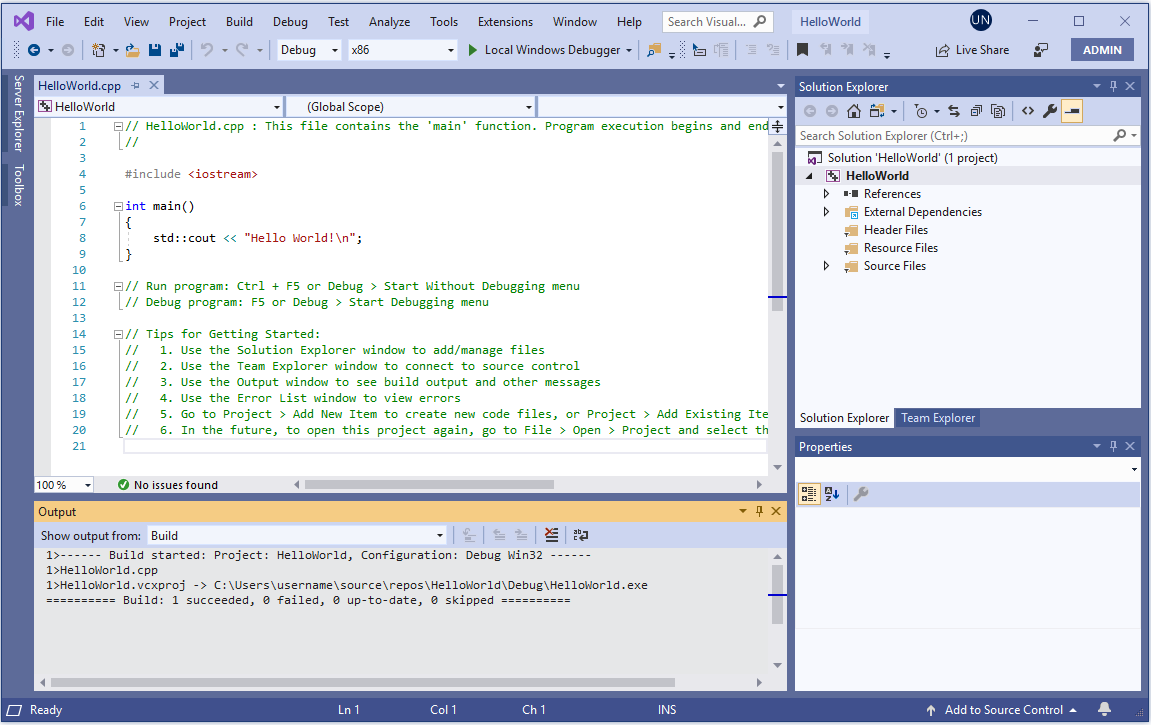
You do not need to understand every line of the generated program yet. The important observation is that the editor contains the program’s text, and Solution Explorer lists the files belonging to your project. The next lessons will unpack the code itself.
Build: check that the program can be made runnable
Before running the program, explicitly build it:
- On the menu bar, select Build.
- Select Build Solution.
- Look at the Output window, usually along the bottom of Visual Studio.
A successful build reports a result similar to:
Build: 1 succeeded, 0 failed
The wording and number of projects may differ slightly, but the key fact is that the build has succeeded and has zero failures.
At this stage, think of building as Visual Studio checking and preparing your program for Windows. The build command does not display the program’s greeting; it only prepares the program to run. In the next lesson, you will look more closely at the different files and products involved in this process.
If the Output window is not visible, select View > Output. You may also see an Error List window. A successful build should not show errors.
Run the console application
Now run the program without attaching the debugger:
- Select Debug on the menu bar.
- Choose Start Without Debugging.
The shortcut is Ctrl+F5. This is worth remembering because you will use it constantly while learning.
A terminal or console window opens and displays the message from the starter program, typically:
Hello World!
Visual Studio usually adds a message such as “Press any key to close this window . . .” after your program finishes. Press any key to return to Visual Studio.
How to Run C++ on Microsoft Visual Studio 2022 | Amit Thinks
Watch Amit Thinks demonstrate the exact project-creation and first-run sequence in Visual Studio 2022. Use it as a visual check if your own Visual Studio layout feels unfamiliar.
Watch project creation to see the C++ Console App template selected, named, and generated. Then watch first execution to see the default Hello World program launched. The video uses the Local Windows Debugger button; for this lesson, use Ctrl+F5 or Debug > Start Without Debugging so you clearly distinguish a normal run from debugging.
A routine you can repeat
For each small program you create in this course, use this working routine:
- Open the project in Visual Studio.
- Make or review a change in the
.cppsource file. - Save with Ctrl+S.
- Build with Build > Build Solution.
- Read the build result in the Output window.
- Run with Ctrl+F5.
- Compare the console’s output with what you expected.
Visual Studio may automatically build a project when you try to run it, but explicitly building first is a valuable habit. It separates two questions:
- Can Visual Studio prepare this program successfully?
- When it runs, does the program behave as intended?
Later, the debugger will help investigate programs that build successfully but behave incorrectly. For now, successful building plus the visible Hello World! message is your confirmation that the C++ setup works end to end.
If you get stuck
You cannot find the C++ Console App template
First clear or adjust the filters near the top of the template dialog. Look specifically for the template tagged C++, Windows, and Console.
If it still does not appear, the C++ workload may not be installed correctly:
- Close Visual Studio.
- Open Visual Studio Installer from the Windows Start menu.
- Find Visual Studio Community and choose Modify.
- Select Desktop development with C++ under Workloads.
- Choose Modify, allow the installation to finish, then restart Visual Studio.
A console window opens and disappears too quickly
Use Debug > Start Without Debugging or Ctrl+F5, not the green play button or F5. Starting without debugging normally keeps the console open until you press a key.
The build says it failed
Do not delete and recreate the project immediately. Open View > Output, select Build in the Output window’s dropdown if necessary, and read the first message marked as an error. At this point, if you have not edited the generated starter code, a failed build is more likely to be an installation or configuration issue than a C++ mistake.
Visual Studio looks different from the screenshots
That is normal: Visual Studio changes its layout and labels across releases. The stable landmarks are the Build menu, Debug menu, Solution Explorer, source-code editor, and Output window.
Completion check
Before finishing, verify each item:
- I created a project using the template tagged C++, Windows, and Console.
- I named and created a console project.
- I used Build > Build Solution and saw a successful result.
- I ran the program with Ctrl+F5 or Start Without Debugging.
- I saw the starter program’s output in a console window.
You now have a working C++ project and a repeatable build-and-run workflow. Next, you will look behind the scenes at what source code, compiler output, and the executable each mean in the C++ build process.
Can't find a good explanation? Sign up and we'll make it for you
Sign up