
Welcome to your first C++ lesson. Over this first module, you will set up a Windows programming environment and use it to build small console programs. The immediate goal is practical: install the tools needed to write, compile, and run C++.
You will use Visual Studio Community, Microsoft’s free full development environment for individual learners. This is different from Visual Studio Code, a lighter editor that requires a separate setup path. For this course, install Visual Studio Community and select the Desktop development with C++ workload.
Plan for about 20–30 minutes of active work; the download and installation itself may take longer depending on your connection and computer.
What you are installing
A C++ program is written as text, but Windows cannot run that text directly. Visual Studio gives you the tools that will later turn your C++ source code into a runnable program.
Three names are worth separating:
- Visual Studio Community is the application you will open to write and manage C++ programs.
- Visual Studio Installer is the setup application that installs Visual Studio and lets you add or remove features later.
- A workload is a preselected bundle of tools for a particular kind of development.
The workload we need is Desktop development with C++. It supplies the core Microsoft C++ toolchain and Windows desktop-development support required for the console projects in this course. You do not need game development, Linux development, mobile development, or individual optional components at this stage.
Before starting, ensure that Windows updates are not waiting for a restart and that you have sufficient free disk space. Installation can be large, so do not start it if your computer is nearly full. If this is a school or work-managed computer, you may need an administrator’s permission to install software.
Install C and C++ support in Visual Studio | Microsoft Learn
Read Microsoft Learn’s official installation guidance first. It explains the preparation checklist, identifies the correct Community edition use case, and shows the exact workload selection that matters for this course.
In Step 1 – Prepare your computer for Visual Studio, read the preparation checklist, especially the update, restart, and disk-space advice. Then read Step 2 – Download Visual Studio and Step 3 – Install the Visual Studio Installer. Start with the download instruction, then follow the directions for running the downloaded setup file and accepting the permission prompt. Finally, in Step 4 – Choose workloads, locate the tile named Desktop development with C++. Read the key workload instruction and the short paragraph immediately after it. Finish with the sentence beginning the install step.
Download and start the installer
Follow these steps on your Windows computer:
- Go to the official Visual Studio download page through the Microsoft Learn guide.
- Find Visual Studio Community and choose Free download. Community is the appropriate edition for individual learning and personal projects.
- Your browser downloads a small setup program, often named
VisualStudioSetup.exe. - Open your Downloads folder and double-click that file.
- If Windows displays a User Account Control dialog asking whether to allow the app to make changes, choose Yes.
- The Visual Studio Installer opens. Read and accept the license and privacy terms, then select Continue.
The small setup download is not the entire programming environment. Its job is to launch the Installer, which downloads the selected tools. This is why selecting the correct workload is the important decision.
Select the C++ workload
When the Installer reaches the Workloads tab, find the tile titled Desktop development with C++ and select its checkbox.
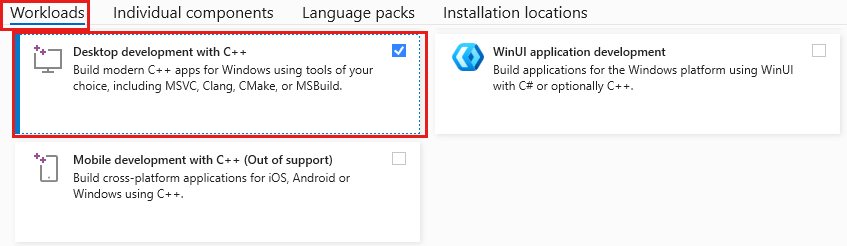
Use the screenshot as a visual checkpoint:
- You should be on the Workloads tab, not Individual components.
- The Desktop development with C++ tile should display a checkmark.
- The right-side Installation details panel may list included components and optional components. Leave the default choices alone for now.
- Select Install at the lower-right of the Installer window.
Do not worry if the Installer screen looks slightly different from the screenshot; Microsoft updates Visual Studio periodically. The decisive detail is the exact workload name: Desktop development with C++.
Other C++-related workloads serve other targets:
| Workload | Intended use | Needed now? |
|---|---|---|
| Desktop development with C++ | Windows console and desktop programs | Yes |
| Game development with C++ | Game engines and graphics tools | No |
| Linux development with C++ | Building C++ programs for Linux | No |
| Mobile development with C++ | Older mobile/cross-platform workflows | No |
Selecting more workloads does not make a beginner C++ setup “better”; it mainly uses additional storage and makes the environment more complicated. Start with the one that directly matches the projects you will build.
Let installation finish
After choosing Install, Visual Studio downloads and configures its components. The duration varies with network speed, available disk space, and computer performance. You can leave the Installer running while it works, but avoid shutting down or restarting the computer during installation.
When it completes, the Installer should show that Visual Studio Community is installed and offer a Launch button. Select Launch.
On its first launch, Visual Studio may ask you to:
- sign in with a Microsoft account;
- choose a color theme;
- select general development settings.
Follow the prompts. The default settings are fine. Sign-in requirements and screens can vary by Visual Studio version, but they do not change the C++ workload you installed.
For today, you do not need to create a project yet. Reaching the Visual Studio start window confirms that the main application launches successfully. The next lesson will use the Create a new project option there.
If something did not work
Most setup problems have a straightforward recovery path.
The Installer cannot start or Windows blocks it.
Make sure you downloaded it from Microsoft’s official Visual Studio page. If Windows asks for permission, choose Yes. On a managed computer, ask the device administrator rather than attempting to bypass restrictions.
The C++ project templates are missing later.
Open Visual Studio Installer from the Start menu. Find your installed Community edition, choose Modify, return to Workloads, check Desktop development with C++, and select Modify or Install to add it.
You selected the wrong workload.
You do not need to uninstall everything. Use the same Modify route in Visual Studio Installer to add the correct workload afterward.
The installation needs more space or fails midway.
Free disk space, apply pending Windows updates, restart Windows, and run the Installer again. The official preparation checklist in the reading is the best first reference for these issues.
Installation checklist
Before moving on, confirm all four statements are true:
- I downloaded Visual Studio Community, not Visual Studio Code or a third-party installer.
- I opened the Visual Studio Installer successfully.
- I selected Desktop development with C++ on the Workloads tab.
- Installation completed, and I can launch Visual Studio Community.
You now have a suitable C++ environment on Windows. The important choice was the Desktop development with C++ workload; it equips Visual Studio to compile the programs you will begin writing next. In the next lesson, you will create a C++ console project, build it, and run it for the first time.
Can't find a good explanation? Sign up and we'll make it for you
Sign up