
Good to see the Expo starter app running on both your browser and Android device. You now have a project worth protecting: the next task is to give it a local history with Git.
Today you will record a small, meaningful project change, inspect exactly what Git is about to save, and view that saved change afterward. This is entirely local to your Windows laptop: Git does not need GitHub or an internet connection to create commits. Plan for about 40 minutes.
A local history for your app
When you build a social app, you will change many files repeatedly. Git keeps a structured record of those changes so that you can answer practical questions later:
- What did I change?
- Which files belong in this small piece of work?
- What did the project look like before this change?
- When did I add a particular feature or fix?
A Git repository is the local database that stores this history. It lives inside a hidden .git folder in your project. Do not edit, move, or delete that folder manually.
A commit is one saved checkpoint in the repository. It records the selected version of your files at that moment, plus a concise message explaining the purpose of the checkpoint.
Git gives you an intentional workflow:
- Edit files in the project folder.
- Inspect what changed.
- Stage only the changes that belong in the next checkpoint.
- Inspect the staged version.
- Commit it with a useful message.
The staging area may initially feel like an extra step, but it prevents accidental commits. For example, later you may be working on a profile screen while also correcting a typo elsewhere. Staging lets those become two understandable commits rather than one mixed record.
The following video gives a useful visual introduction to the working folder, staging area, and local repository. Its presenter uses a different terminal, but the Git concepts and commands are the same in PowerShell.
Git Tutorial for Beginners: Learn Git in 1 Hour
Watch “Git Tutorial for Beginners: Learn Git in 1 Hour” from Programming with Mosh to see the core local Git workflow before applying it to your Expo project.
Watch the workflow model for the distinction between the working directory, staging area, and repository. Then watch the practical example to see git status, git add, and git commit -m used together. Focus on the idea that a commit contains only the version that was staged.
The three places Git compares
Keep this model in mind while you work:
| Place | What it contains | Git command you will use |
|---|---|---|
| Working directory | The files currently on your laptop, including unsaved Git changes | git status, git diff |
| Staging area | The exact changes selected for the next commit | git add, git diff --staged |
| Repository | Previously committed checkpoints stored locally in .git | git log, git show |
Two details are especially important:
- Running
git adddoes not permanently save anything. It prepares the current version of a file for the next commit. - If you edit a file after staging it, you must run
git addagain to stage the newer version.
Git’s names can be precise but initially unfamiliar:
- Untracked: a new file Git sees but has not been asked to include.
- Modified: a tracked file differs from its most recent committed or staged version.
- Staged: a version of a file has been selected for the next commit.
- Clean: the working directory has no unrecorded changes.
Check the repository before changing anything
Open your social-app folder in VS Code. Then select Terminal, New Terminal.
Confirm you are in the project folder:
pwd
The path should end in social-app. If it does not, use the folder path from the previous lesson:
cd "$HOME\Documents\social-app-learning\social-app"
Now ask Git for the project’s current state:
git status
There are three likely outcomes.
Outcome 1: Git reports a clean working tree
You may see wording similar to:
On branch main
nothing to commit, working tree clean
This means the Expo project already has a local repository and its current files match the latest commit. This is common because project-creation tools often initialize Git automatically.
Continue to the next section.
Outcome 2: Git lists files as changed or untracked
Do not immediately run git add ..
Read the filenames first. They may be legitimate changes left from an earlier session. Today, you will stage only the project-note file you create, so existing work remains separate and safe.
Outcome 3: Git says this is not a repository
If you see an error containing not a git repository, initialize Git in the current folder:
git init
Then run:
git status
A newly initialized repository will see the Expo starter files as untracked. Before taking an initial snapshot, confirm that node_modules is not listed. That folder contains downloaded packages and should normally be excluded by the project’s .gitignore file.
If the listed files look like the expected Expo project files, create the initial local checkpoint:
git add .
git diff --staged --stat
git commit -m "Create Expo starter baseline"
The --stat option gives a compact list of the staged files and line counts, rather than printing the full contents of every starter file.
If Git refuses the commit because it does not know your identity, check the values configured during the tools-setup lesson:
git config --global user.name
git config --global user.email
If either command produces no value, set it before committing:
git config --global user.name "Your Name"
git config --global user.email "you@example.com"
Use a name and email address you are comfortable attaching to future project history. The email is only stored locally for now, but commits may later be shared with a remote repository.
Record one small project decision
For your first deliberate change, create a plain text project note. It is not app code, so it is a low-risk way to practice the complete Git cycle.
In the VS Code Explorer:
- Select the New File button.
- Name the file
PROJECT_NOTES.md. - Add the following content:
# Social App Notes

First local Git checkpoint: the Expo starter runs on web and Android.
- Save the file with
Ctrl+S.
The .md ending means Markdown, a simple format commonly used for project notes and documentation.
Now return to the terminal and inspect the status:
git status
You should see PROJECT_NOTES.md under Untracked files. Git can see the file, but it is not yet part of any commit.
For a compact status view, run:
git status --short
The expected line is similar to:
?? PROJECT_NOTES.md
The two question marks mean “untracked.”
At this point, running git diff will usually show nothing. That is expected: Git cannot compare a completely untracked file with a prior Git version because it has not been staged or committed yet. Open the file in VS Code to review its contents before staging it.
Stage, inspect, and commit the intended change
Stage only the note file:
git add PROJECT_NOTES.md
Check its new state:
git status --short
You should now see something like:
A PROJECT_NOTES.md
The A means added, and its position on the left indicates that the file is staged.
Before committing, inspect the exact content that will be recorded:
git diff --staged
For this new file, Git displays a diff. Some technical header lines appear first; you do not need to memorize them. Focus on the actual content lines:
- Lines beginning with
+are being added to the next commit. - You should see the heading and sentence you wrote.
- Nothing unexpected should appear.
This distinction will become a reliable habit:
| Command | What it compares |
|---|---|
git diff | Unstaged working-directory changes against the staging area |
git diff --staged | Staged changes against the most recent commit |
When the staged content looks correct, create a local commit:
git commit -m "Add project notes"
The message describes the change in a short, action-oriented form. Avoid vague messages such as update, changes, or stuff. A future you should be able to scan the history and understand why each checkpoint exists.
Finally, inspect the status again:
git status
If there were no earlier changes, Git should report a clean working tree. If there were earlier changes, PROJECT_NOTES.md should no longer appear as changed; Git may still list the earlier files, which you intentionally left alone.
Inspect the local history you just created
A commit is only useful if you can find and inspect it later. Start with a compact history:
git log --oneline -n 5
You should see a line similar to:
a1b2c3d Add project notes
Your letters and numbers will be different. They are an abbreviated form of Git’s unique commit identifier. The newest commit appears first.
To inspect a concise summary of the latest commit, run:
git show --stat HEAD
HEAD means “the currently checked-out latest commit.” The output should identify the commit message and show that PROJECT_NOTES.md was added.
To view its exact recorded lines, run:
git show HEAD
This is the same type of diff you checked before committing, but now it is evidence of what was actually saved in the repository. If Git opens the output in a pager and you see (END) at the bottom, press q to return to the terminal.
Your basic local Git routine is now:
- Use
git statusto identify the current state. - Use
git diffto inspect unstaged edits. - Use
git addfor only the files intended for one checkpoint. - Use
git diff --stagedto review what will be saved. - Use
git commit -mwith a descriptive message. - Use
git logandgit showto inspect history afterward.
Use the same workflow through VS Code
VS Code’s Source Control view is a graphical interface for the same local Git repository. Terminal commands and the VS Code interface always reflect the same project state.
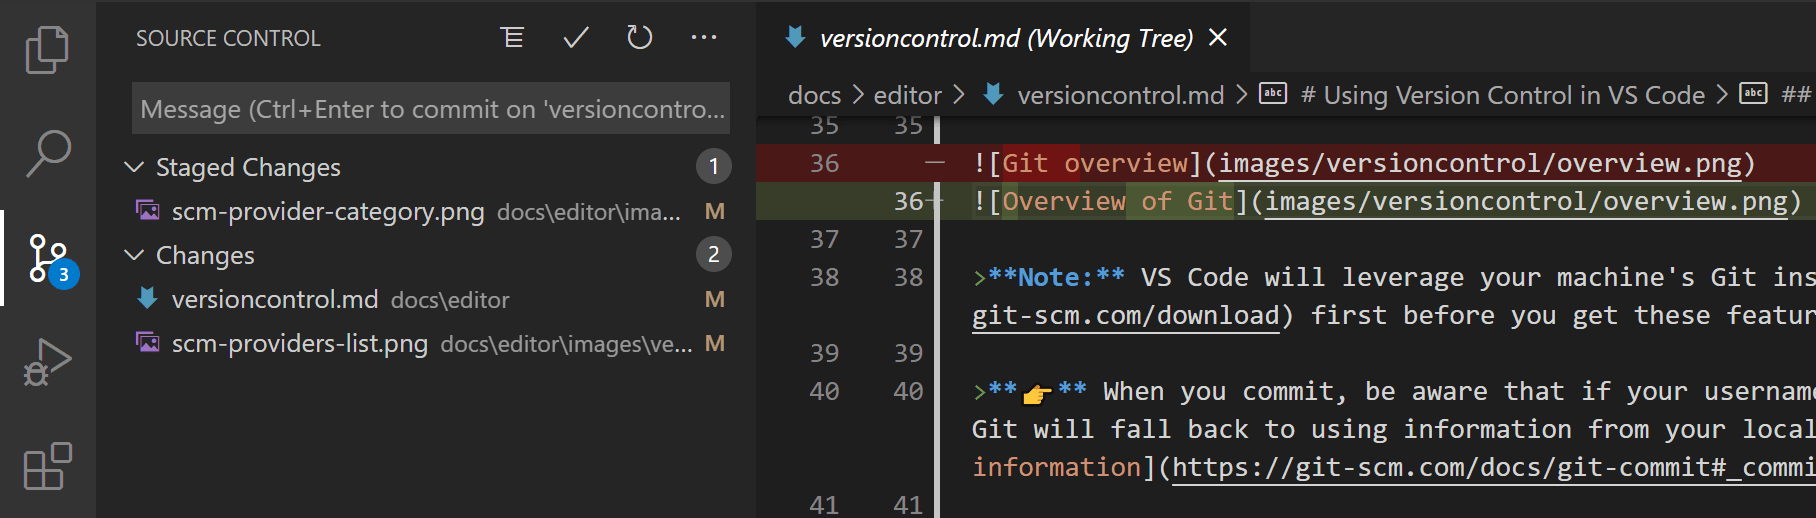
Open Source Control with the branching icon on VS Code’s left activity bar, or use:
Ctrl+Shift+G
While a file is unstaged, it appears in Changes. Selecting that file opens a diff view. For a new file, the content is generally shown as additions; for an edited file, red lines represent removed content and green lines represent added content.
You can stage a file by selecting its + icon. It then moves to Staged Changes. The terminal equivalent is:
git add FILE_NAME
After reviewing staged files, type a commit message in the Source Control message box and select Commit. The terminal equivalent is:
git commit -m "Your descriptive message"
Read the relevant parts of the official VS Code guide to connect the interface you see with the local Git workflow you just practiced.
Read the official Visual Studio Code guide to understand how the Source Control view, diff editor, and history views correspond to Git operations.
In the “Source control interface” section, read the interface overview and identify the Source Control view, Diff editor, and Source Control Graph. In “Common workflows,” read from the commit-message guidance to the end of that paragraph; relate the UI action to the git add and git commit commands you used. Finally, in “View commit history,” read the history options, noting that Timeline focuses on one file while the Source Control Graph shows the repository’s broader commit history.
For now, use either the terminal or VS Code’s Source Control view for a given operation. Do not try to stage and commit the same change twice. The important practice is always the same: review first, then commit only the intended change.
Key takeaways
Git now gives your Expo project a local, inspectable history. A commit is a saved checkpoint, not an automatic backup of every file currently on your laptop. The staging area is the review point where you choose exactly what belongs in that checkpoint.
The essential commands are:
git status
git diff
git add FILE_NAME
git diff --staged
git commit -m "Describe the change"
git log --oneline
git show HEAD
You have also created a first purposeful project record: the app starter has been tested on web and Android, and Git can show exactly when that note was added.
Next, you will begin the JavaScript foundations needed to turn this starter project into an app: variables and the primitive values they can hold.
Can't find a good explanation? Sign up and we'll make it for you
Sign up