
Welcome to the first module of your dental assisting course. Before chair positioning, instrument transfer, or evacuation technique can become efficient, the dental team needs a shared spatial map around the patient. In four-handed dentistry, that map is the clock concept.
By the end of this lesson, you should be able to label the operator’s zone, assistant’s zone, transfer zone, and static zone for a right-handed operator, explain what each zone is used for, and orient yourself correctly using the patient—not the clinician—as the clock face.
Build the clock around the patient
Imagine that the patient’s face is the center of an analog clock:
- 12 o’clock is above the patient’s head.
- 6 o’clock is toward the patient’s feet.
- The numbers remain fixed to the patient, even when you change where you are standing or seated.
This patient-centered reference is important. If you orient the clock from your own viewpoint instead, you can accidentally reverse the zones. The clock is not a description of the room layout; it is a consistent map for the clinical team working around the chair.
Watch “Clinician Clock Positions” from Amarillo College Dental Hygiene to see the patient-centered clock orientation before learning the four working zones.
Watch clock orientation. Focus on the fixed landmarks: the patient’s head at 12 o’clock and feet at 6 o’clock. The later portions of the video demonstrate specific operator positions; for this lesson, concentrate on establishing the clock reference.
A clock position is a particular place where a clinician sits, such as 9 or 11 o’clock. A zone is a broader area assigned a main role. Thus, a dentist may shift among several clock positions within the operator’s zone as the tooth or arch being treated changes.
The four zones for a right-handed operator
The standard four-handed layout shown here assumes a right-handed dentist/operator.
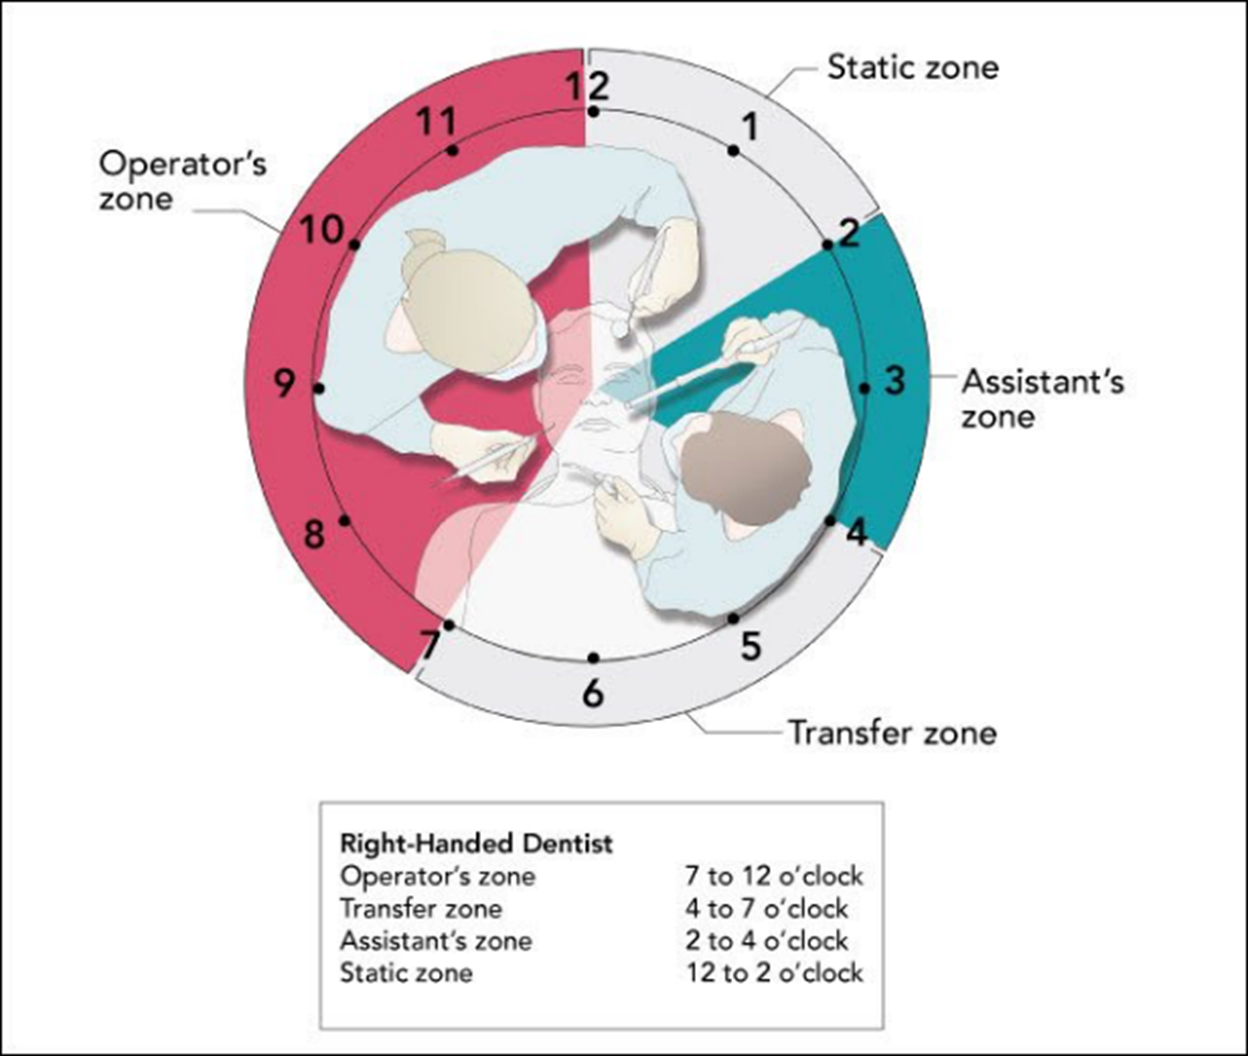
Starting at 12 o’clock and moving clockwise around the patient, the zones are:
| Zone | Clock range | Main purpose |
|---|---|---|
| Static zone | 12 to 2 o’clock | Holds the tray setup, materials, and small equipment needed during treatment |
| Assistant’s zone | 2 to 4 o’clock | Primary working position for the dental assistant |
| Transfer zone | 4 to 7 o’clock | Shared area for safe instrument and material exchanges |
| Operator’s zone | 7 to 12 o’clock | Working area for the dentist/operator |
The boundary times, such as 4 or 7 o’clock, are not precise lines on the floor. They are practical reference points. What matters is that both members of the team understand the intended role of each area and avoid reaching across one another unnecessarily.
Zones of Activity - The Concepts of Four-handed Dentistry Including ...
Read “Zones of Activity” from Dentalcare. It introduces the four zones, gives the right-handed clock ranges, and explains why the static zone functions as a setup area rather than an active working area.
In the section titled “Zones of Activity,” begin with the introductory explanation and study the right-handed diagram. Then continue to the paragraph immediately below the left-handed diagram, beginning “The operator’s zone for a right handed operator extends…” Read the discussion of movement and setup through the end of the section. Pay particular attention to the distinction between the assistant’s working position and the static zone’s role as a supply area.
What each zone means in practice
The names make more sense when connected to the team’s movements during a procedure.
Operator’s zone: 7 to 12 o’clock
The operator’s zone is the dentist’s working territory. It is the largest zone because the operator may need to change position for access and visibility depending on:
- whether treatment is on the maxillary or mandibular arch,
- whether the tooth is anterior or posterior,
- which surface is being treated, and
- the patient’s head position.
The dentist is not expected to remain at one clock number throughout an appointment. However, the dentist should remain within the operator’s zone rather than twisting toward a distant tray or reaching behind the assistant for supplies.
Assistant’s zone: 2 to 4 o’clock
The assistant’s zone is where the assistant is normally seated and performs chairside duties. From here, the assistant can observe the operative field, manage evacuation, retract when indicated, and anticipate the operator’s needs.
This zone is deliberately separate from the operator’s zone. Each person needs space for their legs, stool, arms, and instruments. Later in this module, you will work on stool height and neutral posture; for now, recognize that the assistant should not have to lean deeply into the static zone or cross over the patient to perform routine tasks.
Transfer zone: 4 to 7 o’clock
The transfer zone is the shared work area between the operator and assistant. It is used for passing instruments and materials during treatment.
Its purpose is safety as well as efficiency. A predictable transfer area lets the operator keep visual attention on the mouth and lets the assistant pass instruments without moving them over the patient’s face. The detailed mechanics of single-handed and two-handed transfers come in the next module, but the essential spatial rule begins here: transfers belong in the transfer zone.
Static zone: 12 to 2 o’clock
The static zone is often best understood as the setup zone. It is the area where the assistant places the procedure tray, materials, and small equipment that need to be accessible during treatment. Depending on the operatory design, it may also include counter space or items such as a curing light or timer.
“Static” does not mean irrelevant or unused. It means that this area is not intended to be a frequent crossing path for the operator and assistant. Keeping supplies organized here reduces the need for long reaches, torso twisting, and interruptions during treatment.
See the zones as a coordinated system
Consider a basic restorative procedure for a right-handed dentist. The dentist works somewhere between 7 and 12 o’clock, adjusting position as needed for visibility. The assistant remains primarily between 2 and 4 o’clock, close enough to support the procedure without crowding the operator. Instruments are exchanged in the 4-to-7 o’clock transfer area. Extra materials and equipment stay organized in the 12-to-2 o’clock static area until needed.
The point is not to make the team rigid. Good four-handed dentistry includes small adjustments for the tooth, procedure, patient anatomy, and equipment design. The zones provide a reliable default so that those adjustments do not become unnecessary reaching, collisions, or unsafe transfers.
Three distinctions are especially worth retaining:
- Operator and assistant zones are people-centered. They identify each person’s primary working territory.
- The transfer zone is action-centered. It is the predictable area for exchanges between team members.
- The static zone is supply-centered. It keeps prepared materials and equipment accessible without intruding into active work areas.
For left-handed operators, the zones are arranged as a mirror image of the right-handed setup. In a real clinic, follow the operator’s established arrangement and office protocol rather than assuming the right-handed clock ranges apply unchanged.
A short spatial rehearsal
Spend a few minutes with the diagram or an empty chair setup. First identify the patient’s head as 12 o’clock and feet as 6 o’clock. Then trace the four right-handed zones aloud, naming both the clock range and its purpose:
- 7 to 12: operator
- 2 to 4: assistant
- 4 to 7: transfer
- 12 to 2: static/setup
Finally, picture what belongs in each area: dentist, assistant, instrument exchange, and supplies. This verbal-plus-spatial rehearsal is useful because the clock concept needs to become automatic before you begin practicing transfers and positioning at chairside.
Key takeaways
Four-handed dentistry organizes activity around a clock centered on the patient’s face. For a right-handed operator, the operator’s zone is 7 to 12 o’clock, the assistant’s zone is 2 to 4 o’clock, the transfer zone is 4 to 7 o’clock, and the static zone is 12 to 2 o’clock.
The zones do more than label locations: they reduce unnecessary motion, protect the patient during transfers, preserve access to the oral cavity, and make the team’s work more predictable. In the next lesson, you will use this spatial map to position the dental chair and headrest appropriately for basic maxillary and mandibular procedures.
Can't find a good explanation? Sign up and we'll make it for you
Sign up