
Hello. In the previous lesson, you learned to organize the space around a patient using the clock concept: the operator works primarily from 7 to 12 o’clock, the assistant from 2 to 4 o’clock, instruments are exchanged through the transfer zone, and supplies remain in the static zone.
That spatial map only works when the patient is positioned well. Chair and headrest positioning determine whether the operator can see the treatment area without hunching, raising the shoulders, or reaching awkwardly—and whether the patient remains supported and comfortable. In this lesson, you will learn a dependable basic setup for the maxillary arch and the mandibular arch, plus the checks that tell you when a position needs adjustment.
Begin with three positioning goals
A dental chair position is not “correct” simply because the chair back looks flat or the headrest has been moved. It must accomplish three things at once:
- Patient support and comfort. The patient’s body, neck, and head are supported, and the patient can tolerate the position.
- Visibility and access. The oral cavity is placed where the operator can see and reach the intended arch.
- Neutral working posture. The team should not need to round the back, elevate the shoulders, or lean far forward to compensate for a poorly positioned patient.
The patient’s chair will generally be higher than the seated operator and assistant. As a basic ergonomic reference, the operator should be able to work with the treatment area near elbow level, without lifting the elbows or collapsing toward the patient.
Before reclining the chair, explain what you are about to do and make sure the patient is comfortably seated. When the chair is reclined, patients can slide downward. If that happens, their head no longer rests at the proper point on the headrest, restricting access and creating neck strain.
A useful setup check is this: ask the patient to slide up, if necessary, until the top of the head is near the upper edge of the headrest. Then adjust the headrest to support the head rather than allowing it to hang unsupported.
The basic difference: upper arch versus lower arch
The essential pattern is simple:
| Treatment area | Chair position | Head position | Main visual target |
|---|---|---|---|
| Maxillary arch | Supine or nearly flat | Chin up | Upper occlusal surfaces are close to perpendicular to the floor |
| Mandibular arch | Semi-supine, more upright than maxillary | Chin down | Lower occlusal surfaces are angled for direct viewing, often about 45 degrees to the floor in a basic setup |
The occlusal surfaces are the chewing surfaces of posterior teeth; on anterior teeth, the comparable edges are called incisal edges. These surfaces give the team a practical visual guide for positioning. Rather than memorizing a button setting on one model of dental chair, learn to observe the patient’s head, jaw, and tooth surfaces.
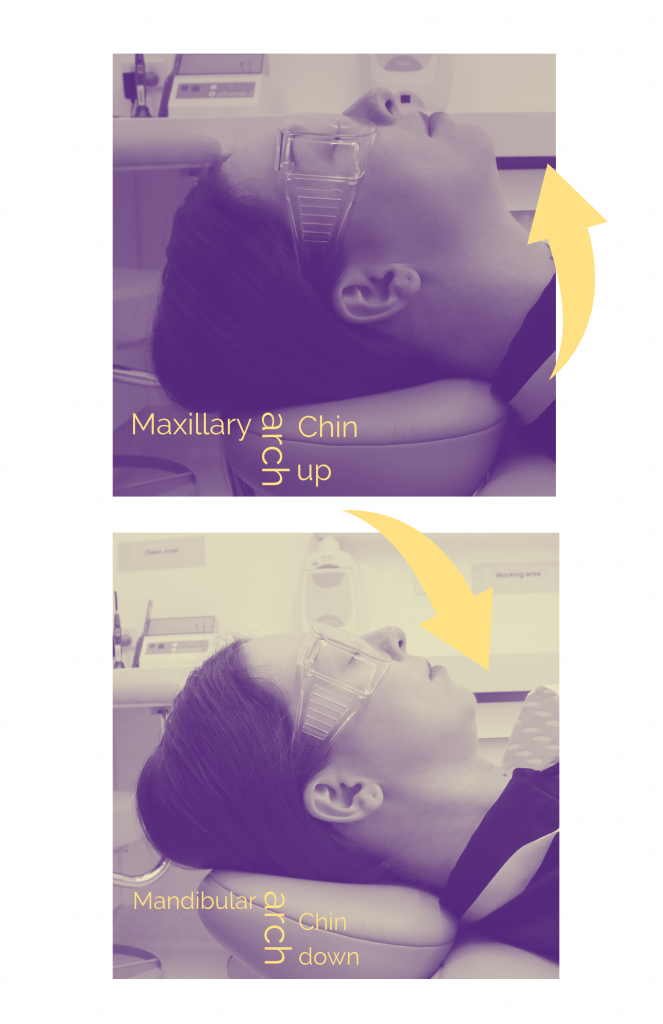
The image shows an important point: “chin up” and “chin down” describe the head orientation, not whether the entire chair is raised or lowered.
Maxillary procedures: recline and bring the chin up
For basic treatment in the maxillary arch, position the patient supine: lying back with the chair nearly parallel to the floor. The patient’s head, knees, and feet should be approximately level, and the head should not be significantly lower than the legs. A very head-down position can be uncomfortable and is not a routine starting position.
Once the chair is reclined, adjust the headrest into a chin-up position. This is a controlled upward tilt of the head, not forced neck extension. In a typical chin-up position:
- the chin and nose are approximately level;
- the head is fully supported by the headrest;
- the maxillary arch tips backward enough for the upper occlusal surfaces to be near perpendicular to the floor.
This orientation makes the upper teeth more visible, especially when the operator is seated behind or slightly behind the patient. Upper-arch work commonly relies on a mouth mirror for indirect vision, so steady head positioning is particularly important.
The assistant should watch for two common setup errors:
- The patient has slid down. The head is too low on the headrest, access is limited, and the patient may be bearing tension through the neck.
- The headrest is too flat. The patient remains reclined, but the maxillary arch does not rotate into a useful viewing position. The operator may respond by bending the neck and shoulders forward instead of requesting a headrest adjustment.
Operator and patient positioning – Dentistry Environment Essentials
Read this University of Queensland Pressbooks chapter for a concise clinical rationale for maxillary and mandibular positioning, including patient adaptations.
In the “Patient positioning” section, read the “Maxillary arch” subsection. Begin with the maxillary setup and connect the supine body position with the chin-up headrest adjustment. Then read the entire “Mandibular arch” subsection; pay particular attention to the ergonomic reason for correct working height. Finally, in “Normal variations requiring adaptations,” read the adaptation guidance through the end of that passage.
Mandibular procedures: sit the patient more upright and bring the chin down
For the mandibular arch, the patient is generally placed in a semi-supine position. In other words, the patient remains reclined, but is more upright than for maxillary treatment.
A basic instructional reference describes this as roughly a 45-degree semi-supine position. In practice, do not rely solely on a chair’s numbered display: different chair designs, patient body shape, and the particular tooth being treated can make the same displayed angle look different. Use the position of the lower arch and the operator’s posture as your guide.
Next, adjust the headrest so the patient is chin down:
- the chin is lower than the nose;
- the head and neck remain supported;
- the mandibular occlusal surfaces are brought into a useful working angle, commonly around 45 degrees to the floor in the basic setup.
Why not leave the head chin up for lower teeth? If the patient’s head is tipped too far back, the lower arch becomes harder to see directly. The operator often compensates by bending the neck, leaning toward the patient, or raising the arms. Proper mandibular positioning brings the teeth into view instead of asking the clinician’s body to chase them.
Think of the two positions as opposite headrest adjustments serving opposite viewing needs:
- For maxillary teeth, recline the patient and place the head chin up.
- For mandibular teeth, use a more upright semi-supine chair position and place the head chin down.
These are starting positions, not rigid rules that eliminate all later adjustment. During treatment, the dentist may ask for a modest head turn or small side tilt to improve access to a particular quadrant or tooth surface. Make only deliberate, comfortable adjustments, and return to a supported central position when the adjustment is no longer needed.
Use a repeatable chairside positioning sequence
A consistent sequence prevents the common mistake of changing several things at once and then not knowing what improved or worsened access.
For a basic procedure, use this order:
- Confirm the treatment area. Establish whether the dentist will work primarily in the maxillary or mandibular arch.
- Position the patient in the chair. Ensure the patient is centered, supported, and high enough in the chair that the head can rest near the top of the headrest.
- Set the chair-back position. Use nearly supine for maxillary treatment; use semi-supine for mandibular treatment.
- Set the headrest. Adjust chin up for maxillary treatment or chin down for mandibular treatment.
- Check comfort. Ask whether the patient feels secure and comfortable. Watch for neck strain, dizziness, coughing, or difficulty tolerating the reclined position.
- Check access and posture. The clinician should be able to approach the oral cavity without raised shoulders or a deeply bent neck. The assistant should also have room to sit in the assistant’s zone and manage suction without crowding the patient or operator.
Do not move the chair unexpectedly during treatment. Tell the patient before changing position, pause active instrumentation when appropriate, and follow the dentist’s direction and the office’s equipment protocol.
When the standard position must be adapted
The standard maxillary and mandibular positions are defaults, not substitutes for patient assessment. Some patients cannot comfortably tolerate full recline or a strongly extended neck.
Examples include patients with:
- vertigo or positional dizziness;
- certain respiratory or cardiac limitations;
- pregnancy-related discomfort in reclined positions;
- limited cervical mobility, kyphosis, or a pronounced forward-head posture;
- anxiety associated with lying back;
- mobility limitations that make it difficult to slide into position.
In these situations, support and communication matter more than achieving the textbook angle. A neck pillow or cervical support may improve comfort when permitted by office protocol. A patient who cannot remain supine may need treatment in a more upright position, sometimes requiring the operator to adjust their own posture or stand.
As an assistant, do not independently force a patient into a standard position when the patient reports discomfort. Inform the operator, support the patient safely, and follow the provider’s instructions. The goal remains the same: obtain the best feasible access while protecting patient comfort and clinician posture.
A brief chairside rehearsal
Using an empty chair, manikin, or mental walkthrough, rehearse the two setups slowly.
For the maxillary rehearsal, center the patient, recline the chair close to supine, check that the head is supported near the top of the headrest, and adjust to chin up. Look at the imagined upper occlusal surfaces and confirm that they face close to vertically.
For the mandibular rehearsal, raise the chair back into semi-supine, support the head near the top of the headrest, and adjust to chin down. Check that the imagined lower occlusal surfaces are presented for direct viewing and that the clinician could work with relaxed shoulders.
Say the position aloud as you set it: “Upper arch: supine, chin up” or “Lower arch: semi-supine, chin down.” This gives you a compact memory cue for practical sessions.
Key takeaways
Chair positioning is an ergonomic and patient-care skill, not just an equipment adjustment.
- For maxillary procedures, use a supine or nearly flat position with the headrest chin up.
- For mandibular procedures, use a semi-supine, more upright chair position with the headrest chin down.
- Keep the patient’s head supported near the upper edge of the headrest and correct any sliding before trying to improve visibility by changing your own body posture.
- Verify comfort, access, and neutral posture every time. Adapt the standard position when a patient’s medical condition, mobility, or comfort requires it.
Next, you will build on this positioning foundation by adjusting the assistant stool, body position, and working height to maintain a neutral posture throughout a procedure.
Can't find a good explanation? Sign up and we'll make it for you
Sign up