
Hello! Welcome to your final lesson in the Medical Instrumentation course.
In our last session, we explored the powerful role of machine learning in cleaning physiological signals, extracting features, and classifying states. We saw how ML provides the "intelligence" that turns raw data into actionable insights.
Today, we will tie everything together. This lesson addresses the learning outcome: Evaluate the design of a microprocessor-based system for a specific medical instrumentation application. We will assemble all the pieces we've studied—from sensors and amplifiers to filters and ML algorithms—into a complete, functional device. You'll learn to analyze and evaluate the design choices and trade-offs that engineers make when creating these systems.
This is the capstone lesson of the course, integrating concepts from every module. For your work at Neuraease, understanding how to evaluate a full system design is the critical step in moving from a concept to a robust, real-world product.
1. The Core Architecture of a Microprocessor-Based Medical Instrument
At its heart, nearly every modern medical instrument follows a similar architectural pattern. A central microprocessor or microcontroller orchestrates the entire process of measurement, processing, and communication.
Let's start with a classic, general representation of such an instrument.
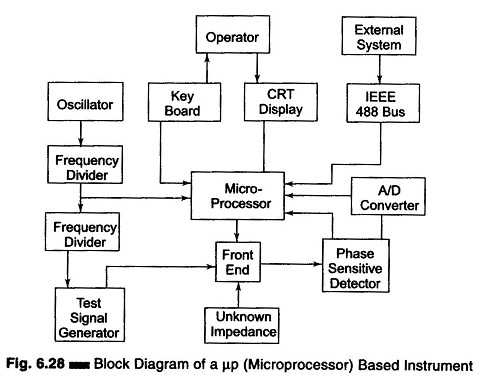
While this diagram is general, it establishes the key components:
- A central processor (Microprocessor/Microcontroller)
- Sensors and Analog Front-End (AFE) to capture the physiological signal.
- An Analog-to-Digital Converter (ADC) to digitize the signal.
- Memory (RAM/ROM/Flash) to store the program and data.
- Communication Interfaces (e.g., USB, Bluetooth, Wi-Fi) to transmit data.
- Power Management circuitry.
- Peripherals like displays and buttons for user interaction.
The following text provides a high-level overview of the design considerations and introduces the block diagrams of several real-world microprocessor-controlled medical devices.
MEDICAL MICROPROCESSOR SYSTEMS
The textbook 'MEDICAL MICROPROCESSOR SYSTEMS' provides an excellent overview of the general principles for designing these systems and shows several examples. We will focus on the parts most relevant to portable and wearable devices.
Please read the introduction to Section 2, 'Medical devices with microprocessor control' (page 18), and then skim Section 4.1, 'Patient monitor and portable medical meter' (starting on page 86). Pay attention to the block diagram for the portable medical meter (Fig. 4.1.3) and the description of its main subsystems (Analog input, Microcontroller, Communication, Power management).
The text highlights a crucial trade-off in system design: hardware vs. software. Functions can be implemented using dedicated hardware (e.g., a specialized filter chip), which is often faster but more expensive and less flexible, or in software on the microprocessor, which is more flexible but consumes processing cycles and development time.
Now, let's look at a more modern and specific architecture for a wearable device.
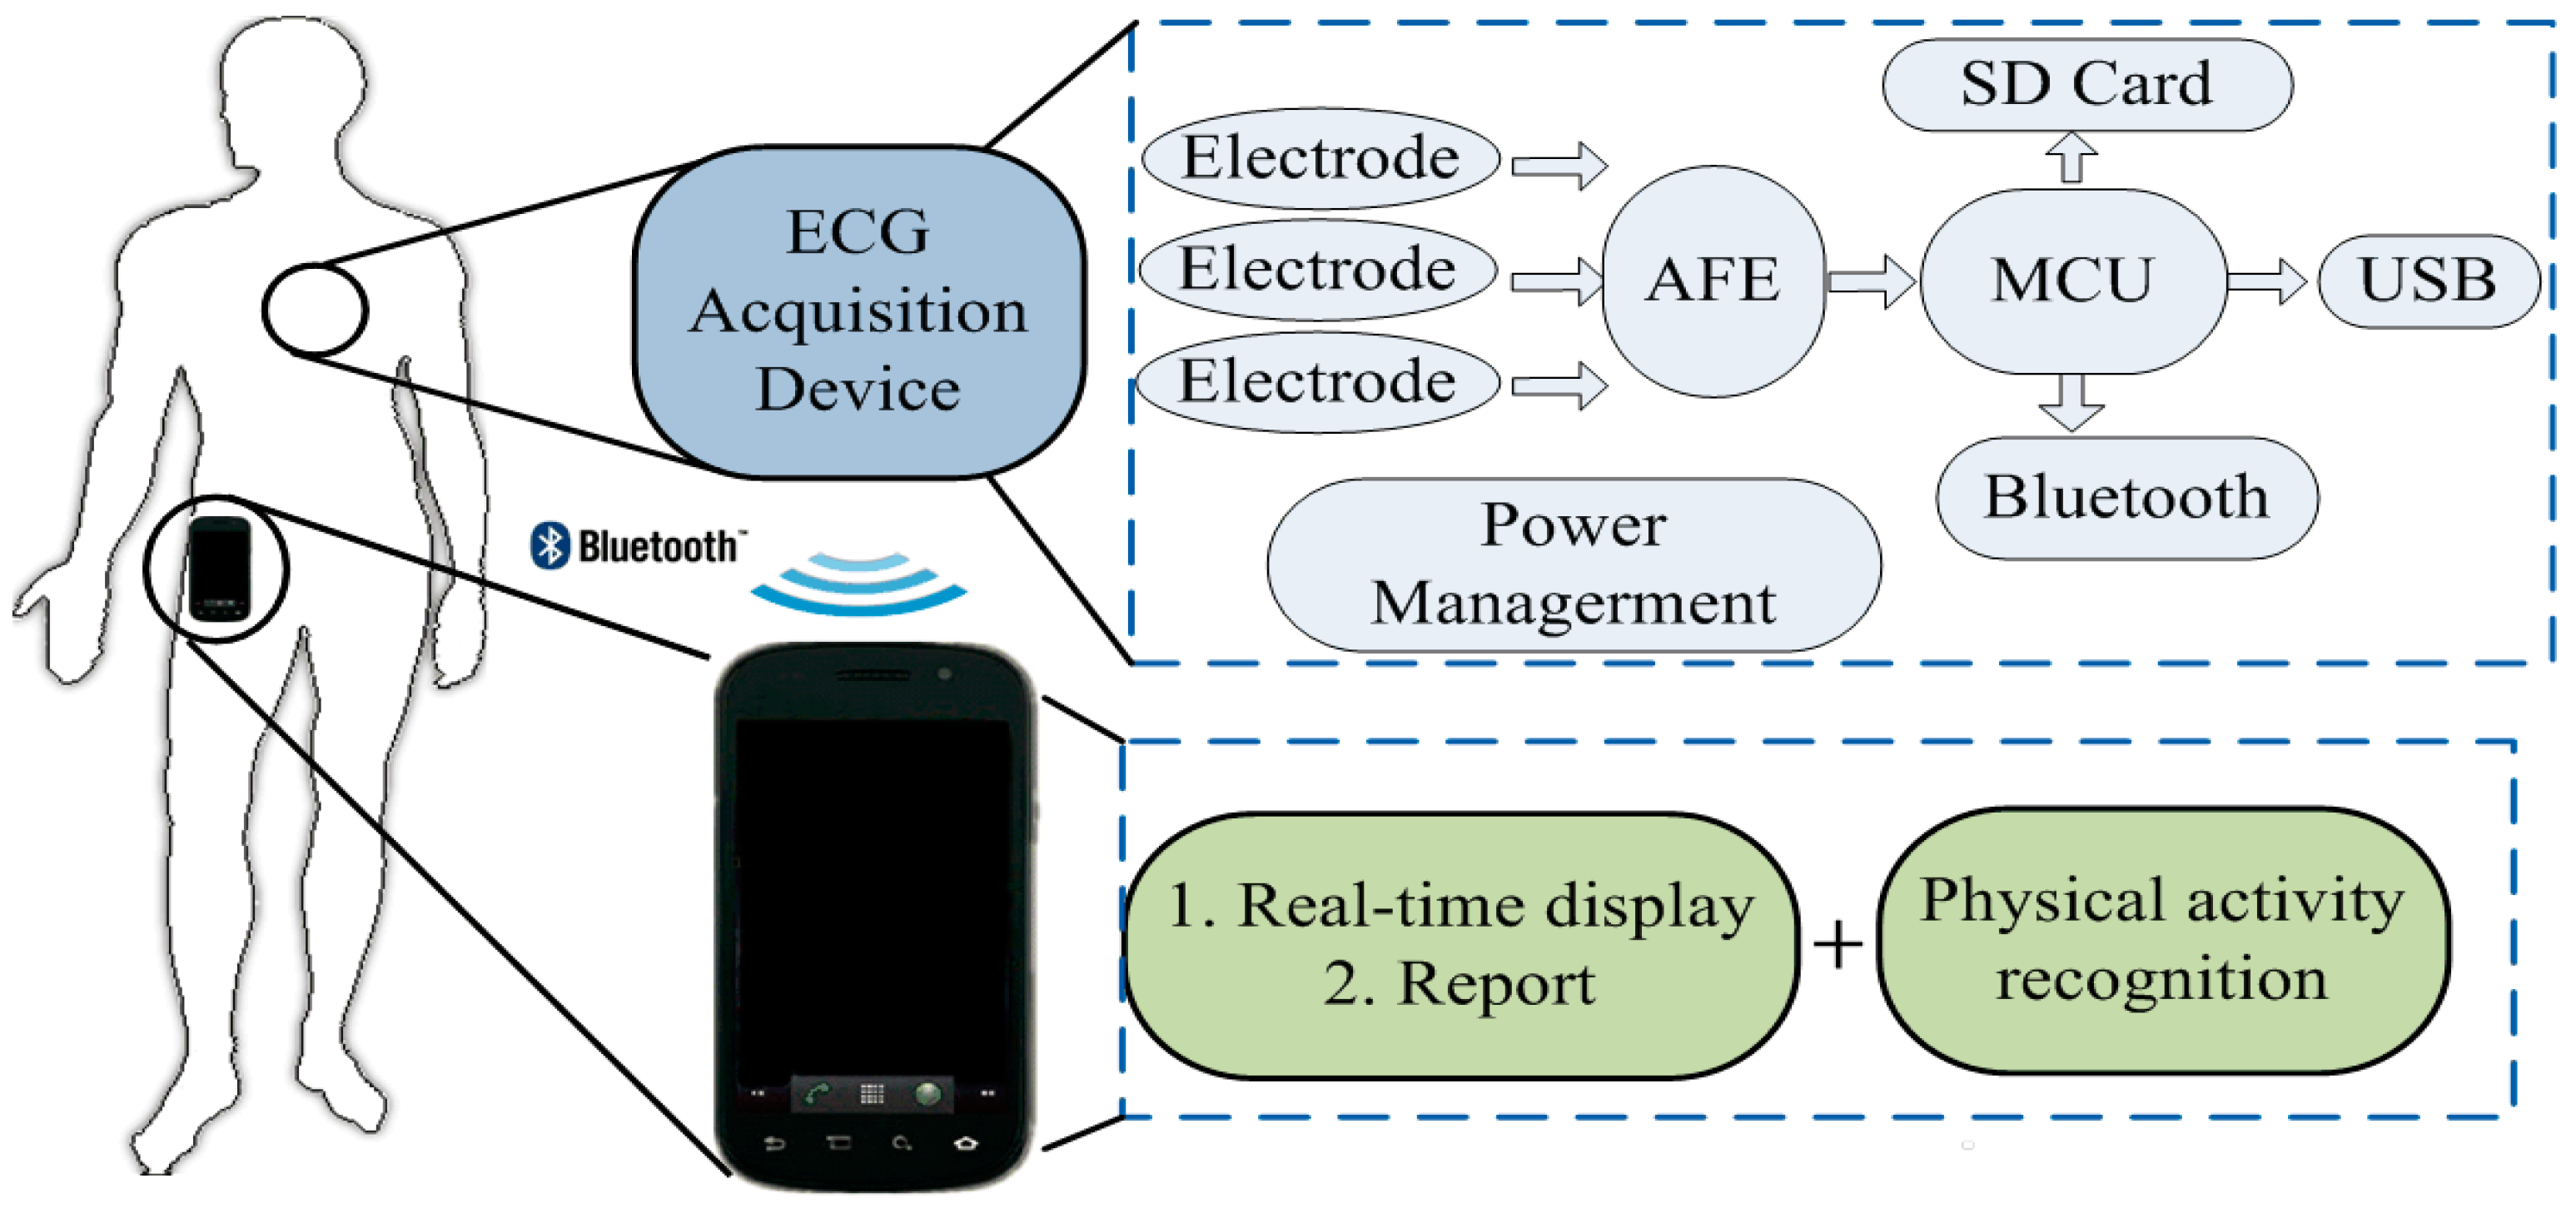
This architecture is very representative of systems like the one you're developing at Neuraease. The Microcontroller Unit (MCU) is the hub, managing the Analog Front-End (AFE), storing data on an SD card, and communicating wirelessly via Bluetooth.
2. Case Study 1: A Modern Wearable for Vital Signs
Let's dive deep into the design of a real-world prototype. A recent research paper details a low-cost wearable system for monitoring heart rate, SpO2, blood pressure trends, and temperature. This is a perfect case study for evaluating design choices for a device similar to what your startup aims to build.
Evaluating the Accuracy of Low-Cost Wearable Sensors for ...
The paper 'Evaluating the Accuracy of Low-Cost Wearable Sensors for Continuous Multiparametric Health Monitoring' details the hardware and software design of a prototype built with modern, off-the-shelf components.
Please read the following sections: Section 2.1, 'Wearable Measuring System': Focus on the specific components chosen: the nRF52840 MCU and the various sensor modules (MAX30102, etc.). Section 2.4, 'Software': Understand the firmware environment and the data transmission pathway. The second and third paragraphs of the 'Discussion' section (starts on page 12): This part is crucial for evaluation. It compares the prototype's capabilities (like ADC resolution and embedded algorithms) to a commercial device.
Based on your reading, let's evaluate the design of this wearable system:
-
Microcontroller (MCU): They chose the nRF52840, an ARM Cortex-M4 based MCU.
- Why is this a good choice? It's a system-on-a-chip (SoC) specifically designed for low-power wireless applications. It has built-in Bluetooth Low Energy (BLE), sufficient processing power for running ML algorithms at the edge, and excellent power-saving features, which are critical for extending battery life in a wearable.
-
Sensors & AFE: The design uses integrated modules like the MAX32664 biometric sensor hub, which contains the MAX30102 optical sensor.
- Evaluation: This is a smart choice. Instead of building an analog front-end from discrete op-amps and filters, these modules integrate the AFE, a high-resolution ADC (18-bit in this case), and even some initial processing algorithms (e.g., for ambient light cancellation). This simplifies the hardware design, reduces size, and provides high-quality data. As the paper notes, the higher ADC resolution allows for greater sensitivity than many commercial devices.
-
Software & Data Flow: The firmware is written in C on Arm® Mbed™ OS, and data flows from the MCU via BLE to a smartphone app, which then uploads it to a cloud server via MQTT.
- Evaluation: This is a standard and robust IoT architecture. Using an RTOS (Real-Time Operating System) like Mbed OS simplifies the management of concurrent tasks (e.g., reading sensors, managing BLE communication). Offloading the cloud communication to the phone conserves the wearable's battery, a key design constraint.
This case study shows how a thoughtful combination of a modern low-power MCU, integrated sensor modules, and a standard IoT software architecture can produce a device that is not only low-cost but also potentially more sensitive than some existing commercial products.
3. Case Study 2: A Practical IoT ECG Monitor
Let's look at another, simpler example that you could build yourself. This project uses the popular ESP32 microcontroller to create an internet-connected ECG monitor.
IoT Based ECG Monitoring with AD8232 ECG Sensor & ESP32
This video, 'IoT Based ECG Monitoring with AD8232 ECG Sensor & ESP32', provides a great step-by-step walkthrough of building a complete microprocessor-based system, from sensor to cloud.
Watch the video from the beginning up to 09:32. As you watch, identify the main hardware and software components and trace the flow of data.
Let's break down this design:
- Sensor/AFE: AD8232. This is a single-chip solution that acts as a complete analog front-end for ECG. It includes the instrumentation amplifier, filters, and driven-leg circuit we've discussed in previous lessons.
- MCU: ESP32. This is a very popular choice for hobbyist and commercial IoT projects.
- Data Path: Electrodes → AD8232 → ESP32 (ADC) → Wi-Fi → Ubidots (IoT Platform).
Test your understanding!
Based on these two case studies, compare the design choices of the ESP32-based ECG monitor with the nRF52840-based multi-vital-sign wearable. What are the key trade-offs in choosing the ESP32 over the nRF52840 for a wearable application?
Show answer
The main trade-off is power consumption vs. connectivity.
- The ESP32 has powerful built-in Wi-Fi, making it excellent for applications where it can connect directly to a router. However, Wi-Fi is very power-hungry, making the ESP32 generally less suitable for small, battery-powered wearables that need to run for days.
- The nRF52840 is optimized for Bluetooth Low Energy (BLE), which uses significantly less power than Wi-Fi. This makes it a much better choice for a wearable that communicates with a nearby smartphone, prioritizing battery life over direct internet connectivity.
4. Broader Criteria for Evaluating a System Design
When you evaluate a medical device design, either for your startup or for an exam, you need to consider more than just the technical specifications of the components. A robust evaluation looks at the entire system and its context of use.
Security and reliability are paramount. As medical devices become more connected, they also become more vulnerable. Understanding these risks is part of a thorough design evaluation.
In this lecture from MIT OpenCourseWare, medical device security expert Kevin Fu discusses the real-world challenges of software and security in medical devices. This provides a crucial perspective for evaluating any modern design.
Please watch these two clips: From 01:56 to 04:06: This section introduces the FDA's focus on cybersecurity in the design phase and the cultural challenges involved. From 12:52 to 16:24: This part discusses the challenges of software updates and the long lifecycle of medical devices, including the problem of devices running on outdated operating systems like Windows XP.
Drawing from our case studies and this discussion on security and reliability, here is a checklist of key criteria for evaluating a microprocessor-based medical system:
- Clinical Performance & Accuracy: Does the device measure what it's supposed to, with the accuracy required for its intended use (diagnostic vs. wellness)?
- Power Consumption: What is the battery life? How have design choices (e.g., MCU selection, data transmission protocol) impacted it?
- Safety and Reliability: Does the device meet electrical safety standards? Is the software robust? What happens if it fails (e.g., the infusion pump example from the video)?
- Security and Privacy: Is patient data protected? Is the device vulnerable to remote attacks or interference? Is the software designed with security in mind from the start?
- Form Factor and Usability: Is the device practical for its intended user and environment (e.g., a comfortable wearable, an easy-to-use hospital monitor)?
- Cost: What is the bill of materials (BOM)? How does it compare to alternatives?
- Data Management & Connectivity: How is data stored, transmitted, and accessed? Does it use standard protocols (BLE, Wi-Fi, MQTT)?
- Software Lifecycle: How will the device's firmware be updated? Can it be patched for security vulnerabilities over its entire operational life?
Applying these criteria allows you to move beyond a simple description of components to a true, critical evaluation of the system's design.
Conclusion and Course Wrap-up
This lesson brought together all the elements of the course to show how a complete medical instrument is designed and evaluated.
Key Takeaways:
- A microprocessor-based system consists of a central MCU, sensors/AFE, ADC, memory, communication interfaces, and power management.
- Evaluating a design involves analyzing the specific component choices (e.g., nRF52840 for low-power BLE vs. ESP32 for direct Wi-Fi) and understanding the trade-offs.
- Modern designs often use highly integrated components (SoCs, sensor modules) to simplify design, reduce size, and improve performance.
- A complete evaluation must consider a wide range of criteria, including performance, power, safety, security, usability, and the software lifecycle.
This marks the end of our journey through Medical Instrumentation. We began by understanding the unique challenges of measuring signals from the human body. We then worked our way through the entire signal chain: the origins of biopotentials, the sensors and electrodes to capture them, the amplifiers and filters to condition them, and finally, the microprocessors and machine learning algorithms to process and interpret them. You have built a comprehensive understanding of how modern medical devices work, from the skin to the screen.
This knowledge provides a solid foundation for your university exams and, more importantly, for the innovative work you are pursuing with your startup.
Good luck with your exams and your future endeavors in this exciting field
Can't find a good explanation? Sign up and we'll make it for you
Sign up