
Hello again. In the previous lesson, you composed residential light from three materials: integrated architectural light, decorative luminaires, and purposeful darkness. You also established that different layers need separate roles rather than operating as one uniformly bright scheme.
Now the focus is on time and use. A residence changes character throughout the day: it supports waking and grooming, cooking and working, gathering with guests, quiet reading, and half-awake movement at night. A lighting scene translates those changing conditions into a deliberate, repeatable arrangement of light.
By the end of this lesson, you should be able to define scenes that support daily routines, entertaining, relaxation, and nighttime navigation—while preserving the visual hierarchy and calm established in the previous lesson.
A scene is a designed condition, not “all lights dimmed”
A residential scene is a coordinated state of the lighting layers for a particular activity, time, or mode of occupation. It may also coordinate shading, but its central purpose is visual: it decides what is bright, what is quietly present, and what may disappear.
A useful scene definition has six parts:
-
Name and purpose
Use activity-based names that occupants recognize: Morning, Cooking, Dinner, Relax, and Night Path are clearer than “Scene 1” or “Preset B.” -
User location and route
Consider where the user is standing or sitting when the scene begins, and where they may move next. A bedroom scene starts at the door or bedside; a night scene may start at a bedside control and extend to the bathroom. -
Active lighting layers
Identify which ambient, task, accent, and decorative layers are on, dimmed, or off. -
Visual hierarchy
State the intended focus. In an entertaining scene, the dining table and faces may lead. In a relaxation scene, a wall, artwork, or reading lamp may lead instead. -
Colour appearance and dimming character
Decide whether the scene is visually warm, neutral, or more alert in character. For a fixed-white residential scheme, or often provides a coherent warm appearance; if tunable-white or dim-to-warm sources are used, the apparent colour can be adjusted as well as the brightness. -
Access and override
The intended user must be able to activate the scene conveniently, then make a simple local adjustment when reality differs from the preset. Someone reading should not have to leave the chair to increase their reading lamp.
A scene therefore is not a technical list of channels at arbitrary percentages. It is a short operational description of an experience. Percentage settings are simply the means of realizing it and must be calibrated in the completed room, where wall reflectance, furniture, glazing, and lamp shades affect the result.
Home Lighting Design Guide Pocket Book
Read Home Lighting Design Guide Pocket Book from Natural Resources Canada for a practical account of layered lighting and user-centred switching. Its recurring question—what does a person need when moving through and using a room?—is the right starting point for scene design.
First, read the opening discussion of people, layers, and controls, beginning with the guide's design approach. Focus on the distinction among ambient, task, accent, and decorative light, then note the advice to visualize real actions such as arriving with groceries or preparing for dinner. Next, in the room-by-room guidance beginning with “Entry way and hallway,” read the “Living room,” “Dining room,” “Kitchen,” “Bedroom,” “Bathroom,” and “Stairwells” subsections. Follow the residential examples, concentrating on separately controlled layers, bedside reading glare, vanity lighting, and low-level stair guidance. Treat individual product references and legacy source examples as illustrative rather than as a current specification.
The guide’s advice to “visualize” daily actions matters because scene design fails when it is based only on a plan. A plan shows fixture positions; it does not show a person carrying a tray from kitchen to table, reclining on a sofa, or waking at 2 a.m. without wanting a bright ceiling light.
Build scenes from activities, not from rooms
A kitchen does not have one correct lighting state, and neither does a living room. A scene crosses room boundaries when the activity crosses them. Cooking, for example, may require bright kitchen worktops but only modest light in the connected dining space. Entertaining may make the dining and living zones visually prominent while allowing the kitchen to recede after food preparation.
Begin by listing the recurring domestic conditions. Then identify what must be visible and what can remain quiet.
| Scene | Primary purpose | Dominant visual emphasis | Layers that normally matter |
|---|---|---|---|
| Morning / ready | Grooming, dressing, breakfast, leaving home | Faces, worktops, wardrobes, safe routes | Moderate ambient, strong local task, selected vertical light |
| Cook / clean | Food preparation, cooking, washing up | Countertops, cooktop, sink, island | Strong task light, supportive ambient, limited accents |
| Welcome / daily return | Arrival, orientation, settling in | Entrance, route, a welcoming wall or object | Warm ambient and accent light; local task light available |
| Dinner / entertain | Conversation, dining, hospitality | Table, faces, key architectural backdrop | Dimmed ambient, decorative table focus, accents, selective kitchen task |
| Relax | Reading, conversation, music, television, rest | Reading plane or quiet focal surface | Low ambient, table or floor lamps, gentle wall/accent light |
| Good night / path | Safe movement without fully waking occupants | Floor, stair edges, doorways, bathroom threshold | Very low-level, shielded guidance light only |
These scenes do not need to be identical in every home. A family with young children may need a brighter early-evening Homework scene. A resident who works from home may need a focused Work scene in part of the living room. The important point is that each scene expresses a real pattern of occupation, not merely a desire for variety.
Daily routines: visibility where work happens
Daily routine scenes usually require the widest range of light because the home is being actively used. However, wide range does not mean indiscriminate brightness.
In a Morning / ready scene:
- bathroom vanity light should illuminate the face from a useful direction, reducing strong shadows from overhead-only light;
- wardrobe interiors and dressing areas should be legible;
- kitchen worktops need enough light for breakfast preparation;
- entry and circulation routes should be clear;
- the living room does not necessarily need its decorative and accent layers at full output.
The scene is best understood as a functional baseline with hierarchy. Task surfaces are bright enough for work, but vertical surfaces still receive enough light for orientation and comfort. This avoids the flat, cave-like condition produced when only floors and worktops are bright.
A Cook / clean scene is more specific. Under-cabinet light, island lighting, and light at the sink or cooktop should be independently available, because food preparation requires clear visibility and can be compromised by the user’s own body shadow. Keep the social layers separate: the pendant over the dining table and decorative living-room lamps should not be forced to full brightness simply because the cooktop is in use.
Design Expert’s Guide to Lighting Your Interior | Tricks of the Trade
In Design Expert’s Guide to Lighting Your Interior, Brandon Schubert of House & Garden walks through a combined kitchen and dining room. The example shows how task light can remain practical while the adjoining social space becomes more atmospheric.
Watch the kitchen strategy, focusing on why work surfaces need even light from useful directions and why a wall wash is often more effective for ambience than a bright floor. Then watch the dining transition, noting the independently dimmed under-cabinet layers, the dining pendant’s role, and the use of table lamps to support the room’s evening character.
A productive design habit is to write one sentence for each scene before assigning levels:
Cooking: “Bright, shadow-controlled light supports preparation; adjacent social areas remain calm and usable.”
That sentence tells you far more than “Kitchen downlights 100%.”
Scenes for entertaining and relaxation: change the emphasis, not only the brightness
Entertaining often exposes a weak lighting design because it brings several functions together: arrival, drinks, conversation, dining, occasional food preparation, circulation, and use of the bathroom. A single “party” scene that simply turns everything on is usually uncomfortable, visually flat, and wasteful.
Dinner / entertain
For an open-plan living, dining, and kitchen space, a well-defined Dinner scene might work as follows:
- The dining pendant is dimmed to become a warm visual centre, rather than a glaring isolated pool of light.
- A wall wash behind the table or across a nearby textured wall is active at a modest level. This gives faces a visually comfortable background and prevents the room perimeter from disappearing.
- Table lamps, sconces, or joinery light create small points of inhabitation in the living zone.
- Kitchen task lighting remains available for serving and clearing, but it is reduced after cooking so the kitchen does not dominate the social scene.
- Selected art or material accents remain on if they reinforce the architectural concept; competing decorative effects are reduced or extinguished.
- The entry route and guest bathroom remain intuitively usable without a guest having to search for controls.
The table must not be the only bright area. If surrounding walls, faces, and routes are too dark, the table can feel isolated and occupants may experience the pendant itself as glare. Conversely, if all downlights, cabinet lights, pendants, and accents operate at full output, the social centre loses authority.
Relax
A Relax scene should be genuinely different from Dinner, not merely a slightly dimmer version. It normally shifts visual emphasis away from the dining table and toward the location where people settle: a sofa group, reading chair, fireplace, media wall, or garden view.
Typical characteristics include:
- low, indirect, or wall-based ambient light rather than a bright overhead field;
- one or two local reading lamps that remain independently adjustable;
- carefully restrained accents on artwork, shelving, or a textured surface;
- reduced brightness on highly reflective surfaces and glazing;
- more darkness at unused room edges, provided routes and changes in level remain apparent.
The room should feel settled rather than switched off. A person entering late should still understand its depth and find a seat without activating a harsh general-light circuit.
Design Expert’s Guide to Lighting Your Interior | Tricks of the Trade
Continue with House & Garden’s Design Expert’s Guide to Lighting Your Interior for two useful scene ingredients: local light for a sitting room and independently controlled light in a bedroom.
Watch the sitting room to see the complementary roles of wall lighting, a wall wash, table lamps, and a reading floor lamp. Then watch the bedroom example, paying particular attention to the separation of entry, bedside, and wall-light controls, and to positioning a reading light so the source is not in the user’s direct view.
Colour temperature can contribute to the distinction between active and restorative scenes, but it should not replace good composition. A lower CCT appears warmer: generally looks warmer than , despite the lower number. In a fixed-white scheme, consistency is usually more important than trying to force different moods through CCT alone. If the project includes tunable or dim-to-warm luminaires, warmer dimmed evening scenes can reinforce intimacy—but the selected sources must still render materials well and appear consistent together.
Night navigation is a safety scene, not an afterthought
The Good night / path scene deserves special treatment. It is not simply the Relax scene dimmed further. Its goal is to provide just enough visual information for a short route—typically bed to bathroom, bedroom to nursery, stair landing to kitchen, or entry to bedroom—without forcing the eye to adapt to high brightness.
Place the light where the route needs information:
- At the bedside, provide a reachable scene control or a local low-level light.
- At doorways and thresholds, reveal the opening, floor change, or direction of travel.
- Along stairs, make treads and landings legible, with controls accessible at both top and bottom.
- In the bathroom, provide a low-level route light that does not substitute for proper vanity or cleaning light when those are needed.
- At the destination, allow a simple return to a normal bathroom or kitchen scene.
Low-mounted joinery light, concealed under-vanity light, a shielded wall light, or dedicated step lighting can be more successful than dimmed downlights. Overhead downlights often create bright pools, cast stronger shadows, and put the source within the field of view when eyes are dark-adapted.
The design principle is directional, shielded, warm-looking light with no unnecessary upward spill. This extends beyond the interior: an exterior threshold, terrace step, or path should guide movement without becoming a glaring beacon for occupants, neighbours, or the night sky.
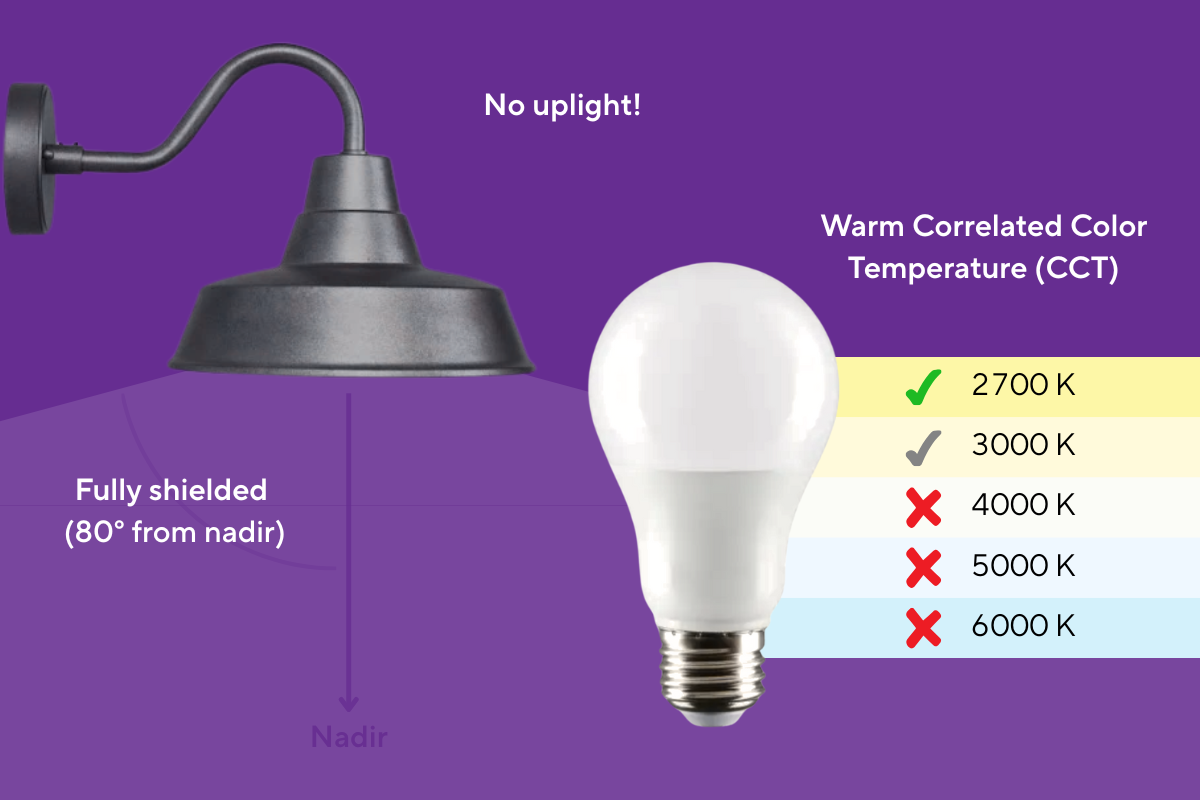
The image’s “no uplight” principle is especially relevant around bedroom windows and external circulation. Bright, unshielded exterior fixtures can create intrusive reflections in glazing and undermine the calm darkness the interior scene is designed to preserve.
Turn the concept into an intuitive scene schedule
A scene only succeeds when people can actually use it. Start by locating the moments where a choice naturally occurs:
- at the entry, when arriving home;
- at the kitchen entrance or island, before cooking;
- at the dining area, before guests arrive;
- beside the sofa or reading chair, when settling down;
- beside the bed and near stairs, when moving at night.
Give occupants a small, understandable set of named scenes, while retaining direct control of genuinely local tasks such as a reading lamp or vanity light. Avoid a system that demands a phone, a remote, or multiple button presses for basic actions.
Smart Home Lighting Design Explained | Wellness, Atmosphere & Control
In Smart Home Lighting Design Explained, Audio Advice illustrates the practical idea of a scene button: one action recalls a coordinated lighting state, while a night setting leaves only selected route lights active.
Watch scene recall. Focus on the underlying design idea rather than on any particular control brand: an arrival setting can establish orientation, a relax setting can lower competing layers, and a good-night setting can preserve only the necessary paths.
For the open-plan home developed in the previous lesson, a concise scene schedule could read like this:
| Scene | Intended result | Lighting state |
|---|---|---|
| Morning | Clear, active, and comfortable for breakfast and departure | Kitchen worktop and bathroom task layers active; circulation and selected wall light on; living-room decorative layers restrained |
| Cook | Safe, shadow-controlled food preparation | Under-cabinet, sink, cooktop, and island task light active; moderate kitchen ambient light; dining and living layers low or off |
| Dinner | Sociable table-centred atmosphere with a legible backdrop | Dining pendant dimmed; dining wall wash and a few lamps active; kitchen task light reduced but available |
| Relax | Quiet living area with a reading option | Wall wash, selected accent, and table or floor lamps on low; local reading lamp independently adjustable; kitchen largely recedes |
| Night path | Unobtrusive navigation to bathroom or kitchen | Low-level bedside, corridor, stair, and bathroom route lighting only; no bright ceiling layer |
Notice that the scenes are defined through relationships, not fixed numerical outputs. “Dining pendant dimmed” is meaningful only relative to the wall wash, table surface, and faces in that specific room. Final levels should be tested after installation, with the actual finishes, furnishings, artwork, curtains, and glazing in place.
A robust scene schedule also anticipates imperfect behaviour. Someone may cook late at night, read while another person sleeps, or need full light in the bathroom. Do not force every person into the preset. A good system provides a clear default scene and accessible local override, then lets the user return easily to the intended setting.
Key takeaways
Residential scenes organize light around life rather than around fixture circuits.
- Define each scene through its purpose, users, active layers, visual hierarchy, colour appearance, and control access.
- Use daily routine scenes to provide task visibility and orientation without making every space equally bright.
- For entertaining, maintain a social focal point while allowing preparation areas to remain practical but visually secondary.
- For relaxation, lower overall brightness, preserve selected vertical and decorative light, and keep local reading light available.
- Treat night navigation as an independent, low-level safety scene: reveal routes, thresholds, and stairs while avoiding glare and abrupt brightness.
- Specify relative visual priorities first; calibrate actual dimming levels in the furnished space.
Next, you will examine what can undermine even a well-composed scene: glare, unwanted reflections, and visual clutter around glazing, polished finishes, and reflective surfaces.
Can't find a good explanation? Sign up and we'll make it for you
Sign up