
Good to continue from the scene work in the previous lesson. You already established that a residential scheme needs distinct layers and scene settings rather than uniformly bright rooms. That work becomes credible only when those layers remain comfortable to look at—especially after dark, when windows become reflective, polished materials reveal every bright source, and too many visible luminaires can compete with the intended atmosphere.
This lesson develops a practical method for resolving direct glare, reflected glare, veiling reflections, and visual clutter around glazing and glossy finishes. The aim is not to remove every reflection. A controlled highlight can make glass, metal, stone, or lacquer feel deliberate and tactile. The aim is to decide which reflections support the residential character and which interrupt sightlines, obscure tasks, or make the room feel visually noisy.
Begin with the viewer, not the fixture
A lighting plan can look orderly while the completed room is uncomfortable. Glare and reflection are judged from where people actually are: sitting at a dining table, reading in bed, preparing food at an island, looking out to a garden, or moving through a darkened room.
It is useful to distinguish four related problems.
| Condition | What the occupant experiences | Typical residential cause |
|---|---|---|
| Direct glare | A bright source is visible directly and feels uncomfortable or distracting. | Exposed lamp, bare downlight, unshielded strip, bright daylight through clear glazing |
| Reflected glare | A bright source is seen as a reflected image in a shiny surface. | Pendant reflected in a glass table; under-cabinet light reflected in polished stone |
| Veiling reflection | A reflection overlays the visual task and reduces its contrast. | Window or luminaire reflected across a laptop, television, framed art, or glossy worktop |
| Visual clutter | Numerous bright points, reflected images, fixture details, and competing accents create an unsettled composition. | Rows of downlights, multiple exposed decorative lamps, bright joinery strips, reflections in glazing |
Glare is not simply “too much light.” A room can be dim yet uncomfortable if it contains one tiny, intense source within the field of view. Conversely, a room can feel bright but comfortable when its brightness is distributed across walls, ceiling, and other broad surfaces.
The optical reason is straightforward. A smooth glossy surface reflects light in an ordered direction: the angle of incidence equals the angle of reflection.
If a luminaire, bright window, or sun patch lies at the correct angle relative to a polished surface and the occupant’s eyes, it will appear as a sharp bright image. A matte or textured finish has many tiny surface orientations, so it scatters light more broadly. It can still look bright, but it is less likely to act like a mirror.
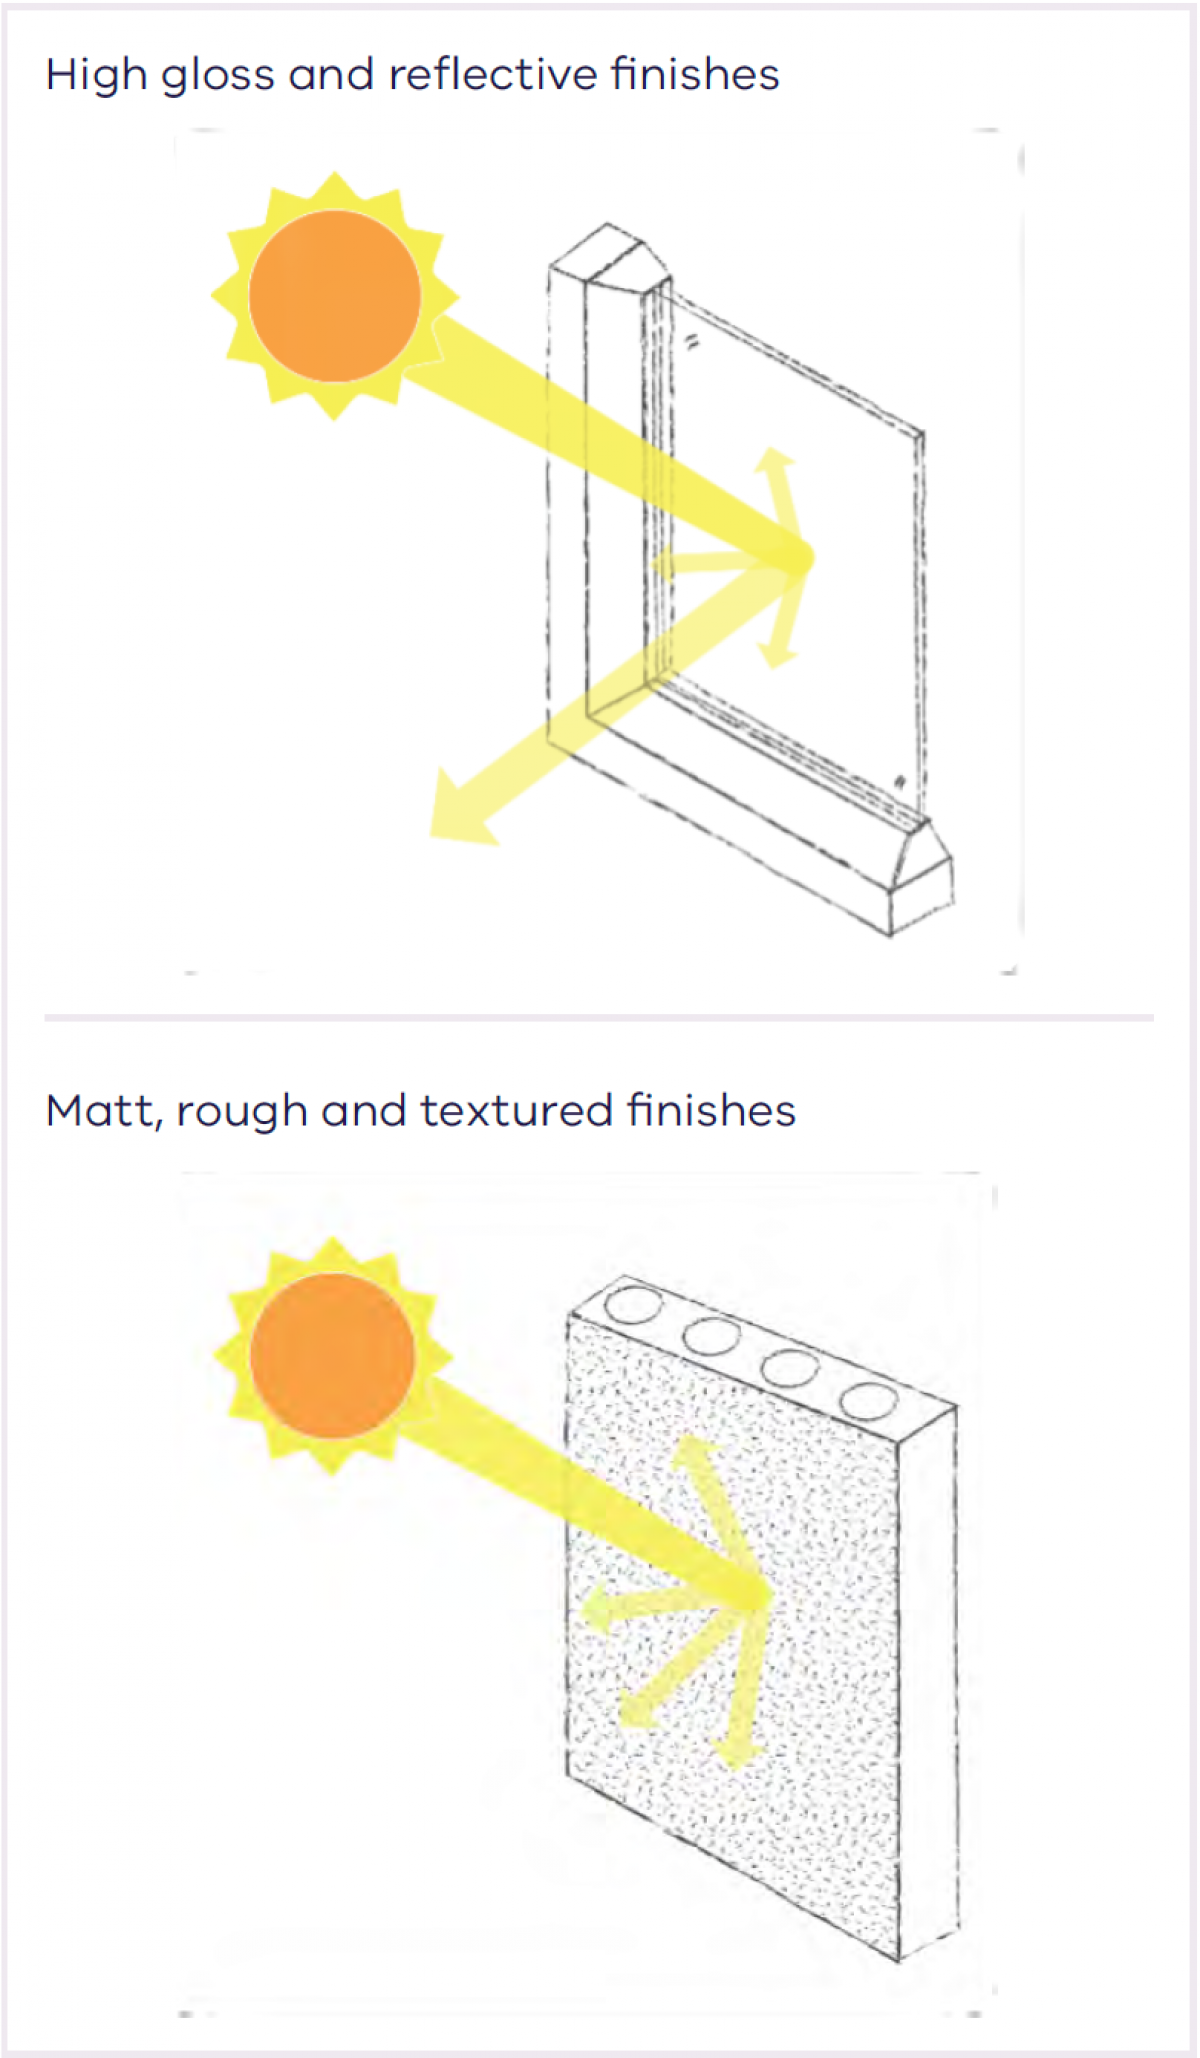
This distinction matters during finish selection, but it is not a substitute for lighting design. A polished black stone worktop can be successful if the reflected sources are controlled; a matte surface can still cause discomfort if a very bright source is directly visible.
Light for Vision : What We Do : Center of Design for an Aging Society
Read “Light for Vision” from the Center of Design for an Aging Society for a concise explanation of direct and reflected glare. Although written with ageing users in mind, its principles are broadly useful: a scheme that avoids glare supports a wider range of visual sensitivity.
In the Quality of Light section, read from the quality-of-light guidance. Notice the distinction between a visible bright source and light reflected from a shiny surface. Then, in Avoiding Reflective Glare, read the material examples, particularly the discussion of glass tables, polished floors, and stone counters.
A good residential designer therefore asks a different first question:
What does the occupant see from this position, and what bright images compete with that view?
That question is more useful than asking whether a fixture is visually attractive in a catalogue.
Perform a reflection audit before prescribing a solution
Use the scenes developed in the previous lesson—such as Cooking, Dinner, Relax, and Night path—to test the room under realistic conditions. A reflection that is acceptable during an active morning scene may become conspicuous in a dimmed evening scene because the surrounding room is darker.
For each important position, make a short reflection audit.
-
Choose the viewpoint and task.
Record whether the person is standing, seated, reclining, or moving. A pendant that is comfortable while standing at an island may be glaring from the dining chair. A reflected downlight that is unnoticed during cooking may become prominent in a dark window when someone sits on the sofa. -
Identify the critical surface.
Note whether the surface is glazing, a mirror, a polished counter, a glass tabletop, lacquered joinery, framed artwork, or a screen. Describe its finish and colour; dark glossy finishes usually reveal bright reflected images especially clearly. -
Find the reflected source.
Is the unwanted image caused by daylight, a pendant, a row of downlights, an under-cabinet strip, a decorative lamp, or exterior lighting? Switch layers on one at a time during an on-site review. The responsible source is often not the closest fixture. -
Decide what must be preserved.
Do not solve a reflection problem by removing necessary task light, destroying a focal point, or making the room flat. Identify the design intention that remains non-negotiable: a good garden view, usable kitchen worktop, flattering vanity light, or an inviting dining table. -
Choose the least disruptive correction.
First alter geometry, shielding, distribution, or scene level. If the finish is still inappropriate for the use, consider a material change such as honed stone instead of polished stone.
A simple site test is often revealing. At the relevant viewing position, turn on one lighting layer at a time. Temporarily shield, dim, or cover the suspected source, then observe whether the reflection disappears and whether the task or composition still works. Photographs can help document the reflected image, but do not use a camera as the sole judge: exposure settings often exaggerate or suppress glare differently from the human eye.
Control the luminous geometry
Most reflection problems are geometrical before they are technological. Changing lamp wattage, colour temperature, or fixture finish rarely resolves a bright reflected image if the source remains in the wrong place.
There are four main levers.
1. Move the source or alter its aiming
If a downlight is reflected directly toward a seated viewer, shifting its location or aiming can remove the image without reducing useful illumination. This is particularly important over glossy counters, glass tables, and dark floors.
For a mirror, avoid placing an exposed source where the user sees the lamp directly or where it creates strong shadows below the eyes and chin. Diffused vertical light to both sides of the face is often more comfortable and more useful for grooming than a small intense downlight directly above the mirror.
For windows at night, locate and aim interior lighting with the seated view in mind. Bright sources behind a person looking outward are likely to appear in the glazing. A line of downlights near the window is not automatically wrong, but it must be checked from the sofa, dining chair, and circulation route—not only from the plan.
2. Increase the apparent size of the source
Small, intense sources produce small, intense reflections. A larger diffuse source produces a broader and generally softer reflected image. This is why a well-concealed cove, softly luminous wall, or diffused pendant can be more comfortable than a collection of exposed lamps.
HOW TO light highly REFLECTIVE SURFACES
Watch “HOW TO light highly REFLECTIVE SURFACES” by Cine Stuff. It uses product-filming examples, but the underlying principle applies directly to interiors: glossy materials reveal the shape and number of light sources around them.
Watch the problem to see how multiple small reflections make a shiny subject look visually messy. Then watch source-size strategies. Focus on the distinction between many sharp highlights and the single broad reflection produced by a large diffused or bounced source. Finish with the accent trade-off: diffuse light can become visually flat if it is not balanced with restrained, intentional accent.
In a residence, “make the source larger” does not mean adding more luminaires. It may mean concealing a linear source in a cove so that the illuminated ceiling becomes the visible emitter, using a pendant with an adequately shielding diffuser, or bouncing light from a light-coloured matte wall.
3. Shield the source from direct view
Shielding prevents a person from seeing the brightest part of the luminaire at a problematic angle. Useful measures include:
- recessed sources with suitable cut-off;
- opaque or translucent shades around decorative lamps;
- deep channels and baffles for linear light;
- coves, valances, and soffits that conceal the source;
- correct suspension height and shade proportions for pendants and bedside lamps.
A decorative fixture may remain part of the visual identity, but its lamp should not become the brightest object in the viewer’s field of view. In a reading position, for example, a bedside lamp must be sized and positioned so that the bulb is not visible at eye level.
4. Dim the competing source, not necessarily the whole room
A scene can preserve useful task lighting while lowering the source that causes the reflection. During Dinner, the kitchen worktop layer can remain available at a modest level while a bright reflected pendant in the glazing is dimmed. During Relax, wall light and table lamps may maintain spatial legibility while unneeded downlights are switched off.
This is why separate layers and scene controls matter. A single all-or-nothing general-light circuit offers few ways to resolve a reflection without making the room unusable.
[PDF] Strategy Guideline: High Performance Residential Lighting
Read the relevant pages of the U.S. Department of Energy’s “High Performance Residential Lighting” guideline to connect source concealment with architectural integration.
On p. 28, in Recessed Lighting, read the concealed-source discussion. Then continue through Indirect Lighting on pp. 28–29, beginning at the example above kitchen cabinets. Read the indirect-lighting guidance. Focus on the way coves, valances, soffits, and wall washing can make room surfaces luminous while keeping the source itself out of view.
Concealed lighting is not automatically successful. A poorly detailed cove can reveal a visible line of LED dots, illuminate the wrong surface, or produce a bright strip reflected in glazing. The recess depth, source position, shielding angle, surface finish, and viewing direction all need coordination.
Resolve the common residential trouble spots
Glazing: respect both daylight and the night-time mirror
During the day, clear glazing can admit direct sun, bright sky, and high contrast. The primary response is usually architectural: external shading, overhangs, screens, adjustable blinds, sheer drapery, or diffusing material where a clear view is not essential. Do not attempt to “out-light” sunlight with electric light.
Place desks, reading positions, food-preparation tasks, and television screens so occupants are not forced to look into a bright window or work with intense daylight reflected across the task. Where views matter, aim to give the eye a balanced field: illuminate selected interior walls and surfaces gently rather than leaving the room dark against a very bright exterior.
After dark, glazing behaves increasingly like a mirror because the interior is brighter than the exterior. The practical response is to reduce the brightness and number of sources reflected in the glass:
- avoid a repetitive row of bright downlights near glazing;
- keep intense decorative lamps out of critical reflection paths;
- use dimmable, shielded, lower-luminance light near seating facing the view;
- employ curtains or blinds when privacy, glare control, or reflection reduction matters more than the night view;
- light exterior steps and terraces only where needed, using shielded, low-spill fixtures rather than indiscriminate brightness.
A reflected interior can never be entirely removed while occupants want both a brightly lit room and a dark view outside. The design task is to establish the preferred balance for each scene.
Polished counters, glass tables, and lacquered joinery: give highlights a job
Highly polished horizontal surfaces often reveal every downlight and pendant overhead. Before selecting a different material, first ask whether the reflection serves a visual purpose. A single broad, controlled reflection may make a stone island feel rich. A scattered grid of reflected downlights rarely does.
For a kitchen, preserve shadow-controlled task illumination while avoiding unnecessary reflected pinpoints. Continuous under-cabinet light in a concealed, diffused channel is usually visually calmer than multiple small fittings. Its exact position must still be tested: locating the source near the forward edge of upper cabinetry can improve light distribution on the counter and reduce backsplash shadows, but a highly polished counter may still reflect that source into the user’s view.
Design Expert’s Guide to Lighting Your Interior | Tricks of the Trade
Return to House & Garden’s “Design Expert’s Guide to Lighting Your Interior | Tricks of the Trade” for two compact integration details.
In the kitchen sequence, watch cabinet-edge placement and notice how the strip’s location changes shadows on the backsplash. Then watch diffused shades, which illustrates how partially concealing lamps softens a decorative fixture’s direct brightness. Apply both ideas critically: test the final arrangement against the actual countertop or table finish and the occupied viewing positions.
When the finish itself can still be selected, favour a honed, brushed, satin, textured, or medium-value surface in high-use reflective areas. This is particularly effective for kitchen counters, bathroom floors, and large tabletops where the viewing angles cannot be tightly controlled. But do not prescribe matte finishes everywhere. High gloss may be central to the architectural identity; it simply demands more disciplined lighting.
Mirrors: light the face, not the mirror
Mirrors need deliberate treatment because they show both the source and the person using the space. In a vanity, aim for broad, soft, vertical illumination from both sides of the face, with the luminous parts of the fittings controlled and comfortable. Avoid relying only on a bright overhead downlight, which can create facial shadows and a disturbing reflected source.
In circulation or decorative locations, a mirror can increase depth and reflect a carefully composed layer of wall or joinery light. It should not multiply an arbitrary grid of ceiling fittings. Design what the mirror will reflect as consciously as the mirror itself.
Reduce visual clutter through hierarchy and restraint
Visual clutter is a compositional problem as much as an optical one. In a glossy, glazed interior, every visible luminaire can appear twice: once directly and once in reflection. A room with numerous small sources may therefore feel far busier than the plan suggests.
Use the principle introduced earlier in the course: light objects and surfaces, not empty space. Each visible source or illuminated surface should have a role:
| Element | Legitimate role | Warning sign |
|---|---|---|
| Wall wash or cove | Gives the room depth, ambient brightness, and architectural order | Bright stripe, exposed source, or reflection competing with the view |
| Kitchen task light | Makes food preparation clear and shadow-controlled | Reflected glare across polished counters |
| Decorative pendant | Establishes a social focal point or character | Bare lamp visible from seated eye level or repeated in glass surfaces |
| Accent light | Reveals art, texture, or a significant material | Numerous equal-brightness accents with no clear focal priority |
| Low-level route light | Supports safe night movement | Visible dots or bright pools that disturb dark adaptation |
A useful editing question is: If this source were removed, would a task, route, architectural surface, or focal point genuinely suffer? If the answer is no, the source may be unnecessary—or it may need to become less visible, lower in output, or integrated into a more coherent layer.
The best cure for clutter is not total darkness. It is a hierarchy in which the eye understands where to look first, what remains quietly supportive, and what can recede.
Apply the method: an open-plan evening scene
Imagine an open-plan kitchen, dining, and living room with a glazed wall to a garden, a polished dark stone island, a glass dining table, and a decorative dining pendant.
In the original Dinner scene, the pendant is bright, a row of downlights is on near the glazing, under-cabinet strips are at full output, and several joinery shelves are illuminated. From the dining table, the glass wall reflects the pendant and downlights. From the sofa, the reflected kitchen strips appear as bright lines. The stone island shows many small reflected points. Even if the average room brightness is modest, the composition feels restless.
A more resolved scheme could retain the desired atmosphere by making coordinated changes:
- use a shaded or diffused pendant, positioned and dimmed for comfortable seated viewing;
- reduce or switch off downlights that have no essential role in the dinner scene;
- provide broad ambient brightness through a concealed cove or a softly lit wall rather than through bright point sources near the glazing;
- keep kitchen task light independently controllable, then reduce it after cooking;
- retain only the joinery and art accents that reinforce the intended focal sequence;
- test the completed Dinner and Relax scenes from the dining chairs, sofa, kitchen work position, and approach route.
Notice that this is not a rule against pendants, glazing, polished stone, or decorative lighting. It is a decision to make each one cooperate with the others.
Key takeaways
Glare and unwanted reflection are best resolved from the occupant’s viewpoint, not by evaluating fixture locations in isolation.
- Direct glare comes from a visible bright source; reflected glare is a bright source seen in a shiny surface; veiling reflections reduce the contrast of a task or view.
- Smooth, glossy finishes create ordered mirror-like reflections, while matt and textured finishes scatter light more broadly.
- Start with a reflection audit: viewpoint, task, critical surface, reflected source, intended experience, and least disruptive correction.
- The most effective interventions alter geometry, source size, shielding, and scene level before changing materials.
- Glazing requires separate day and night thinking: control sun and sky with architectural shading, then manage reflected interior sources after dark.
- Reduce visual clutter by giving every visible light a clear job and allowing unneeded layers to recede.
In the next lesson, you will adapt a residential lighting concept to different occupant preferences while preserving a coherent design identity.
Can't find a good explanation? Sign up and we'll make it for you
Sign up