Welcome to the next stage of our stablecoin project. In the preceding lessons, we meticulously constructed our USDStablecoin, equipping it with role-based mechanisms for minting and burning, and installing a critical Pausable safety feature. The blueprint is complete, and the contract is assembled. Now, we must ensure it's structurally sound.
Today's objective is to write unit tests for the minting, burning, and pausing functionalities, including access control checks. In software development, testing is important; in the world of immutable smart contracts, it is absolutely paramount. As someone with experience in asset management software, you know that robust quality assurance is non-negotiable when financial value is at stake. On the blockchain, where deployed code cannot be easily patched, this principle is magnified tenfold. We're not just checking for bugs; we're building trust in the system.
This lesson will guide you through creating a comprehensive test suite using Hardhat's environment, which integrates the Mocha testing framework and the Chai assertion library. We will systematically verify every piece of functionality we've built, ensuring our stablecoin behaves exactly as intended under all conditions.
The Philosophy of Smart Contract Testing
Before we write our first test, it's worth taking a moment to understand why the process is so rigorous. Smart contracts, once deployed, are immutable. There's no "hotfix" you can push to correct a flaw.
The following short video from Chainlink offers a clear explanation of this reality and introduces the mindset of "Test-Driven Development" (TDD), a practice where tests are often written before the features themselves.
This clip from "Testing with Hardhat" explains the critical need for testing in the context of immutable blockchain code.
Watch the section from "the reason is" to understand why smart contract programming is often compared to hardware engineering. Then, continue watching to learn about the different types of tests, focusing on the description of unit tests, which will be our focus today.
Our approach will be to write unit tests for each isolated piece of our contract's logic: Can a minter mint? Can a non-minter not mint? Does a transfer fail when paused? Each question will become a test case.
Setting Up the Test Environment
First, create a new file in your project's test directory named USDStablecoin.test.js. This is where our test suite will live.
Hardhat uses Mocha, which provides functions like describe() to group tests and it() to define individual test cases. It also uses Chai, an assertion library that gives us the expect() function to check if our contract's behavior meets our expectations.
Let's begin by structuring our test file. We'll need to import expect and ethers, and then create a beforeEach block. This is a special function that Mocha runs before each test case, ensuring that every test starts with a fresh, predictably clean state.
Here is the initial setup code for USDStablecoin.test.js:
const { expect } = require("chai");
const { ethers } = require("hardhat");

describe("USDStablecoin", function () {
  let USDStablecoin, usdStablecoin, owner, addr1, addr2;
  let MINTER_ROLE, BURNER_ROLE, PAUSER_ROLE;

  // Our stablecoin has 6 decimals, so we create a helper function for clarity
  const parseUnits = (amount) => ethers.utils.parseUnits(amount.toString(), 6);
  const formatUnits = (amount) => ethers.utils.formatUnits(amount, 6);

  beforeEach(async function () {
    // Get signers, which represent Ethereum accounts
    [owner, addr1, addr2] = await ethers.getSigners();

    // Deploy the USDStablecoin contract
    const USDStablecoinFactory = await ethers.getContractFactory("USDStablecoin");
    usdStablecoin = await USDStablecoinFactory.deploy();
    await usdStablecoin.deployed();

    // Fetch the role identifiers from the contract
    MINTER_ROLE = await usdStablecoin.MINTER_ROLE();
    BURNER_ROLE = await usdStablecoin.BURNER_ROLE();
    PAUSER_ROLE = await usdStablecoin.PAUSER_ROLE();
  });

  // Our test cases will go here...
});
This beforeEach block does three crucial things for us:
- It gets a list of test accounts (signers) provided by Hardhat.
ownerwill be the deployer. - It deploys a brand new
USDStablecoincontract. - It retrieves the
bytes32identifiers for our access control roles, which we'll need to check for the correct error messages.
Testing the Minting Functionality
Let's start with the mint function. We need to test two primary scenarios: the "happy path" where an authorized user successfully mints tokens, and the "unhappy path" where an unauthorized user's attempt is correctly blocked.
Add the following describe block inside your main describe("USDStablecoin", ...) block.
  describe("Minting", function () {
    it("Should allow an account with MINTER_ROLE to mint tokens", async function () {
      const mintAmount = parseUnits(100);

      // The owner has MINTER_ROLE by default from the constructor.
      // We expect the mint transaction to emit a Transfer event.
      await expect(usdStablecoin.mint(addr1.address, mintAmount))
        .to.emit(usdStablecoin, "Transfer")
        .withArgs(ethers.constants.AddressZero, addr1.address, mintAmount);

      // Check that addr1's balance and the total supply were updated correctly.
      expect(await usdStablecoin.balanceOf(addr1.address)).to.equal(mintAmount);
      expect(await usdStablecoin.totalSupply()).to.equal(mintAmount);
    });

    it("Should prevent an account without MINTER_ROLE from minting", async function () {
      const mintAmount = parseUnits(100);

      // Construct the expected error message from OpenZeppelin's AccessControl contract.
      const expectedError = `AccessControl: account ${addr1.address.toLowerCase()} is missing role ${MINTER_ROLE}`;

      // We use .connect(addr1) to have addr1 be the caller.
      // We expect this transaction to be reverted with our specific error message.
      await expect(
        usdStablecoin.connect(addr1).mint(addr1.address, mintAmount)
      ).to.be.revertedWith(expectedError);
    });
  });
Notice the patterns here:
expect(TRANSACTION).to.emit(CONTRACT, EVENT).withArgs(...)checks that an event was fired with the correct parameters.expect(VALUE).to.equal(EXPECTED_VALUE)checks for state changes, like balances and total supply.await expect(TRANSACTION).to.be.revertedWith(ERROR_MESSAGE)is how we test for failed conditions. This is the most common pattern for security and access control testing.
The following video demonstrates this exact revertedWith pattern. Although the contract and error message are different, the testing syntax is identical.
Hardhat Testing Tutorial | Solidity Smart Contract Testing Developer | Hardhat Testing Course
This clip from "Hardhat Testing Tutorial" shows how to test for a specific revert reason when a constructor argument is invalid.
Watch the section from "should fail if" to see the expect(...).to.be.revertedWith(...) syntax in action. This is precisely how we test that our access control modifiers are working correctly.
Testing the Burning Functionality
Next, we'll apply the same principles to the burn function. We need to verify that a BURNER_ROLE holder can burn their own tokens, but no one else can, and that no one can burn more than they own.
Add this describe block to your test file:
  describe("Burning", function () {
    const burnAmount = parseUnits(50);

    beforeEach(async function() {
        // Mint 100 tokens to addr1 and grant it BURNER_ROLE for testing.
        await usdStablecoin.mint(addr1.address, parseUnits(100));
        await usdStablecoin.grantRole(BURNER_ROLE, addr1.address);
    });

    it("Should allow an account with BURNER_ROLE to burn its own tokens", async function () {
      const initialTotalSupply = await usdStablecoin.totalSupply();

      // addr1 connects and burns its tokens
      await expect(usdStablecoin.connect(addr1).burn(burnAmount))
        .to.emit(usdStablecoin, "Transfer")
        .withArgs(addr1.address, ethers.constants.AddressZero, burnAmount);

      // Check that balance and total supply are reduced
      expect(await usdStablecoin.balanceOf(addr1.address)).to.equal(parseUnits(50));
      expect(await usdStablecoin.totalSupply()).to.equal(initialTotalSupply.sub(burnAmount));
    });

    it("Should prevent an account without BURNER_ROLE from burning", async function () {
      const expectedError = `AccessControl: account ${addr2.address.toLowerCase()} is missing role ${BURNER_ROLE}`;

      await expect(
        usdStablecoin.connect(addr2).burn(burnAmount)
      ).to.be.revertedWith(expectedError);
    });

    it("Should prevent burning more tokens than the account balance", async function () {
      const excessAmount = parseUnits(200); // addr1 only has 100

      // This revert message comes from the underlying ERC20 _burn implementation.
      await expect(
        usdStablecoin.connect(addr1).burn(excessAmount)
      ).to.be.revertedWith("ERC20: burn amount exceeds balance");
    });
  });
Testing the Pausable Functionality
Finally, we test our emergency brake. We need to confirm that only the PAUSER_ROLE can pause/unpause the contract, and that transfers are indeed blocked when the contract is paused.
The testing approach for this is well-demonstrated in many tutorials. The code example below is written for Hardhat, but the testing logic is universal. Notice how it first impersonates the owner to pause the contract, then impersonates a different user to attempt a transfer, expecting it to fail.
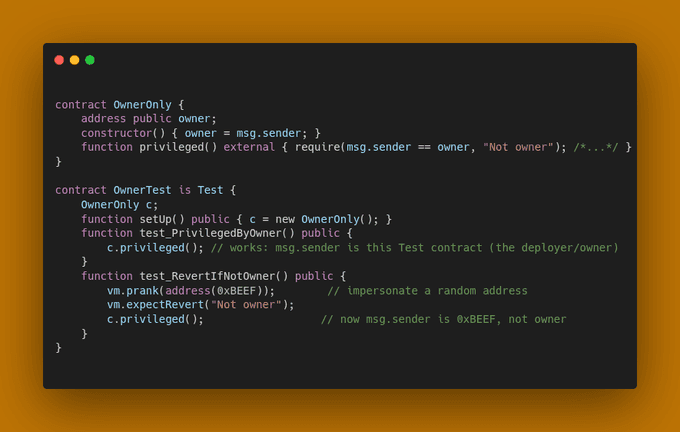
Now, let's implement this logic in our test file. Add the final describe block:
  describe("Pausable", function () {
    const transferAmount = parseUnits(100);

    beforeEach(async function() {
        // Mint some tokens to addr1 for transfer tests
        await usdStablecoin.mint(addr1.address, transferAmount);
    });

    it("Should prevent an account without PAUSER_ROLE from pausing", async function () {
      const expectedError = `AccessControl: account ${addr1.address.toLowerCase()} is missing role ${PAUSER_ROLE}`;
      await expect(usdStablecoin.connect(addr1).pause()).to.be.revertedWith(expectedError);
    });

    it("Should prevent transfers when paused", async function () {
      // Owner (has PAUSER_ROLE) pauses the contract
      await usdStablecoin.pause();
      expect(await usdStablecoin.paused()).to.equal(true);

      // Attempting a transfer should fail
      await expect(
        usdStablecoin.connect(addr1).transfer(addr2.address, transferAmount)
      ).to.be.revertedWith("ERC20Pausable: token transfer while paused");
    });

    it("Should allow transfers when unpaused", async function () {
      // Pause and then unpause the contract
      await usdStablecoin.pause();
      await usdStablecoin.unpause();
      expect(await usdStablecoin.paused()).to.equal(false);

      // The transfer should now succeed
      await usdStablecoin.connect(addr1).transfer(addr2.address, transferAmount);
      expect(await usdStablecoin.balanceOf(addr2.address)).to.equal(transferAmount);
    });
  });
To run your complete test suite, execute the following command in your terminal from the project root:
npx hardhat test
You should see all your tests pass, giving you confidence that your stablecoin's core administrative functions are working correctly and securely.
Conclusion
In this hands-on lesson, you've built a robust test suite that validates the core administrative features of our USDStablecoin. This process moves us from simply writing code to verifying its behavior, a crucial step in developing secure and reliable smart contracts.
Key Takeaways:
- Test Structure: You learned to structure tests using
describe,it, and thebeforeEachhook for clean state management. - Testing Happy Paths: You verified that functions work as expected under normal conditions by checking for correct state changes (balances, total supply) and event emissions.
- Testing Failure Scenarios: You confirmed the security of your contract by writing tests that expect transactions to
revert. This is essential for validating access control (onlyRole) and otherrequirestatements. - Simulating Users: You used
connect(signer)to simulate function calls from different accounts, a fundamental technique for testing multi-user interactions and permissions.
Our contract is now feature-complete and well-tested locally. The next logical step is to see how it behaves in a more realistic environment. In our next lesson, we will deploy the upgradeable stablecoin to a testnet and demonstrate minting, transferring, and pausing, bringing your creation onto a live blockchain for the first time.