
Good to see you again. Your last lesson ended with a focused commit for resilient video-library loading on main. That commit is the stable starting point for this lesson.
Now you will use a feature branch to add one small improvement, verify it independently, and merge it back into main. The aim is not merely to memorize commands: you should be able to answer, at every step, which branch will receive the next commit and which branch will receive the merge result. Plan for about 45 minutes.
Why work on a feature branch?
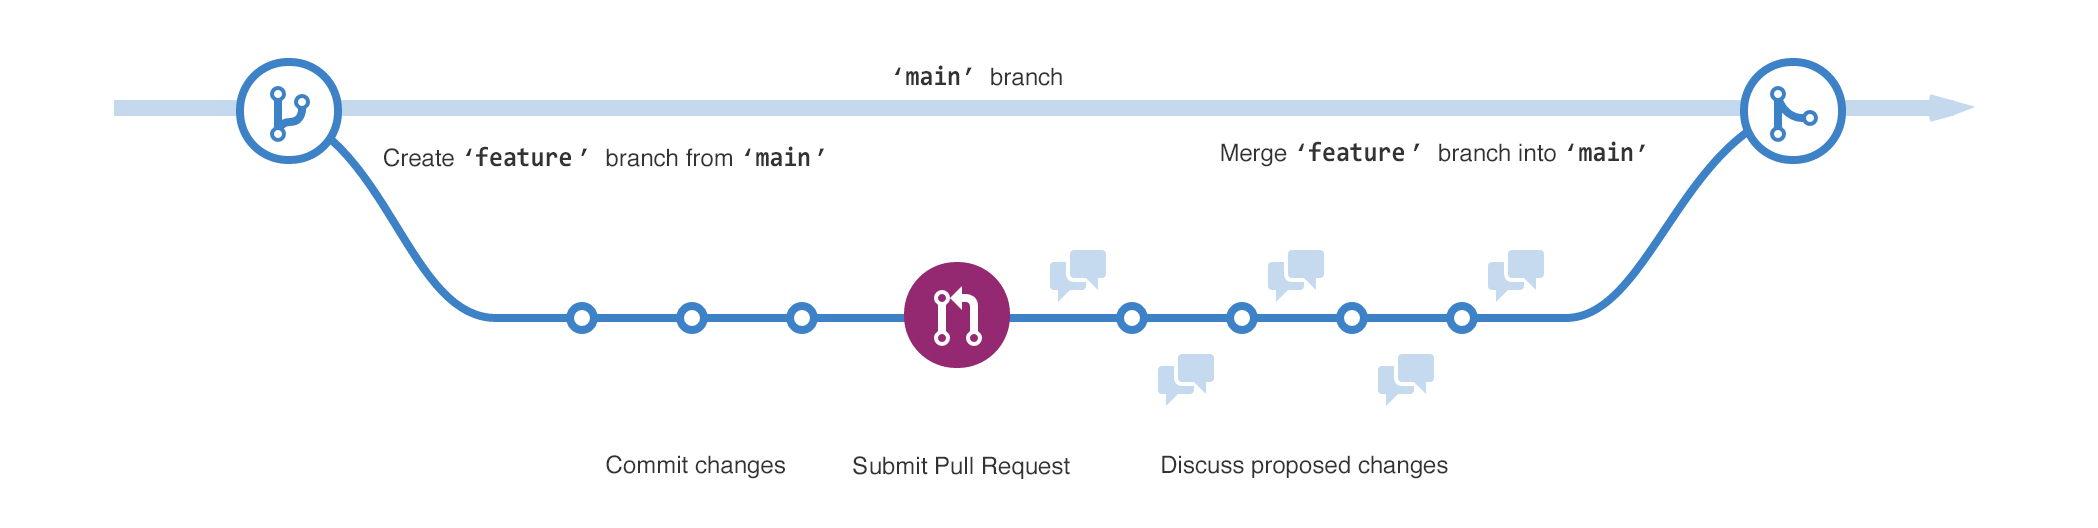
A branch is a named pointer to a commit. It is not a copied project folder and it does not create duplicate files. When two branches start at the same commit, they initially point to exactly the same project snapshot. They diverge only when you make a commit while one of them is checked out.
HEAD identifies your current branch. Therefore:
- create and switch to a feature branch;
- make commits while that feature branch is current;
- switch to
main; - merge the feature branch into the currently checked-out
mainbranch.
This preserves main as a stable integration point while you work on an incomplete change elsewhere. If you need to pause the feature, switch back to main, or begin another independent piece of work, the commits already made on the feature branch remain safely recorded.
A useful sentence to say aloud before a merge is:
“I am on target branch and am merging source branch into it.”
For example:
git switch main
git merge feature/video-count-summary
This means: “Put the work from feature/video-count-summary into main.”
See the branch-and-merge model
The Git Book explanation uses git checkout, which remains valid, but this lesson uses the newer, clearer git switch command for moving between branches. Both commands work with modern Git installations.
Git - Basic Branching and Merging
Read the relevant parts of Pro Git’s “Basic Branching” and “Basic Merging.” The examples use a hotfix and an issue branch, but the commit-pointer model is exactly the one you will use for the video-library feature.
In “Basic Branching,” read from the issue-branch example through the explanation that commits advance the checked-out branch. Focus on feature commits: the active branch, rather than Git guessing your intention, is what moves when you commit. Still under “Basic Branching,” read the paragraph beginning with the description of returning to the production branch. It explains why changing branches updates your files; follow the working-tree change. Committed feature work has not disappeared—it becomes visible again when you switch back to its branch. Then read “Basic Merging” through the explanation of a merge commit. Pay particular attention to the merge result. Your first merge will probably be a fast-forward rather than a merge commit; both integrate the feature correctly.
This short video provides a visual run-through of the same mechanics.
Git Branching and Merging - Detailed Tutorial
Watch “Git Branching and Merging - Detailed Tutorial” by SuperSimpleDev for a visual account of isolated feature commits and the rule that a merge lands on the currently checked-out branch.
Watch branch isolation. Focus on how HEAD moves to the feature branch and how subsequent commits leave main unchanged. Then watch merging back. The essential rule is that git merge <source> integrates the source into the branch you currently have checked out.
Two kinds of merge matter:
| Situation | What Git does | What you will likely see |
|---|---|---|
main has not changed since the feature branch was created | Moves main forward to the feature commit(s) | Fast-forward |
Both main and the feature branch have new commits | Combines their histories, often creating a merge commit | Merge made by... |
A fast-forward is a successful merge, not a shortcut that skipped your feature. Git is simply able to move the main pointer forward because no parallel main commit needs combining.
Lab: create an isolated video-library improvement
You will add a small dynamic summary such as “3 videos available” above the video grid. It is intentionally modest: the important practice is developing it entirely on the feature branch, not making the UI feature complicated.
1. Start from a clean main
Open the terminal at the Vite project root, where package.json is located.
git status
git branch --show-current
You want a clean working tree and, after the next command, to be on main:
git switch main
git status
If git status reports uncommitted changes, do not create a new branch yet. Either finish and commit the existing coherent task, or intentionally set it aside. Uncommitted edits travel in your working directory and can make branch switching confusing.
If this repository is already connected to GitHub and main has an upstream tracking branch, synchronize it before branching:
git pull --ff-only
--ff-only refuses to create an unexpected merge commit while updating your local main. If Git says there is no upstream branch or no remote configured, skip this command; your local main is still a valid baseline for this exercise.
Avoid using git reset --hard as a routine way to “update” a branch. It can discard local commits and uncommitted work.
2. Create and enter the feature branch
Use a short, descriptive branch name that states the purpose:
git switch -c feature/video-count-summary
Confirm the active branch:
git branch --show-current
git log --oneline --decorate --max-count=3
You should see:
feature/video-count-summary
If your Git version does not support git switch, use the equivalent older command:
git checkout -b feature/video-count-summary
At this point, main and feature/video-count-summary point to the same latest commit. The next commit you make will advance only feature/video-count-summary.
3. Implement the summary
In index.html, locate the area around the video-library heading and video grid. Add a live region just before the grid:
<p id="video-count" class="video-count" aria-live="polite"></p>
The summary should communicate a meaningful update without replacing the existing loading-status region from the previous lesson.
In src/main.js, select the element near your other DOM queries:
const videoCount = document.querySelector("#video-count");
Then, inside the successful path of loadVideos(), update the summary after validating the response data and before or after calling your existing rendering function:
videoCount.textContent =
  `${videos.length} ${videos.length === 1 ? "video" : "videos"} available`;
Use the actual variable name returned by your previous validateVideos() call. The key design decision is that the count comes from validated data, not from unvalidated JSON or a hard-coded number.
In the failure path, clear the count so a stale successful count is not shown beside an error message:
videoCount.textContent = "";
If your existing CSS already has an appropriate muted text style, reuse it. Otherwise, add a small rule in src/style.css:
.video-count {
  margin-block: 0.5rem 1rem;
  color: #5b6472;
}
This feature should remain focused:
- it reports the number of successfully loaded records;
- it handles singular and plural wording;
- it does not alter the response-validation or retry behavior from the previous lesson;
- it does not introduce filtering, sorting, or a new data model.
4. Run and inspect the feature on its branch
Start the Vite development server:
npm run dev
In the browser, verify that the count appears after the video records load. With one record, it should read 1 video available; otherwise, it should use videos.
Also check that the existing failure behavior remains coherent:
- Temporarily use browser DevTools to simulate an offline network or otherwise trigger the existing request failure.
- Confirm that the count is cleared when the error state appears.
- Restore the network and use the existing retry button.
- Confirm the count reappears after a successful retry.
Finally, produce a production build:
npm run build
A successful build does not replace careful browser testing, but it checks that the bundled application can be built from the feature branch.
Commit the feature and inspect what differs from main
You practiced deliberate staging in the previous lesson. Apply the same routine here.
git status
git diff
git add index.html src/main.js src/style.css
git diff --staged
git diff --staged --check
git commit -m "Add video library count summary"
If you did not need a CSS change, omit src/style.css from git add. Stage only the files that support this feature.
Now compare the feature branch to its main baseline:
git log --oneline main..HEAD
git diff --stat main...HEAD
The first command lists commits reachable from your current feature branch but not from main. The second summarizes the file-level changes introduced by the feature since the branches diverged.
At this stage, your history should conceptually look like this:
main:                        A
feature/video-count-summary: A -- B
Ais the resilient loading feature committed in the previous lesson.Bis your new count-summary commit.HEADis onfeature/video-count-summary.
main has not received B, which is exactly why the feature branch is useful: the stable branch remains untouched until you decide the work is ready.
Merge the completed feature into main
Before merging, do one last feature-branch check:
git status
npm run build
The working tree should be clean. Now switch to the target branch:
git switch main
git status
Notice that the video-count code is no longer present in the working files after switching to main. That is expected. The count feature exists in the commit reached by feature/video-count-summary, not yet in the commit reached by main.
Merge the source branch into your current main branch:
git merge feature/video-count-summary
For this planned exercise, Git will likely report something like:
Updating <old-commit>..<new-commit>
Fast-forward
That means main now points to the same commit as your feature branch:
main:                        A -- B
feature/video-count-summary: A -- B
Run the build again from the integrated branch:
npm run build
Then inspect the history:
git log --oneline --graph --decorate --all
You should see both branch names at the commit containing the video-count summary. Open the application once more and confirm the integrated main branch displays the count correctly.
Once you have verified the merge, delete the local feature branch:
git branch -d feature/video-count-summary
Git allows ordinary -d deletion only when the branch has been merged, which is a useful safety check. Deleting the branch name does not delete the feature commit: main still reaches it.
Finish with:
git status
git branch
You should have a clean working tree and main as the current branch.
If the merge does not behave as expected
A few responses are worth recognizing:
| Git output | Meaning | Appropriate action |
|---|---|---|
Fast-forward | The feature was integrated cleanly by moving main forward. | Verify the build and behavior. |
Already up to date. | The current branch already contains the source branch’s commits, or you selected the wrong branch. | Inspect git log --graph --decorate --all before deleting anything. |
| A merge commit is created | Both branches gained commits after they split, and Git combined them automatically. | Build and test the result; this is a valid merge. |
CONFLICT | Git cannot decide how to combine competing edits. | Stop before guessing. The next lesson is devoted to resolving conflicts safely. |
Do not use git branch -D merely to silence a deletion warning, and do not use git reset --hard to escape an unfamiliar merge state. First inspect the graph and git status; Git usually tells you precisely what state it is in.
Wrap-up
You have completed the local feature-branch cycle:
- Began from a clean, current
main. - Created
feature/video-count-summaryand made the feature commit there. - Tested and reviewed the feature independently.
- Switched to
mainbefore runninggit merge. - Verified the merged application and safely deleted the merged feature branch.
The central rule is simple but essential: commits advance the current branch, and a merge integrates a named source branch into the current target branch.
Next, you will deliberately create a situation where both branches change the same part of a file, then resolve the resulting merge conflict without throwing away valid work.
Can't find a good explanation? Sign up and we'll make it for you
Sign up