
Good to see you again. In the previous lesson, you completed a meaningful frontend change: the video library now requests JSON data, validates the response, represents loading and failure states, and lets a user retry. Before moving on to collaborative branch work, you need to turn that implementation into a Git commit that another developer can understand quickly.
This lesson is about treating a commit as a small, reviewable unit of project history, not as a button you press at the end of a day. You will use the staging area deliberately, inspect exactly what will be recorded, and create a commit for the resilient video-library loading feature.
A commit records an intentional change
Git distinguishes between three versions of your project:
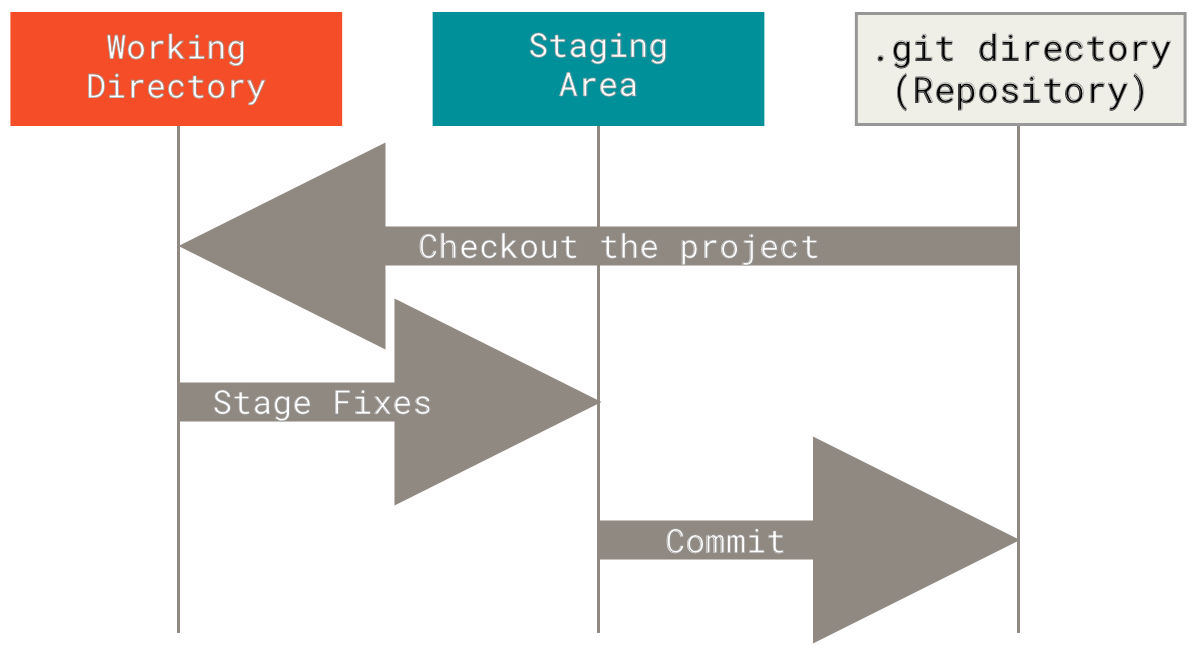
- Working Directory — the files currently on disk. This includes finished work, experiments, debugging output, and unrelated edits.
- Staging Area — also called the index. This is your draft of the next commit.
- Repository — the committed history stored in
.git.
The crucial distinction is:
A commit contains what is staged, not automatically everything that has changed in your working directory.
So the useful workflow is not:
git add .
git commit -m "changes"
Instead, it is:
Inspect working changes
        ↓
Choose one coherent purpose
        ↓
Stage only the files or portions needed for that purpose
        ↓
Inspect the staged diff
        ↓
Commit with a precise message
A focused commit is not necessarily tiny in line count or limited to one file. Your fetch feature correctly spans several files:
index.htmladds the empty video grid, status region, and retry button.src/style.cssstyles the status text and retry control.src/main.jsfetches, validates, renders, and reports failures.public/api/videos.jsonsupplies the local endpoint used by the feature.
Those files belong in one commit because together they produce one usable behavior: resilient loading of the video library. Splitting the JavaScript from the required markup, for example, would leave an intermediate commit that does not work.
By contrast, these should usually be separate commits:
- reformatting unrelated CSS;
- renaming variables throughout the project;
- adding a README note unrelated to the feature;
- removing a temporary debug statement discovered while working.
A clean history helps review, debugging, and safe rollback. If a future change breaks loading, a commit named Add resilient video library loading tells you far more than fix stuff or wip.
What “small and focused” actually means
Read the following guidance before staging. It emphasizes that “small” is about a single self-contained idea, not blindly minimizing the number of changed lines.
Read “Small CLs” from Google Engineering Practices. It provides a practical standard for deciding whether a change belongs in one reviewable unit and why that improves maintenance.
Read the “Why Write Small CLs?” section, focusing on the practical benefits of smaller changes. Then read “What is Small?” through the definition of a self-contained change. Finally, in “Separate Out Refactorings,” read from the cleanup guidance; note the distinction between a tiny local cleanup that may travel with a feature and a broad refactoring that deserves its own change.
Apply that standard to the video-library feature. It has one purpose:
Load and display video records reliably, including loading and failure feedback.
The HTML, CSS, JavaScript, and JSON fixture all support that purpose. They should travel together.
A useful pre-commit test is to finish this sentence:
“This commit ________.”
If you can write one clear sentence without joining unrelated ideas with “and also,” you probably have a good commit boundary.
For this lesson, the sentence is:
“This commit adds resilient video-library loading.”
Inspect before you stage
Open a terminal at the root of your Vite project—the directory containing package.json—and begin with:
git status
A likely result after the previous lesson might resemble:
On branch main
Changes not staged for commit:
  modified:   index.html
  modified:   src/main.js
  modified:   src/style.css

Untracked files:
  public/api/videos.json
Your exact file list may differ. Read it rather than assuming it is correct.
If Git says that this is not a repository, initialize it now:
git init
git branch -M main
If this is the first time Git has been used on your machine, Git may also ask you to configure an author name and email. Follow its displayed command, or configure them deliberately:
git config --global user.name "Your Name"
git config --global user.email "you@example.com"
If your whole Vite project is currently untracked because you initialized Git only today, an initial project snapshot is a reasonable special case. Do not misleadingly label that broad baseline as a narrow fetch feature. Use a message such as:
git commit -m "Initialize video library frontend"
after checking that generated files such as node_modules and sensitive local configuration are excluded. From the next change onward, use the focused workflow below.
Review the working changes
For an already tracked file, git diff compares the working directory to the staging area:
git diff -- index.html src/main.js src/style.css
Review the diff as if you were a teammate seeing it for the first time:
- Does the status message use
role="status"? - Does the retry control remain a real
<button>? - Does
loadVideos()checkresponse.okbefore parsing JSON? - Are server-provided strings rendered with
textContent, rather thaninnerHTML? - Is any temporary
console.logor experimental code still present?
git diff does not show the contents of an untracked file such as public/api/videos.json. Open that file in your editor and review it too. Confirm that its records match the shape required by validateVideos().
Before recording the feature, run the project’s build:
npm run build
A successful build is not a complete test suite, but it catches many JavaScript syntax, import, and bundling problems. Do this before staging so that a failed build does not become part of a supposedly finished commit.
Stage the feature as one unit
Now select only the four files required for the video-library loading feature:
git add index.html src/style.css src/main.js public/api/videos.json
This copies the current versions of those files into the staging area. It does not create a commit yet.
Immediately inspect the staged version:
git diff --staged
git diff --staged answers the most important pre-commit question:
“If I commit right now, exactly what will Git record?”
You can also ask Git to check the staged diff for whitespace errors:
git diff --staged --check
Then compare the two kinds of diff:
| Command | Comparison | Use it for |
|---|---|---|
git diff | Working Directory vs. Staging Area | Finding changes you have made but have not selected for the next commit |
git diff --staged | Staging Area vs. most recent commit | Reviewing exactly what will be committed |
This distinction becomes valuable the moment you continue editing after staging. For example, suppose you stage src/main.js, then add a temporary debug line:
console.log("Loaded videos:", videos);
The debug line is in your working directory, but it is not automatically added to the staged version. git diff will reveal it, while git diff --staged will still show only the intended feature.
If you accidentally stage the wrong file, unstage it without deleting your work:
git restore --staged path/to/file
For example:
git restore --staged README.md
The file remains edited in your working directory; it is simply removed from the proposed commit.
When one file contains two unrelated changes
Selecting whole files is often enough. But real work frequently mixes two ideas in one file: perhaps you implemented fetch handling in src/main.js and also reorganized an unrelated helper while you were there.
This is where patch staging is useful. Watch the short demonstration, then use the same mental model: Git presents a small block of changes—a hunk—and you decide whether it belongs in the current commit.
The BEST git command you've never heard of | GIT ADD PATCH
Watch “The BEST git command you've never heard of | GIT ADD PATCH” from typecraft for a concrete demonstration of selectively staging related hunks while leaving unrelated changes unstaged.
Watch the patch workflow. The example uses several configuration changes, but focus on the decision at each hunk: does this specific change support the commit’s stated purpose, or should it wait for another commit?
To stage selected parts of a tracked file, run:
git add -p src/main.js
Git will show a hunk and ask something similar to:
Stage this hunk [y,n,q,a,d,s,e,?]?
The most useful responses initially are:
y— stage this hunk.n— leave this hunk unstaged.s— try to split the hunk into smaller hunks.q— stop patch staging; leave remaining hunks untouched.?— show help.
Use it conservatively. If the fetch logic and an unrelated cleanup appear in separate hunks, stage the fetch hunk with y and skip the cleanup with n.
If unrelated lines are inseparably mixed in one hunk, the safest beginner-friendly option is often to temporarily remove or undo the unrelated edit, stage the intended feature, commit it, and then restore or redo the cleanup afterward. Git also offers an e option for manually editing a patch, but it is easy to create an invalid patch if you do not yet understand the diff format.
After any patch staging, always inspect both views again:
git diff --staged
git diff
The first should contain only the commit you are about to make. The second should contain only work you intentionally left for later.
Create and verify the commit
Once the staged diff represents exactly the completed loading feature, make the commit:
git commit -m "Add resilient video library loading"
This message works because it:
- begins with an action verb;
- states the behavior added;
- avoids vague words such as “updates” or “changes”;
- does not list every implementation detail.
Prefer messages such as:
Add resilient video library loading
Fix retry button focus state
Document local development setup
Avoid messages such as:
stuff
fix
update files
working version
A commit message is part of the project’s documentation. Months later, someone should be able to scan git log and understand the story of the application without opening every diff.
Now verify the result:
git status
git log --oneline --max-count=5
git show --stat --oneline HEAD
You want to see:
- a clean working tree, or only the intentionally unstaged work you chose to leave out;
- your new commit near the top of the log;
- a summary showing the expected HTML, CSS, JavaScript, and JSON files.
If you want one final close inspection of the committed content:
git show --check HEAD
This displays the latest commit and reports whitespace errors if it finds any.
At this point, the frontend feature has a durable, comprehensible checkpoint. It is local Git history—not yet a GitHub upload—and that is exactly what you want before learning how to develop safely on a feature branch.
A repeatable pre-commit routine
Use this compact routine whenever you finish a coherent piece of work:
git status
git diff
npm run build
git add <only-related-files>
git diff --staged
git diff --staged --check
git commit -m "Clear action-oriented message"
git status
The commands are simple; the judgment is the real skill:
- Choose one purpose.
- Stage only the changes required for that purpose.
- Ensure the commit leaves the project in a usable state.
- Review the staged diff, not just the files you remember editing.
- Describe the outcome clearly.
Wrap-up
You have now used Git’s staging area to create a focused commit rather than treating every current edit as one undifferentiated batch.
The key ideas are:
- Your working directory may contain many changes; the staging area defines the next commit.
- A focused commit is a self-contained, meaningful project step—not necessarily a single file or a minimal number of lines.
- The video-library loading feature belongs in one commit because its HTML, CSS, JavaScript, and local JSON endpoint work together.
- Use
git diffto inspect unstaged work andgit diff --stagedto inspect the exact proposed commit. - Use
git add -pwhen different purposes are mixed in one tracked file. - Clear commit messages make review, debugging, rollback, and future maintenance easier.
Next, you will create a feature branch, develop a change there, and merge it back into main without losing this readable history.
Can't find a good explanation? Sign up and we'll make it for you
Sign up