
Good to continue from the immutable-data patterns in the previous lesson. You now have a way to transform video records safely; the next challenge is preventing all that logic from accumulating in one large browser script.
In this lesson, you will split a small browser application into ES modules, understand the import/export boundary, and use npm and Vite to install and run a modern JavaScript project. This is the tooling foundation for the React work ahead: React components are modules, Vite is commonly the development environment, and npm manages React plus its ecosystem.
From one script to a module graph
A single script.js file is manageable when it contains a few event listeners. It becomes difficult to navigate when it contains page rendering, API calls, validation, state transformations, and helpers. ES modules solve this by allowing each file to own one focused responsibility and explicitly declare what it shares.
For example, a small video-library page might separate:
- video data and data-query helpers;
- formatting logic;
- DOM rendering;
- application startup and event wiring.
The key idea is simple:
- A file exports values it intentionally makes available.
- Another file imports the values it needs.
- Files that are not exported remain private implementation details of their module.
This makes dependencies visible. If main.js imports renderVideoList, you can immediately see that the application entry point relies on rendering code. That explicitness becomes particularly valuable once a React project contains dozens of components, hooks, and API utilities.
Watch “JavaScript ES6 Modules” by Web Dev Simplified for a compact visual explanation of why modules exist and how export/import syntax fits together.
Begin with the motivation for splitting code into focused files. Then watch export styles to distinguish default and named exports. Finish with imports in practice, paying close attention to the type="module" script attribute, relative paths, and aliases.
Named exports and default exports
Use a named export when a module provides several meaningful values:
// data.js
export const videos = [
  { id: 1, title: "React State", status: "ready" },
  { id: 2, title: "FFmpeg Basics", status: "processing" },
];

export function getReadyVideos(items) {
  return items.filter(video => video.status === "ready");
}
A consumer must import those exact exported names, enclosed in braces:
import { videos, getReadyVideos } from "./data.js";
The braces matter: they mean “import these specific named exports.”
You can rename a named import locally when there is a good reason:
import { getReadyVideos as selectReadyVideos } from "./data.js";
A module can also have one default export. This often suits a file whose main purpose is one function, class, or component.
// format-video.js
export default function formatVideo({ title, status }) {
  return `${title} — ${status}`;
}
Import a default export without braces:
import formatVideo from "./format-video.js";
The importing module chooses the local name for a default import:
import makeVideoLabel from "./format-video.js";
That flexibility is convenient, but it can also make a codebase harder to search if naming becomes inconsistent. A practical convention for this course:
- Prefer named exports for utilities, constants, hooks, and most functions.
- Use a default export when a file represents one primary thing—later, commonly one React component.
Browser-specific rules to remember
Native browser modules use URLs to locate files. Therefore, a relative import needs a path prefix and normally the file extension:
import { videos } from "./data.js";
import { renderVideoList } from "./ui/render.js";
These are different:
import { videos } from "./data.js";  // a file relative to this module
import { nanoid } from "nanoid";     // a package name, resolved by a tool such as Vite
A browser cannot treat an ordinary script as a module. Your HTML must load the entry module using type="module":
<script type="module" src="/src/main.js"></script>
You link only main.js in the HTML. When the browser evaluates it, it follows its imports and loads the required module files. Do not add separate script tags for data.js, render.js, and every other imported file.
JavaScript modules - MDN Web Docs - Mozilla
Read this MDN guide to connect the syntax to the browser’s loading model. It explains both the motivation for modules and the details that commonly cause first-time setup errors.
In “A background on modules,” read the opening rationale. Then read “Basic example structure,” focusing on the separation between the entry file and the files under the modules directory. Next, in “Applying the module to your HTML,” locate the explanation beginning the separate-file guidance; note why the entry script needs type="module". Finally, read the first bullet of “Other differences between modules and classic scripts,” from local testing. Modules must be served over HTTP during development rather than opened through a file:// URL.
Modules are automatically deferred: the browser waits until the HTML has been parsed before executing the module entry point. They also run in strict mode and have their own top-level scope. That means this will not silently become a global variable shared with every other script:
// format-video.js
const fallbackStatus = "unknown";
If another module needs fallbackStatus, export it explicitly.
Build a modular video-library page
The best way to make modules feel natural is to use them for a small feature. Create the following structure in a folder called video-library:
video-library/
├── index.html
└── src/
    ├── data.js
    ├── format-video.js
    ├── render.js
    └── main.js
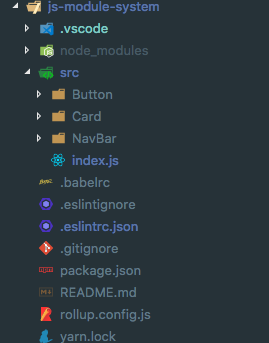
The JavaScript project directory structure image below shows a larger version of the same principle: source code lives under src, while dependencies and project configuration remain at the project root.
Start with a minimal page. In index.html:
<!doctype html>
<html lang="en">
  <head>
    <meta charset="UTF-8" />
    <meta name="viewport" content="width=device-width, initial-scale=1.0" />
    <title>Video Library</title>
  </head>
  <body>
    <main>
      <h1>My Video Library</h1>
      <p id="summary"></p>
      <ul id="video-list"></ul>
    </main>

    <script type="module" src="./src/main.js"></script>
  </body>
</html>
Now place data and a focused selector in src/data.js:
export const videos = [
  { id: 1, title: "React State", status: "ready", views: 240 },
  { id: 2, title: "FFmpeg Basics", status: "processing", views: 85 },
  { id: 3, title: "PostgreSQL Joins", status: "ready", views: 120 },
];

export function getReadyVideos(items) {
  return items.filter(video => video.status === "ready");
}
This module owns the sample data and a non-mutating query. It does not know anything about HTML, which makes it reusable and easy to test later.
In src/format-video.js, create one default-exported formatting function:
export default function formatVideo({ title, status, views }) {
  return `${title} — ${status} — ${views} views`;
}
Next, create src/render.js:
import formatVideo from "./format-video.js";

export function renderVideoList(container, videos) {
  const listItems = videos.map(video => {
    const item = document.createElement("li");
    item.textContent = formatVideo(video);
    return item;
  });

  container.replaceChildren(...listItems);
}
Notice the division of responsibilities:
render.jsimports the formatter because it needs labels.- It exports only
renderVideoList. - It receives a container and data rather than reaching into unrelated parts of the page.
Finally, wire everything together in src/main.js:
import { getReadyVideos, videos } from "./data.js";
import { renderVideoList } from "./render.js";

const readyVideos = getReadyVideos(videos);

const summary = document.querySelector("#summary");
const videoList = document.querySelector("#video-list");

summary.textContent = `${readyVideos.length} videos are ready to play`;
renderVideoList(videoList, readyVideos);
Think of main.js as the application’s composition root: it chooses which modules work together and starts the page. This role maps closely to a future React main.jsx, which will mount the React application into an HTML element.
At this stage, opening index.html by double-clicking it may result in an error related to CORS or loading a module from file://. This is expected. The next section supplies the local development server that modules and modern frontend projects need.
npm: a project’s dependency and task manager
Node.js is a JavaScript runtime that also provides the tooling ecosystem used by modern frontend development. npm is its standard package manager and command-line tool. Once Node.js is installed, verify both commands in a terminal:
node --version
npm --version
npm has two important jobs:
- Dependency management — download and track libraries your project uses.
- Task execution — run project-defined commands such as a development server, production build, formatter, or test suite.
An introduction to the npm package manager | Node.js Learn
Read this introduction from Node.js Learn to establish what npm stores, installs, versions, and runs. Focus on the workflow rather than memorizing every installation flag.
In “Introduction to npm” and “Packages,” read what npm is. In “Installing all dependencies,” follow the install workflow. Continue through “Installing a single package,” especially dependency categories. In “Updating packages,” read from version constraints. Finish with “Running Tasks,” where scripts turn memorable npm run commands into project workflows.
The three files and folders you must distinguish
After npm is used in a project, you will commonly see these:
| Item | What it contains | Commit to Git? |
|---|---|---|
package.json | Project metadata, npm scripts, and direct dependency ranges | Yes |
package-lock.json | Exact resolved versions of the full dependency tree | Yes |
node_modules/ | Downloaded package files installed on your machine | No |
package.json is the project’s declared intent. A typical simplified example is:
{
  "name": "video-library",
  "private": true,
  "scripts": {
    "dev": "vite",
    "build": "vite build",
    "preview": "vite preview"
  },
  "dependencies": {
    "nanoid": "^5.0.0"
  },
  "devDependencies": {
    "vite": "^6.0.0"
  }
}
The exact versions in your project will differ. Do not copy this file over one created by Vite; inspect the generated one instead.
The caret in a version such as ^5.0.0 permits compatible updates within the same major version—conceptually, versions from up to but not including . The lockfile records the precise versions selected at installation time so another developer, CI system, or future you can reproduce the same dependency tree.
node_modules can contain thousands of generated files. It is recreated with npm and should remain in .gitignore. The JavaScript project directory structure image includes both package.json and node_modules, but only the former (and its npm lockfile) belongs in version control.
Use Vite to run modules and install a package
Vite provides a development server and build pipeline for modern frontend code. It is the standard starting point for the React projects later in this course, but it also works well with ordinary HTML, CSS, and JavaScript.
From the directory where you keep projects, create a vanilla JavaScript Vite project:
npm create vite@latest video-library -- --template vanilla
cd video-library
npm install
npm run dev
The terminal will display a local URL, usually similar to http://localhost:5173. Open the exact URL Vite prints. Leave the development server running while you edit files; it will normally refresh the browser automatically.
How to Add NPM to HTML CSS & JavaScript Projects
Watch the Vite-and-npm portion of “How to Add NPM to HTML CSS & JavaScript Projects” by Smoljames. It demonstrates the same transition from a static HTML/JavaScript project to a Vite-managed project.
Watch Vite setup to see project creation, installation, and the local development server. Then watch package installation, focusing on how a package is recorded in package.json, placed in node_modules, and imported from JavaScript.
Replace the template’s contents with the modular files from the previous section. In a Vite vanilla project, retain the generated module entry reference in index.html, which normally looks like this:
<script type="module" src="/src/main.js"></script>
The leading / means “from the Vite project root.” Your relative imports inside main.js, render.js, and other modules should still begin with ./ or ../.
Install and use one package
To see npm’s role directly, install nanoid, a small package for generating IDs:
npm install nanoid
npm will:
- Download
nanoidand any required transitive dependencies intonode_modules. - Add
nanoidtodependenciesinpackage.json. - Update
package-lock.jsonwith exact versions.
Now add this import to the top of src/main.js:
import { nanoid } from "nanoid";
Then use it while creating a client-side draft identifier:
const draftUpload = {
  id: nanoid(),
  title: "Untitled upload",
  status: "draft",
};

console.log(draftUpload);
The import has no ./ because nanoid is a bare package specifier, not a local file. Vite resolves it from your installed npm packages and produces browser-compatible code during development and production builds.
You will not generally generate the final database ID in the browser; Django or FastAPI will do that after a real upload request. This client-side example simply demonstrates package installation and import resolution.
Use these commands regularly:
npm run dev       # start the local development server
npm run build     # create an optimized production build
npm run preview   # serve the built output locally for inspection
npm install       # install according to package.json and lockfile
npm install name  # add a runtime package
npm install -D name  # add a development-only tool
For an existing cloned project with a committed lockfile, npm ci is often preferable in CI or when you need a clean, reproducible installation. It installs exactly what the lockfile specifies and avoids changing it.
One final practical caution: npm packages and npm scripts run code on your machine. Prefer established packages, check a package’s documentation and maintenance status, and review unexpected changes to package.json and package-lock.json. Later, Git pull requests will make that review part of your normal workflow.
Key takeaways
You have moved from isolated browser scripts to a modern application structure:
- ES modules split code into focused files with explicit
exportandimportrelationships. - Use named exports for several shared values and a default export for a module’s single primary value.
- Browser module scripts require
type="module"and should be served through a local HTTP server rather than opened withfile://. - npm installs packages and runs project tasks defined in
package.json. - Commit
package.jsonandpackage-lock.json; do not commit generatednode_modules. - Vite runs the development server, resolves installed package imports, and later builds production-ready frontend assets.
Next, you will use this Vite-based foundation to build an accessible, responsive application shell with semantic HTML and CSS.
Can't find a good explanation? Sign up and we'll make it for you
Sign up