
Hello! In our last lesson, you successfully drafted the front neckline and shoulder, cleverly integrating a temporary bust dart directly into the shoulder line. This was a crucial first step in building the three-dimensional shape required for the front bodice.
Today, we're going to perform a fundamental piece of patternmaking magic. We will take the shaping you created in that shoulder dart and move it. This lesson focuses on rotating that dart from the shoulder to the side seam, creating the classic side bust dart. This process of dart manipulation, or pivoting, is a core skill that allows you to control where the shaping occurs on a garment. Your experience in product design, where you often reconfigure components within a system, will serve you well here as we re-allocate the dart's volume to a new location.
By the end of this lesson, you will have transformed your draft by creating a functional side bust dart originating from the bust apex, preparing the pattern for the next steps in shaping the armhole and torso.
The Bust Apex: Your Pivot Point
Before we can rotate the dart, we must confirm the location of our pivot point: the bust apex (or bust point). This is the fullest point of the bust and the central hub for all darting on the front bodice. In the previous lesson, you used your Bust Depth and Bust Span measurements to locate this point when drafting the shoulder dart.
Let's briefly revisit what this point represents.
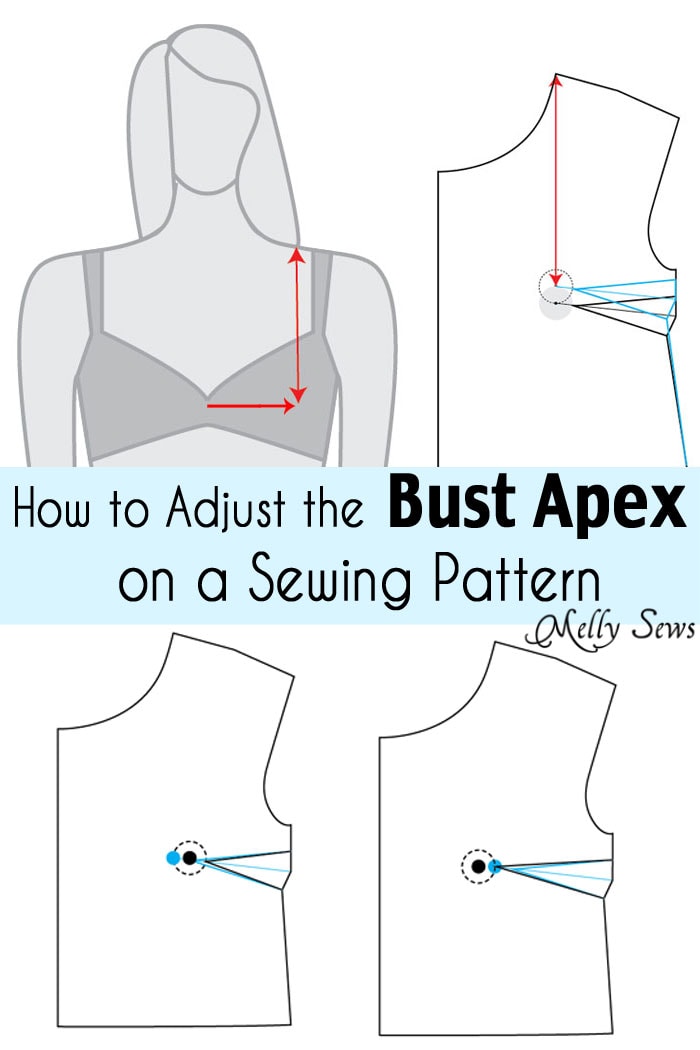
On your paper draft, this point is defined by two coordinates: its vertical distance from the neckline/shoulder area (Bust Depth) and its horizontal distance from the center front line (Half of bust point to bust point).
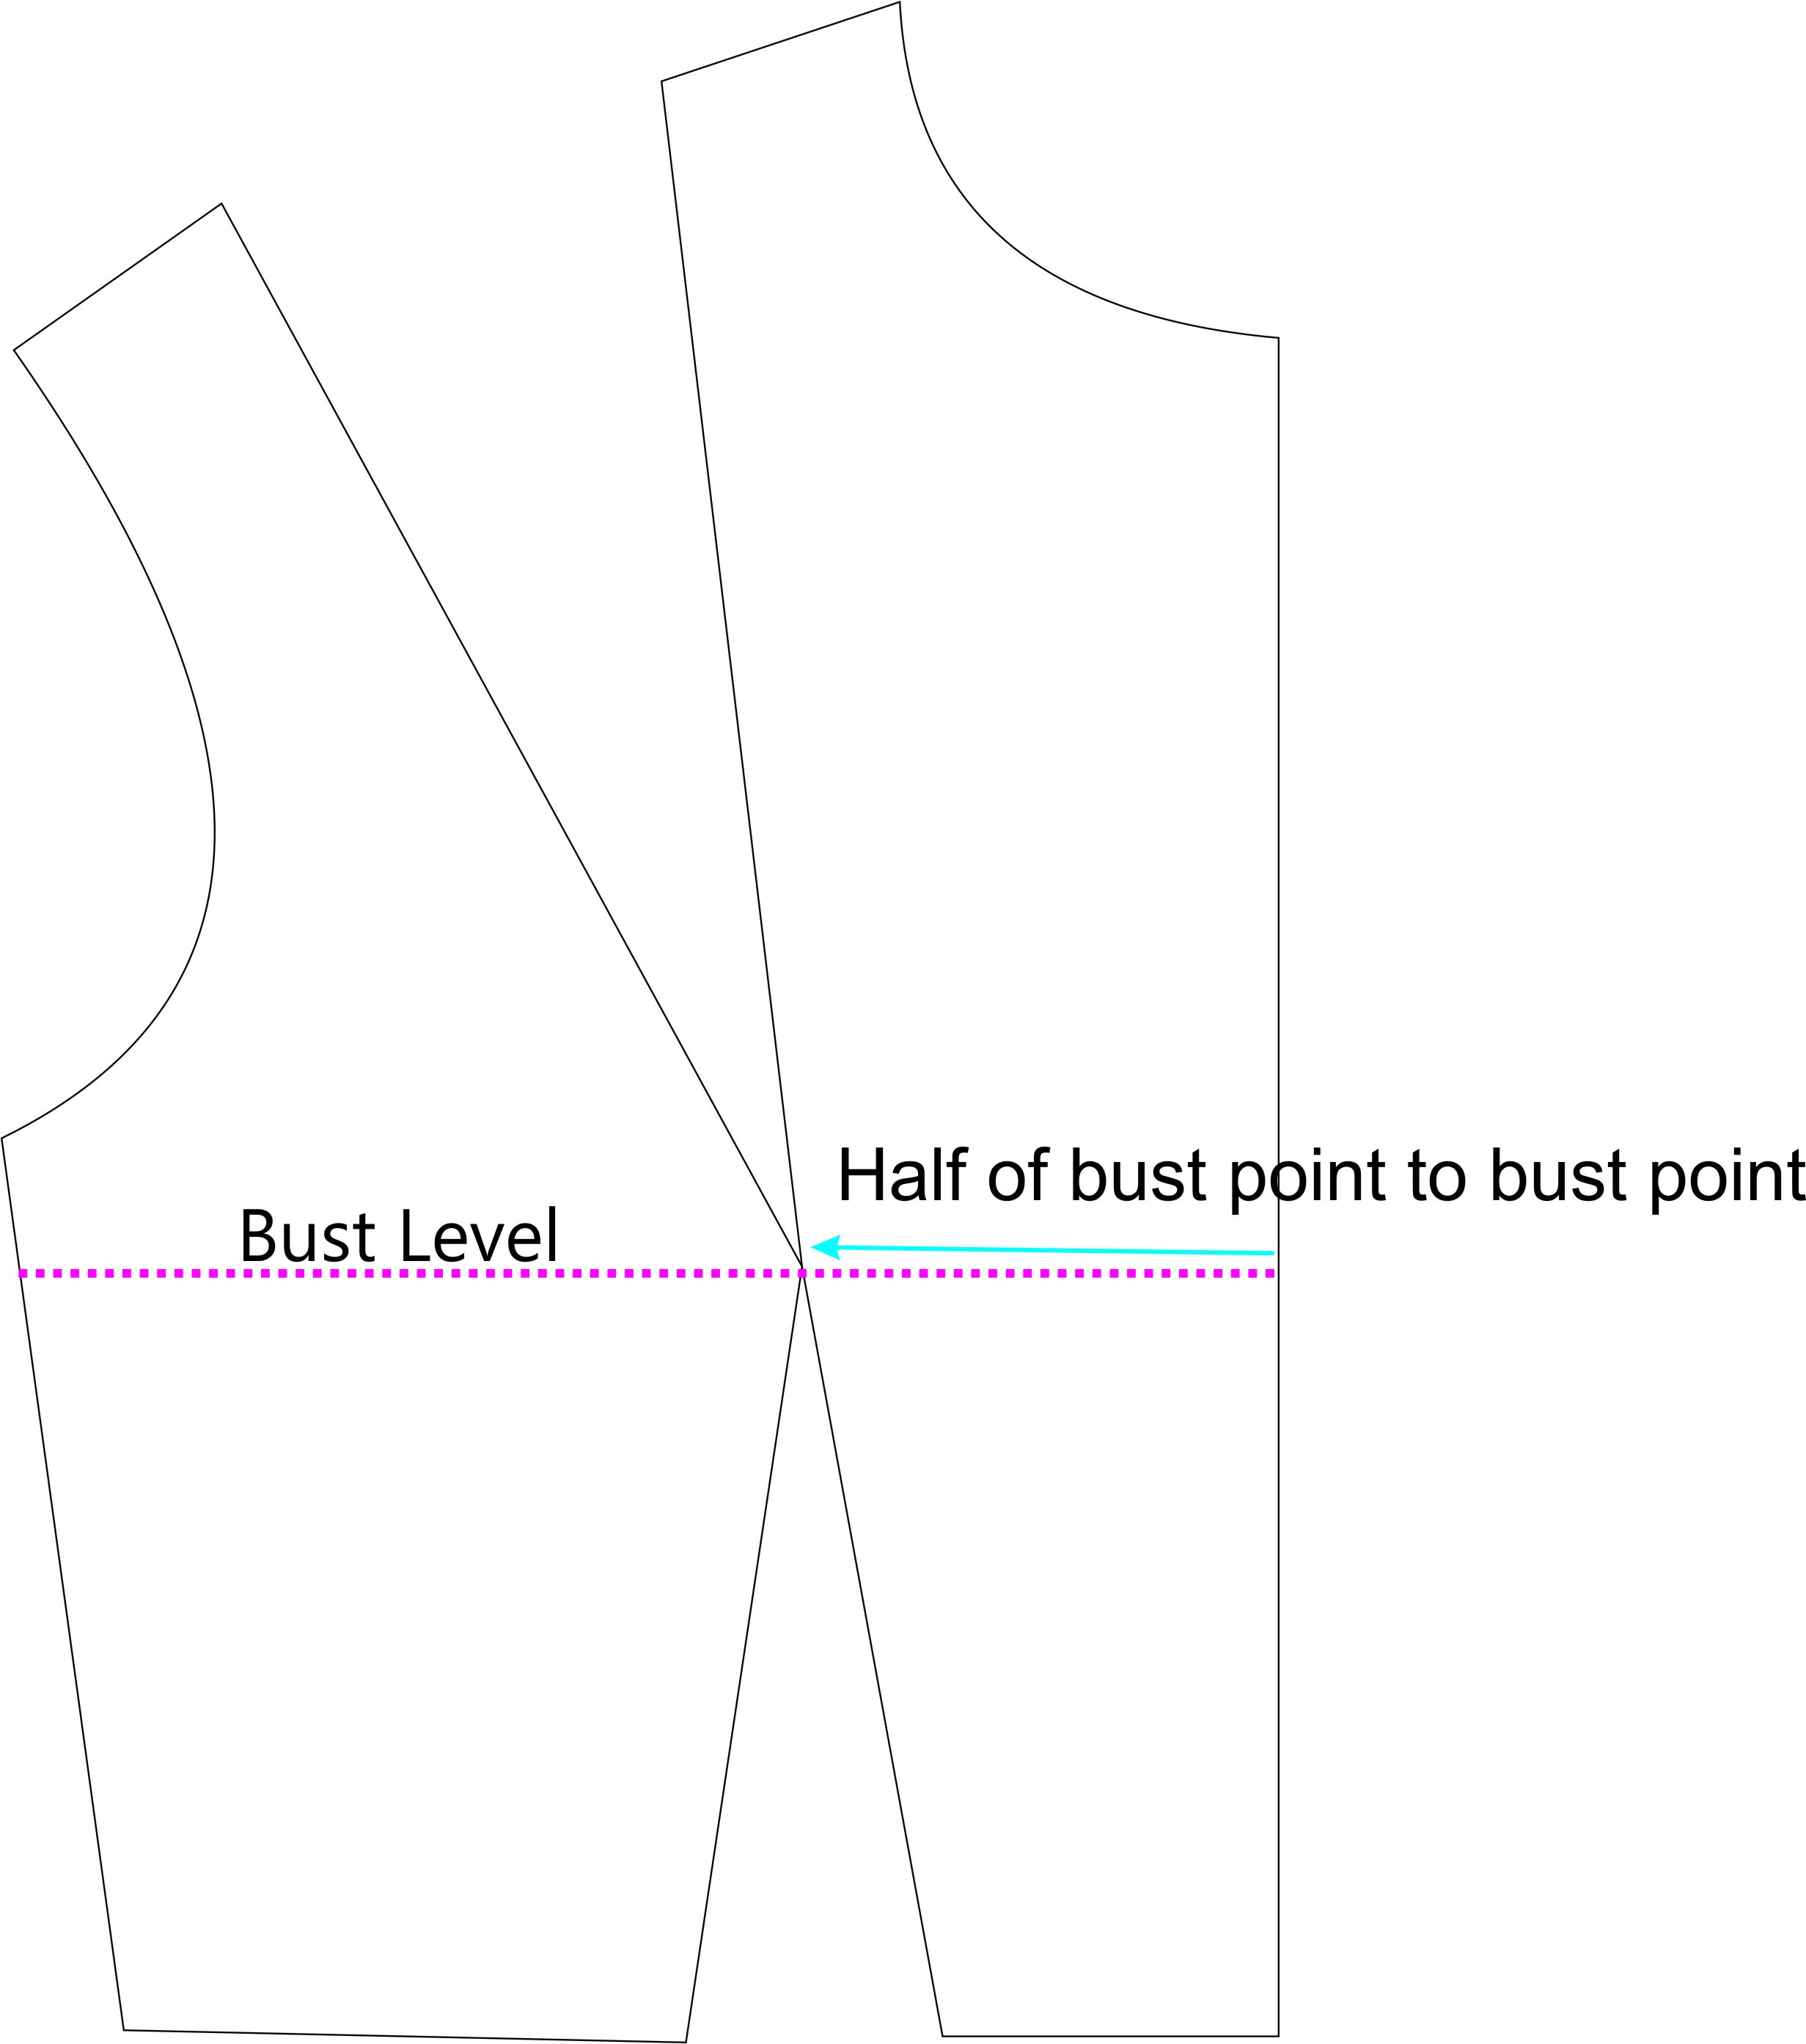
Ensure this bust apex is clearly marked on your draft. Every action we take in this lesson will hinge on this single, critical point.
Dart Rotation: The "Slash and Spread" Technique
The core concept of this lesson is that the volume of a dart—the wedge-shaped piece of fabric it removes—can be moved around the bust apex without changing the fundamental fit. The technique we will use is called "slash and spread" or "pivoting." You will literally cut into your pattern and pivot the pieces to redistribute the shape.
The "Dresspatternmaking" video tutorial provides an excellent demonstration of this exact technique. While the instructor in the video is manipulating a waist dart to create a side dart, the principle is identical for rotating the shoulder dart you created in the last lesson. We will follow this "cut and spread" logic precisely.
Drafting the Bodice Front (Metric Version) - Dresspatternmaking
This resource demonstrates the physical process of dart manipulation. It shows how cutting and pivoting a pattern piece can move darting from one location to another. Focus on the action of cutting, hinging, and closing one dart to open another.
Watch the segment on the "cut and spread" method, starting from the introduction to the technique. Follow these steps on your own pattern, adapting them for your shoulder dart: Draw the New Dart Line: Draw a straight line from your bust apex to the side seam, about 2 inches (5cm) below where the armhole will be. This line marks the center of your future side bust dart. Slash the Pattern: Cut from the side seam along this new line, stopping about 1mm before the bust apex. You want to create a hinge, not separate the pieces. Close the Original Dart: Now, cut along one leg of your shoulder dart, from the shoulder edge down to the bust apex, again leaving a 1mm hinge. Pivot: Swing the side piece of the shoulder down, closing the shoulder dart completely. As you do this, you will see a new dart opening appear at the side seam. Secure the Pattern: Place a new piece of paper under the opened side dart and tape everything securely in place. The video shows this pivot in action in the section from this part of the demonstration.
Follow these steps on your own pattern, adapting them for your shoulder dart:
- Draw the New Dart Line: Draw a straight line from your bust apex to the side seam, about 2 inches (5cm) below where the armhole will be. This line marks the center of your future side bust dart.
- Slash the Pattern: Cut from the side seam along this new line, stopping about 1mm before the bust apex. You want to create a hinge, not separate the pieces.
- Close the Original Dart: Now, cut along one leg of your shoulder dart, from the shoulder edge down to the bust apex, again leaving a 1mm hinge.
- Pivot: Swing the side piece of the shoulder down, closing the shoulder dart completely. As you do this, you will see a new dart opening appear at the side seam.
- Secure the Pattern: Place a new piece of paper under the opened side dart and tape everything securely in place.
The video shows this pivot in action in the section from
You have now successfully moved the dart volume from the shoulder to the side seam. Your shoulder line should now be a single, straight line, and you should have a new, open dart at your side seam.
Refining the Side Bust Dart
The new dart you've created is functionally correct in its volume, but its shape is not yet ready for sewing. It needs to be refined in two ways: truing the dart legs and repositioning the dart point.
1. Truing the Dart Legs
When you fold and sew the dart, the two cut edges at the side seam must match up perfectly. We'll use a geometric trick to ensure this happens.
Drafting the Bodice Front (Metric Version) - Dresspatternmaking
This part of the "Dresspatternmaking" tutorial details the precise method for redrawing the dart legs to ensure a smooth, sewable side seam.
Follow the visual explanation for shaping the dart, starting from this step. The key is to: Find the midpoint of the dart opening at the side seam. Draw a line from the bust apex through this midpoint and extend it outwards. Draw the upper dart leg as a straight line connecting the underarm point to this new extended center line. Draw the lower dart leg connecting the bottom of the dart opening to the point you just marked on the center line. This ensures both dart legs are the same length.
- Find the midpoint of the dart opening at the side seam.
- Draw a line from the bust apex through this midpoint and extend it outwards.
- Draw the upper dart leg as a straight line connecting the underarm point to this new extended center line.
- Draw the lower dart leg connecting the bottom of the dart opening to the point you just marked on the center line. This ensures both dart legs are the same length.
This truing process guarantees that when you fold the dart down and stitch it, the side seam of your bodice will be a clean, continuous line.
2. Pulling Back the Dart Point
A dart should always point towards the bust apex, but it should never end at the apex. Doing so creates a pointy, unflattering shape in the final garment. The dart point must be moved back. How far back depends on the overall volume of the bust.
Drafting the Bodice Front (Metric Version) - Dresspatternmaking
This final, crucial section provides guidelines for how far to pull the dart point away from the bust apex for a professional fit.
Review the instructions on pulling the dart points back.
As a general rule:
- A/B cup: Move the point back 1 inch (2.5 cm) from the bust apex.
- C cup: Move the point back 1.5 inches (3.8 cm).
- D cup and larger: Move the point back 2 inches (5 cm) or more.
Measure this distance from your original bust apex along the dart's center line and mark your new dart point. Redraw the dart legs from the side seam to this new point. This is your final, sewable side bust dart.
Conclusion
In this lesson, you've mastered one of the most powerful concepts in pattern drafting: dart manipulation. By using the "slash and spread" technique, you have taken the shaping from a shoulder dart and rotated it to create a side bust dart. You then refined this new dart by truing its legs and pulling back its point, transforming a basic draft into a more sophisticated and better-fitting pattern piece.
Key Takeaways:
- The bust apex serves as the primary pivot point for all front bodice shaping.
- Dart volume can be moved around the bust apex using the "slash and spread" (or cut and spread) method.
- Closing a dart in one location forces a new dart to open along a "slashed" line.
- For a professional finish, a new dart must be "trued" so its legs are of equal length, and its point must be moved back from the bust apex.
Your front bodice pattern now has its primary shaping element in place. In our next lesson, we will use the newly established underarm point and side seam to construct the front armhole curve, completing the main contours of your pattern.
Can't find a good explanation? Sign up and we'll make it for you
Sign up