
Hello. Last lesson moved your Natural World project from evidence to action: you used contact-sheet observations and a controlled botanical experiment to plan a small, purposeful reshoot. You should now have a clearer visual intention—perhaps fragility, trace, decay, or hidden natural structure—and at least one practical decision that you can justify.
This lesson gives that practical work a written argument. Your Personal Investigation is not an artist biography placed beside a sketchbook: it is a source-cited explanation of how contextual research has sharpened your own photographic decisions. By the end, you will have a workable -to--word structure and a draft analytical section that connects a contextual image to your own selected outcome or reshoot.
What the written investigation needs to do
For Component 1, AQA requires written work of no fewer than 1,000 and no more than 3,000 words that supports your practical work. More importantly, the Assessment Objectives expect analytical and critical understanding of contextual sources, thoughtful refinement of practice, and coherent connections between written and visual elements.
A-level Art and Design 7206 | Specification | Scheme Of Assessment
Read the relevant official AQA requirements first. They give you a useful test for every paragraph: does it develop an idea from contextual research, explain a practical decision, or clarify how your response realises your intention?
In the “Synoptic assessment” material, read the Component 1 requirement. Then read the Assessment Objectives from AO1 to AO4. In the mark descriptors, focus on the AO1 passage beginning what high-level contextual analysis looks like, then the AO4 passage beginning what it means to connect written and visual work. Notice that AQA rewards the quality of the connection, not the number of artists named.
A useful distinction:
| Weak written investigation | Strong written investigation |
|---|---|
| “Aaron Siskind was an American photographer who took black-and-white images.” | “Siskind’s high-contrast framing turns grass into a dense field of marks; this encouraged me to test monochrome and a tighter crop in my own leaf photographs.” |
| Names a technique without explaining it. | Identifies a formal choice, describes its effect, and evaluates its relevance. |
| Treats research and practical work as separate tasks. | Makes research lead to a visible practical decision. |
| Says “I was inspired by…” repeatedly. | Explains what was selected, adapted, rejected, and refined. |
The strongest question to hold in mind is not “What can I say about this photographer?” It is:
What does this source help me understand or test in my own investigation of the Natural World?
Give the investigation an argument, not a scrapbook order
A coherent written investigation has a line of enquiry. Because your practical work is currently developing from botanical observation toward “trace” and fragility, a possible working question is:
How can close photographic and experimental processes transform overlooked plant forms into images of fragility and transience?
This is only a working version. It is focused enough to guide choices, but flexible enough to change if your reshoots take you in a more abstract direction.
Your visual intention might then become:
I aim to photograph fallen and damaged plant forms so that they move beyond factual botanical documentation. Through close framing, directional light, monochrome tone, and occasional loss of focus or detail, I want to suggest that natural forms are temporary traces rather than fixed specimens.
The question asks something; the intention states what you will make in response. Together they stop the written work becoming a sequence of disconnected artist pages.
A practical structure for a developing project
Do not wait until all your practical work is complete before planning the written investigation. Build a structure now, then draft individual sections as evidence accumulates.
| Section | Purpose | Evidence to insert |
|---|---|---|
| Title and investigation question | State the specific focus of the project. | A concise title, question, and perhaps one representative personal image. |
| Introduction | Define your Natural World focus, establish your intention, and preview the visual issues you will investigate. | Your own early image, a short statement of what you will explore, and the contextual sources you will consider. |
| Section 1: Natural form as texture or abstraction | Analyse a source that changes how ordinary plant material can be seen. | A contextual image, close formal analysis, and a direct link to your initial shoot or reshoot. |
| Section 2: Fragility, trace, and process | Explore a source or process that helps you move away from straightforward recording. | Your cyanotype or photogram tests, annotations, and comparison with contextual research. |
| Section 3: Comparison and development | Compare contextual approaches around a specific issue, such as focus, tonal contrast, viewpoint, or material trace. | Two sources and your own images placed alongside them. |
| Section 4: Personal resolution | Evaluate which ideas you selected, adapted, or rejected, and why your chosen outcome best realises the intention. | Your final contact sheet, selected outcome, alternatives, and refinements. |
| Conclusion | Answer the investigation question in a qualified way and state what your work has demonstrated. | A final personal image and a concise reflection on development. |
| Figure list and bibliography | Identify every image and source used. | Figure numbers, titles, maker, date where available, medium, source, and access date. |
The headings may change. The logic should not: idea, contextual evidence, visual analysis, practical response, evaluation.
The Harvard Writing Project’s advice is particularly useful here: outline by the argument you need to make, not merely by the names of artists. A section called “Aaron Siskind” can easily become biography. A section called “Natural form as abstraction through tone and crop” demands analysis and gives you a reason to include Siskind.
[PDF] How to Do Things with Pictures - Harvard Writing Project
Use this Harvard Writing Project guide to plan an argument led by images and evidence. Its distinction between formal analysis and contextual interpretation will help you make your writing analytical rather than descriptive.
First, read the discussion of formal and contextual analysis. Note that your claims should be rooted in visible details, even when you discuss wider ideas. Then find “Part Two: Writing Outlining” and read the outlining example. Focus on how broad headings become specific claims, comparisons, and a developing thesis. Finally, read the additive method, which gives you a fast way to place images, notes, and citations into your outline before trying to write polished prose.
Build your outline using “argument modules”
Open a document or create a double-page sketchbook plan. Under each heading, add only three things:
- Claim: the point the section will argue.
- Evidence: figure numbers, visual observations, quotations, and factual research notes.
- Personal decision: the exact practical change that this evidence caused.
For example:
| Section heading | Claim | Evidence | Personal decision |
|---|---|---|---|
| Natural form as abstraction through tone and crop | Close framing and tonal contrast can make vegetation appear less descriptive and more like a field of marks. | Siskind photograph: dense dark background, bright grass heads, limited depth cues; my Frame 18: leaf veins visible but cluttered grass behind it. | Reshoot against a dark plain background; crop closer; test monochrome. |
| Trace through partial visibility | Partial loss of detail can imply fragility, but total loss makes the natural form unreadable. | Cyanotype Test C softened plant edges while preserving veins. | Keep partial definition at the torn edge; avoid overexposure or an excessively wide photogram gap. |
This is efficient because it turns blank-page writing into a sorting task. Once the evidence is in the right section, prose becomes easier to draft.
Analyse a source so that it changes your own work
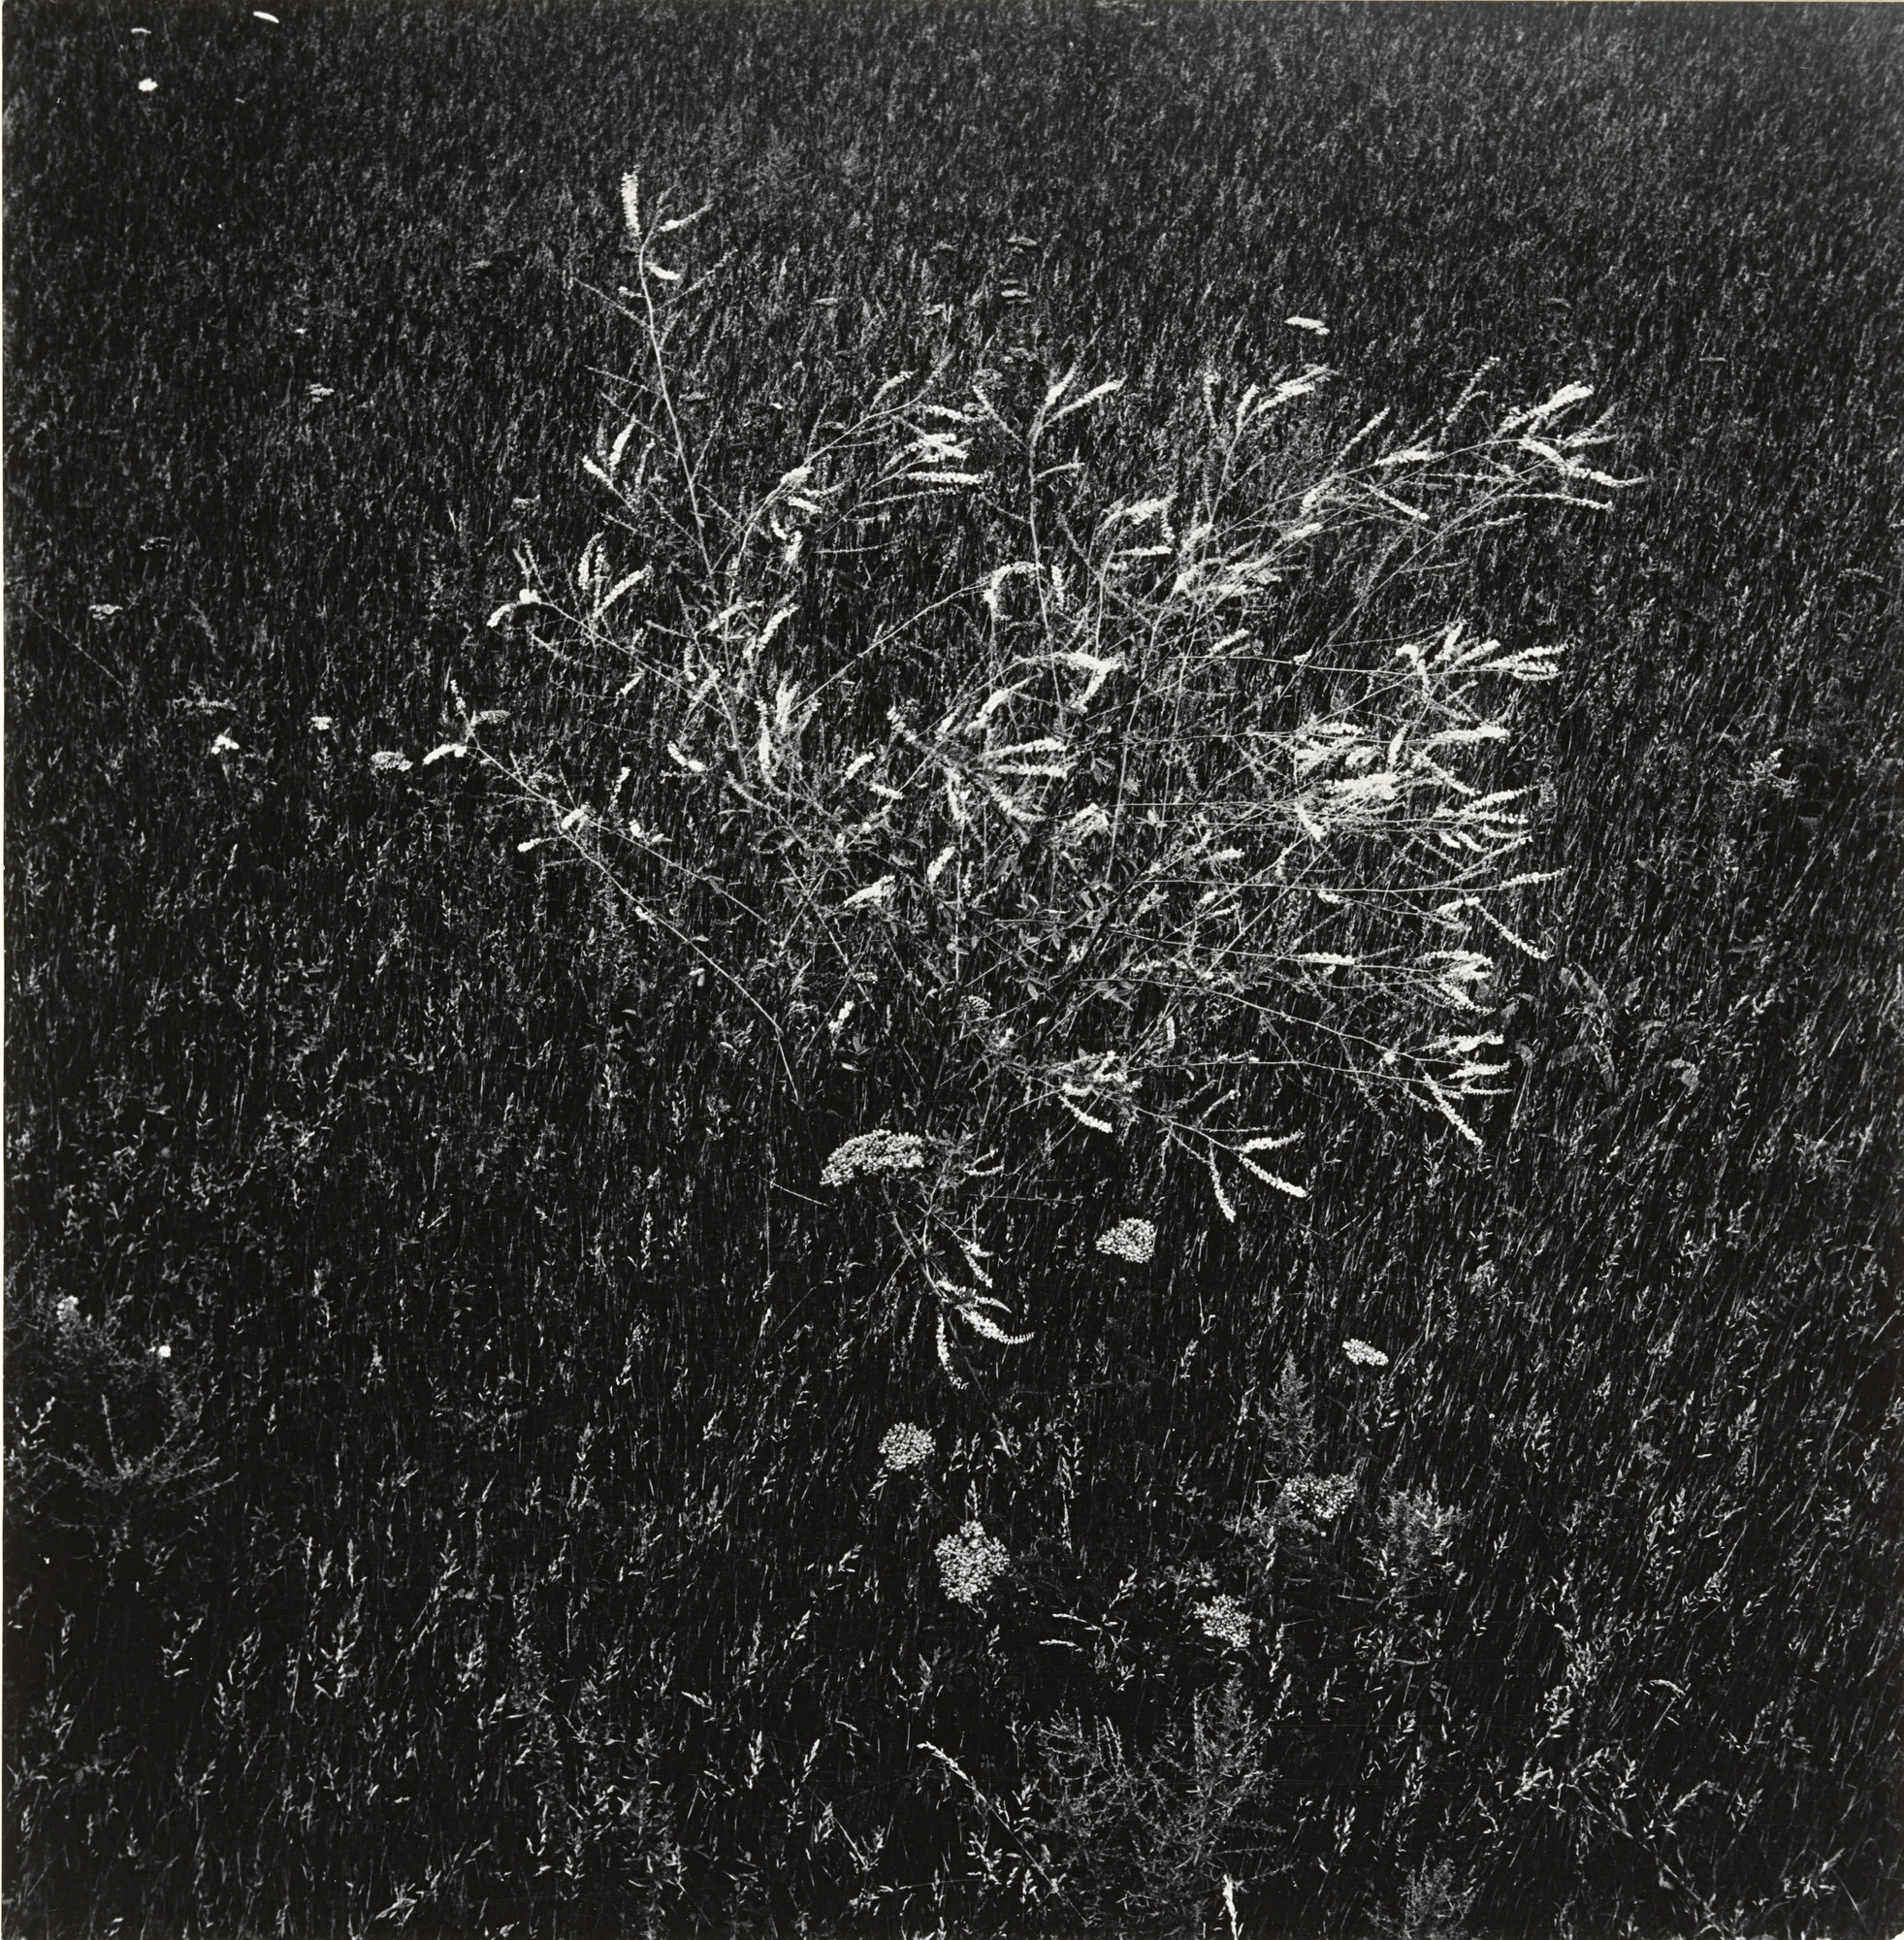
Begin with what you can actually see, then make an interpretation. Avoid pretending to know more than your source proves.
In this photograph, the frame is filled with a dark, dense ground of grass. A lighter central cluster of stems and seed heads emerges from it. The limited tonal range, high contrast, and close viewpoint reduce the usual sense of a wide landscape. Instead of reading the scene only as “weeds in a field,” the viewer can read it as a web of line, texture, and contrast.
That movement—from observation to effect—is analysis:
| Visual observation | Possible effect or interpretation |
|---|---|
| Bright stems are concentrated near the centre while surrounding grass is dark. | The eye is drawn to a fragile-looking cluster that seems to emerge from shadow. |
| Fine lines overlap and tangle. | Individual plants become difficult to separate, creating visual density and ambiguity. |
| The image is black and white. | Colour information is removed, so texture, shape, and tonal contrast carry more meaning. |
| There is little horizon or environmental context. | The location becomes less important than the physical qualities of the plant forms. |
A contextual point can deepen this reading, but it must remain connected to the image. For this project, you do not need a long life history of Siskind. If biographical or historical information does not help explain the image or your decision-making, leave it out.
Watch the following focused sections before drafting. They reinforce three habits: analyse the actual image, use figure references, and link every contextual point to your own practice.
A-Level Essay Help.... Art and Photography Essay tips
In “A-Level Essay Help.... Art and Photography Essay tips,” G Robinson-White explains how to avoid artist biography and make the written investigation visibly connected to your photography.
Watch image analysis for the warning against biography and the emphasis on an artist’s relevance to your work. Then watch figures and citations to see why images need labels and direct discussion. Continue with making comparisons. Focus especially on the recommendation to compare practitioners through a common visual issue rather than discussing each one in isolation. Finish with personal image links, which shows why placing your own photograph beside a contextual image makes the practical connection clearer.
The analytical paragraph engine
Use this six-part sequence whenever a contextual source informs your work:
- Make a claim about the source’s approach.
- Identify visual evidence using specialist vocabulary.
- Explain the effect or idea produced by those choices.
- Introduce contextual relevance only where it illuminates the work.
- Connect it to a precise personal decision.
- Evaluate the adaptation rather than claiming you copied it.
Here is a model paragraph based only on the supplied Siskind photograph and the photographic direction established in your previous lesson. Replace the bracketed figure number and details with your real ones.
In Figure 1, Aaron Siskind uses monochrome tone and close framing to make grass and weeds appear less like a landscape and more like an intricate arrangement of line and texture. The central plant cluster is picked out in pale grey and white against a much darker ground, so the fine stems appear temporarily visible before merging back into shadow. This tonal contrast gives ordinary vegetation a fragile, almost unstable presence; the viewer has to search through the dense background rather than receiving a clear botanical description. This approach is relevant to my intention of presenting fallen plant material as a fading trace. In my initial contact sheet, Figure 2, side lighting revealed leaf veins effectively, but the surrounding grass made the image visually busy. Rather than copying Siskind’s subject matter, I adapted his use of tonal separation by reshooting one damaged leaf against a plain dark background and concentrating focus on its torn edge. However, I retained more recognisable detail than in Siskind’s image because complete abstraction would weaken my interest in the physical evidence of damage and decay.
Notice what makes this critical:
- It does not simply praise the photograph.
- It uses visual vocabulary: monochrome, close framing, tonal contrast, texture, focus, background.
- It acknowledges a limitation and a deliberate difference: your image needs more recognisable damage than Siskind’s highly abstracted vegetation.
- The final decision can be checked against your reshoot, contact sheet, and selected image.
That last point matters. Never write that research influenced you unless the sketchbook evidence shows the resulting test, shoot, edit, or selection.
Put citations and figures to work
A citation is not decorative proof that you have researched. It allows the reader to tell which ideas and images come from a source, and which are your own interpretation.
Use figure labels consistently in the text:
- “In Figure 1, the dense black ground…”
- “I tested this idea in Figure 2, Reshoot Frame 12.”
- “Comparing Figures 1 and 2 reveals…”
Your figure list could use this format:
| Figure | Caption model |
|---|---|
| Figure 1 | Aaron Siskind, [verify exact title], black-and-white photograph, accessed via Museum of Modern Art collection image. |
| Figure 2 | Your name, Damaged Leaf, Reshoot Frame 12, digital photograph, 2026. |
| Figure 3 | Your name, Botanical Photogram Test C, cyanotype/photogram experiment, 2026. |
For the Siskind image, do not invent missing details such as a date, title, or medium. Check the museum record before final submission and replace the bracketed wording with verified information. In your bibliography, record the creator, full confirmed title, date if supplied, institution or webpage, URL, and access date in the referencing format your school uses.
The same precision applies to statements about an artist’s intention or historical context. A source needs to support the claim. Your own reading of formal choices does not need an external critic to be valid—but it does need accurate description and a clear argument.
A 55-minute writing session: draft one usable section
Do not attempt the entire written investigation in a single free period. Your immediate target is one analytical section of roughly 250–350 words, supported by a contextual image and one or two of your own figures.
First 10 minutes: set up the evidence
Prepare:
- one contextual image, labelled Figure 1;
- one personal photograph or experiment, labelled Figure 2;
- your working investigation question;
- three visual observations about each image;
- one practical decision you made after the contextual research.
Next 15 minutes: write an unpolished first draft
Use the paragraph engine. If you get stuck, write in note form first:
Claim: Siskind’s close monochrome view makes vegetation visually ambiguous.
Evidence: central pale stems; dark background; tangled fine lines.
Meaning: fragility, difficulty of separating individual forms, nature as texture rather than record.
My response: dark background, close crop, focus on torn leaf edge.
Evaluation: retain recognisable damage so my idea does not become too abstract.
Then turn those notes into connected sentences. Do not spend this stage perfecting the opening sentence.
Final 15 minutes: add the critical layer
Read the draft once and underline:
- one sentence describing the contextual image;
- one sentence explaining its effect;
- one sentence about your own practical decision;
- one sentence evaluating your adaptation.
If any of those are missing, add them. If you have three sentences of biography or broad praise, cut them.
Final 10 minutes: make the connection visible
Place the contextual source and your own image side by side on the sketchbook page or in the written document. Add figure captions and check that the paragraph mentions both figures. A reader should be able to move from the words to the relevant images immediately.
Key takeaways
A strong Personal Investigation is a sustained argument supporting your practical work, not a collection of separate artist profiles. Build it around a focused question and thematic sections such as abstraction, trace, tone, focus, or fragility.
For each contextual source, make a visible chain:
formal observation, interpretation, personal decision, practical evidence, evaluation.
Your immediate task is modest but important: set up the section on Aaron Siskind or another verified contextual source, place it beside one of your own images, and draft the first -to--word analytical section. In the next lesson, you will refine this drafting process by analysing a relevant photographer in a source-cited paragraph that makes an even more explicit connection to your Natural World work.
Can't find a good explanation? Sign up and we'll make it for you
Sign up