
Hello. In the previous lesson, you set up a controlled botanical-photogram experiment: one variable changed across several tests, with the aim of moving from a factual botanical record towards a more fragile “trace” of nature. You also recorded how the results should be evaluated rather than simply labelled good or bad.
This lesson turns that evidence into a focused next move. You will use your earlier contact sheet and experiment to identify one specific strength worth preserving, one limitation worth correcting, and a small reshoot plan that can produce a more resolved Natural World outcome. This is valuable for AQA because development must be visible: the examiner should be able to see why you made the next image, not just that you made it.
From evidence to a purposeful next shoot
A targeted reshoot is not repeating a shoot because you dislike the first photographs. It is a response to evidence. It has a clear chain of reasoning:
- You identify what is visibly successful or unsuccessful.
- You connect that observation to your visual intention.
- You change one or two justified decisions.
- You select the strongest new result against clear criteria.
For example, this is too vague:
My first photos were not very good, so I will take more photos of leaves.
This is a targeted reshoot decision:
My strongest contact-sheet frame used side light, which made the leaf veins and torn edges visible, but the background was too busy and reduced the sense of fragility. My cyanotype Test C also showed that partial loss of detail creates a more delicate effect. I will reshoot a fallen leaf against a plain dark background using backlighting and close framing, keeping some areas slightly out of focus so that the photograph suggests a fading trace rather than a scientific record.
The second version is stronger because another person could understand exactly what you discovered, what you will retain, and what you will refine.
A-level Art and Design 7206 | Specification | Scheme Of Assessment
Read the official AQA assessment language first. It gives you a practical definition of what your reshoot and outcome selection need to demonstrate: purposeful refinement, critical reflection, and a meaningful response.
In the sections titled “Assessment objective 2”, “Assessment objective 3”, and “Assessment objective 4”, read the AO2 descriptors. Then read the AO3 descriptors, followed by the AO4 descriptors. Focus on the repeated ideas of reviewing, refining, reflecting, and realising intentions. These are the verbs your annotations need to prove.
A useful rule is:
Do not reshoot a subject. Reshoot a visual problem.
Your visual problem might concern:
- insufficient detail in veins, surface texture, or decay;
- cluttered backgrounds that weaken the natural form;
- lighting that is flat, overly harsh, or hides the intended texture;
- an image that is technically clear but conceptually too literal;
- an experimental result with a strong atmosphere that needs a more controlled version.
Read a contact sheet as evidence
A contact sheet is not just proof that you took many photographs. It is a record of decisions, comparisons, mistakes, and possibilities.
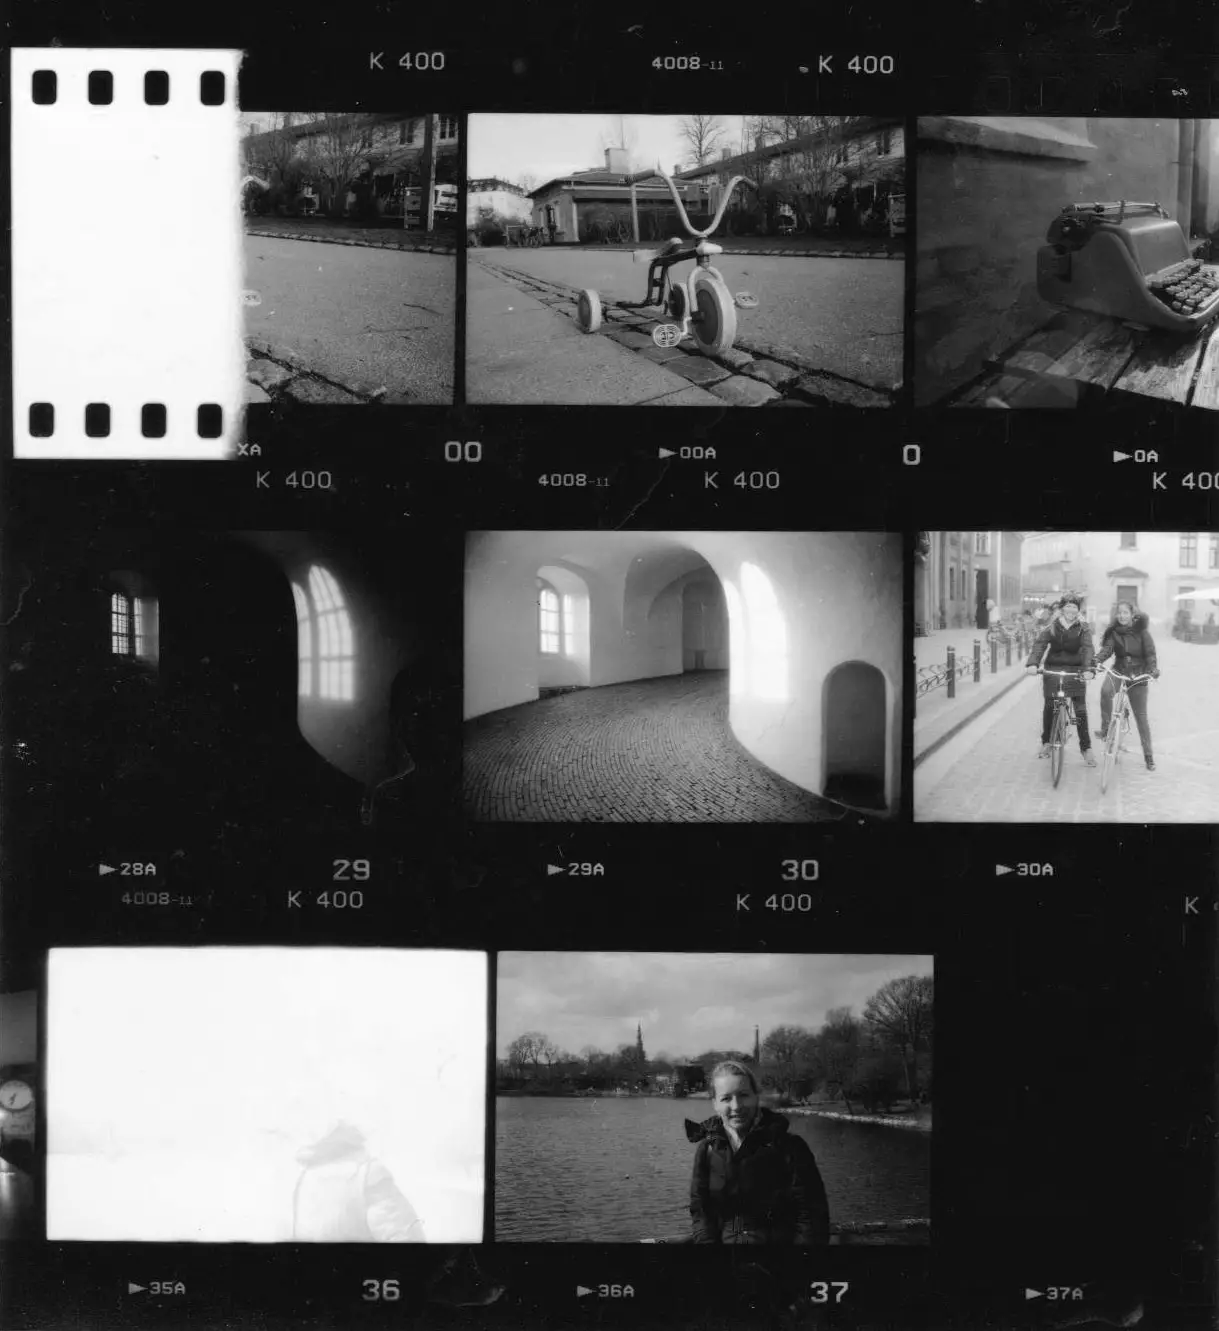
In the Exposure Contact Sheet, some frames are nearly blank because too much light reached the film, while others are so dark that details are hard to read. The more balanced frames are not automatically the strongest photographs, but they give the photographer usable information about exposure, subject placement, and the relationship between foreground and background.
Apply the same approach to your own contact sheet. Do not try to annotate every frame in equal detail. Instead, mark:
- two strongest candidates;
- one technically informative failure;
- one image with potential but a correctable weakness.
For each selected frame, write an annotation that separates observation from judgement.
| Part of annotation | What to write |
|---|---|
| Visible observation | What is actually present: light direction, framing, focus, tone, texture, background, viewpoint, depth. |
| Effect | How this affects the viewer’s reading of the image. |
| Link to intention | Whether the result communicates fragility, trace, decay, hidden structure, or your own chosen Natural World idea. |
| Next decision | What you will keep, change, or test in the reshoot. |
Here is a model using a hypothetical close-up leaf image:
Frame 18 is stronger than the wider photographs because the close crop removes distracting grass and makes the torn edge of the leaf dominate the frame. The low side light reveals the raised veins and creates a clear contrast between the dry surface and the darker background. However, the sharp focus across the entire leaf makes it feel more like a botanical specimen than a fragile trace. In the reshoot, I will retain the close viewpoint and directional light but test a shallower focus point on the torn edge so that the leaf appears to fade away from the viewer.
Notice that the next step is not based on vague preference. It comes directly from what the image shows.
PastPaperHero | Photography techniques and processes - Storyboarding and shoot planning
This PastPaperHero guide is written for a lower-level course, but its practical method for turning contact-sheet annotations into a reshoot plan is useful. Treat it as workflow guidance, while using the AQA A-level assessment objectives as your standard.
In the section “Recording, reviewing and improving after the shoot”, read the contact-sheet review guidance. Then move to “Storyboarding composition, viewpoint and sequence” and read the paragraph on cropping and selection. Focus on the idea that rejected images are useful when they lead to a specific improvement.
Combine the contact sheet with the experiment
You now have two kinds of evidence:
- Contact-sheet evidence shows what happened when you photographed your subject in a real setting.
- Experiment evidence shows what happened when you controlled a process, such as the distance between plant material and cyanotype paper.
The most convincing next step connects them. Your reshoot should not become a completely unrelated idea.
Use this planning grid in your sketchbook. Fill it in with your real frame numbers and experiment labels.
| Evidence source | What worked | What limited the result | Decision for the reshoot |
|---|---|---|---|
| Contact sheet: frame ___ | For example, close framing isolated the leaf from its setting. | The background was still visually busy. | Use a plain dark surface or photograph against shadow. |
| Contact sheet: frame ___ | Side light revealed surface texture. | The full leaf was equally sharp and descriptive. | Focus on one damaged area, allowing the rest to soften. |
| Experiment: Test ___ | Softened edges suggested fragility while the veins remained visible. | The plant form became too faint at the widest gap. | Retain partial detail; avoid making the whole subject unreadable. |
| Contextual research | Botanical photograms make direct traces of real material. | Copying the process exactly would not be personal development. | Use the idea of a “trace” in your own leaf, location, and composition. |
At the bottom of the grid, write a single reshoot hypothesis:
Because my strongest photographs reveal vein texture through directional light, and my photogram experiment showed that partial loss of detail communicates fragility, I will photograph a damaged fallen leaf in close-up against a plain dark background. I will use side or back light and focus on the torn edge, so that the rest of the leaf becomes less distinct and suggests a fading natural trace.
This is your control statement. If a shot does not help you test it, you do not need to spend time taking it.
Make the reshoot deliberately small
With limited school free periods, plan a reshoot that can be completed in one 55-minute Photography session. A focused session is more useful than collecting hundreds of nearly identical images.
Choose one route based on where your strongest evidence currently lies.
Route A: Refine the camera photographs
Choose this if your contact sheet already contains promising photographs but they need better control of light, background, framing, or focus.
Your plan might be:
| Decision | Your specific plan |
|---|---|
| Intention | Show a fallen leaf as fragile and temporary rather than as a factual specimen. |
| Subject | One damaged fallen leaf, ideally with visible veins or tears. |
| Location/background | A shaded wall, dark card, dark fabric, or shadowed ground with no distracting objects. |
| Lighting | Low side light or window light from one direction. |
| Main controlled change | Background simplicity and focus on the damaged edge. |
| Keep from first shoot | Close framing and visible texture. |
| Planned images | Wide context image; medium close-up; extreme close-up; alternative angle; vertical crop; horizontal crop. |
| Evidence to record | A setup photograph, camera settings if available, and the final contact sheet with frame numbers. |
Route B: Refine the photogram experiment
Choose this if your experiment produced a stronger visual language than your ordinary photographs.
Your plan might be:
| Decision | Your specific plan |
|---|---|
| Intention | Create a botanical trace that is delicate but still recognisable. |
| Subject | Thin stems, torn leaves, translucent petals, or overlapping fallen leaves. |
| Keep from experiment | The distance range that created a softened edge without losing all detail. |
| Main controlled change | Plant arrangement: overlap, rotation, or a more delicate specimen. |
| Avoid | Increasing several variables at once, such as changing exposure, distance, material, and arrangement together. |
| Planned outcomes | One single leaf; one overlapping composition; one sparse stem arrangement; one composition selected for scale and placement. |
| Evidence to record | Setup photographs, actual exposure time, test labels, and a comparison with the original experiment. |
The aim is not to complete every possible version. The aim is to create enough purposeful alternatives to make a justified selection.
A-Level Photography Sketchbook A* examples "Aspects of the Landscape"
Watch “A-Level Photography Sketchbook A* examples: Aspects of the Landscape” by G Robinson-White for a visual example of development. The useful point is not to copy the student’s landscape techniques, but to notice how earlier images are transformed through selective experimentation and then narrowed into a resolved result.
Watch development choices to see how initial images and artist research inform later experiments. Then watch outcome selection, focusing on how several developments are narrowed to a “best image” rather than all being presented as equally successful.
Select a more resolved outcome
A “more resolved outcome” does not mean the most edited image, the sharpest image, or the one that took longest. It means the image that most convincingly brings together your intention, visual choices, and development work.
After the reshoot, make a new small contact sheet or selection page. Choose one primary outcome and one reserve outcome. The reserve is useful if the first choice does not reproduce or print as expected.
Assess your top three images against these five criteria. Give each a score from 0 to 3, then write one sentence of evidence beside it. The numbers help you compare; they do not replace visual judgement.
| Criterion | What a score of 3 looks like |
|---|---|
| Intentional meaning | The image clearly communicates your chosen idea, such as fragility, trace, decay, or overlooked natural structure. |
| Composition | Framing, negative space, viewpoint, and crop direct attention to the natural form. |
| Technical control | Focus, exposure, tonal contrast, and depth of field are purposeful for the image’s meaning. |
| Connection to development | You can point to a particular contact-sheet discovery and experimental result that informed it. |
| Potential as an outcome | It could be printed, presented, or developed further without needing a completely new idea. |
Your final annotation can follow this structure:
I selected Reshoot Frame 12 as my more resolved outcome because the torn edge is sharply defined while the rest of the leaf fades into soft shadow. This retains the vein texture that worked in my original contact-sheet images but develops the partial loss of clarity from cyanotype Test C. The dark negative space makes the leaf appear isolated and temporary, which is closer to my intention of presenting nature as a fragile trace. Before presenting it as a final outcome, I will test a tighter crop and a monochrome version, but I will keep the tonal separation between the leaf and the background.
That paragraph is doing important assessment work:
- AO2: selecting and refining a method;
- AO3: recording observations and evaluating progress;
- AO4: choosing an outcome that realises a personal intention.
Avoid a false conclusion such as “this is my final image because it is the best.” Explain what makes it more resolved and how it develops earlier evidence.
Two-period practical workflow
Use two Photography free periods rather than letting this stage expand indefinitely.
Photography period 1: evidence and plan
- Review your existing contact sheet and experiment.
- Annotate two strengths, one weakness, and one useful failure.
- Complete the evidence grid.
- Write your reshoot hypothesis.
- Prepare your small shot list, equipment, materials, location, and backup plan.
Photography period 2: reshoot and select
- Take a setup photograph before beginning.
- Make your planned variations first.
- Record actual conditions: time, location, light, material, and camera settings where possible.
- Create a new contact sheet.
- Select one primary outcome and one reserve.
- Write the final selection annotation while you can still remember what changed.
This creates a visible sequence in the sketchbook: initial shoot, experiment, evidence-based decision, targeted reshoot, resolved selection.
Key takeaways
- A reshoot should solve a named visual problem, not merely repeat an earlier shoot.
- Your contact sheet provides evidence about composition, lighting, background, focus, and technical control.
- Your experiment provides evidence about process, abstraction, material, and meaning.
- Combine both sources in one short reshoot hypothesis.
- Change only the decisions needed to test that hypothesis.
- Select a more resolved outcome using visible evidence and your intention, not personal preference alone.
Next, you will begin shaping the written investigation so that contextual research, practical decisions, and your developing Natural World outcomes form one coherent critical argument.
Can't find a good explanation? Sign up and we'll make it for you
Sign up