
Hello. Your previous lesson converted artist research into a practical decision: rather than trying to “shoot like Ansel Adams,” you identified a particular formal choice—such as tonal contrast, directional composition, or careful framing—to test in your own Natural World investigation.
This lesson turns that decision into evidence. You will plan a small but deliberate primary photoshoot, make the images, and annotate a contact sheet so that it shows what you tested, what worked, what failed, and what you will develop next. This is especially useful when time is limited: one focused shoot with honest evaluation is far stronger than many unplanned images.
A contact sheet is evidence of thinking, not a gallery of favourites
A contact sheet is a visual record of a whole shoot: successful frames, near-misses, technical failures, and variations. It demonstrates that you made decisions rather than happening to take one acceptable photograph.
For AQA Photography, this work contributes to all four assessment objectives:
- AO1: your shoot follows from a researched idea or photographer influence.
- AO2: you test and select techniques, equipment, lighting, composition, or processes.
- AO3: you record your observations and evaluate what the images reveal.
- AO4: you identify the images that most effectively realise your personal intention.
The sheet will be strongest for AO2 and AO3, but it should make its links to AO1 and AO4 visible too. For example, “I tested high contrast because of my research into Adams” connects to AO1; “Frame 18 best communicates fragility” begins to justify an AO4 selection.
A-level Art and Design 7206 | Specification | Subject Content | Photography
Read the AQA Photography specification to keep the shoot focused on the practical and conceptual skills the course actually assesses.
In Section 3.8, Photography, read from the opening guidance through the paragraph on the importance of process as well as product. Then, under “Skills and techniques,” read the listed photography skills. Notice that AQA expects purposeful decisions about viewpoint, composition, aperture, depth of field, shutter speed, movement, lighting, and intended meaning—not simply technically neat images.
A-level Art and Design 7206 | Specification | Scheme Of Assessment
Use AQA’s official AO definitions as a checklist for the evidence your shoot and contact sheet must contain.
Read the assessment-objective list beginning with the four AOs. As you read, translate each AO into one visible piece of evidence for this shoot: a research-led aim, a technical test, annotations of observations, and a justified selection.
The supplied contact-sheet guide gives a useful physical structure: mark favourites and weaker frames, add crop lines where appropriate, identify techniques, and record relevant camera settings.
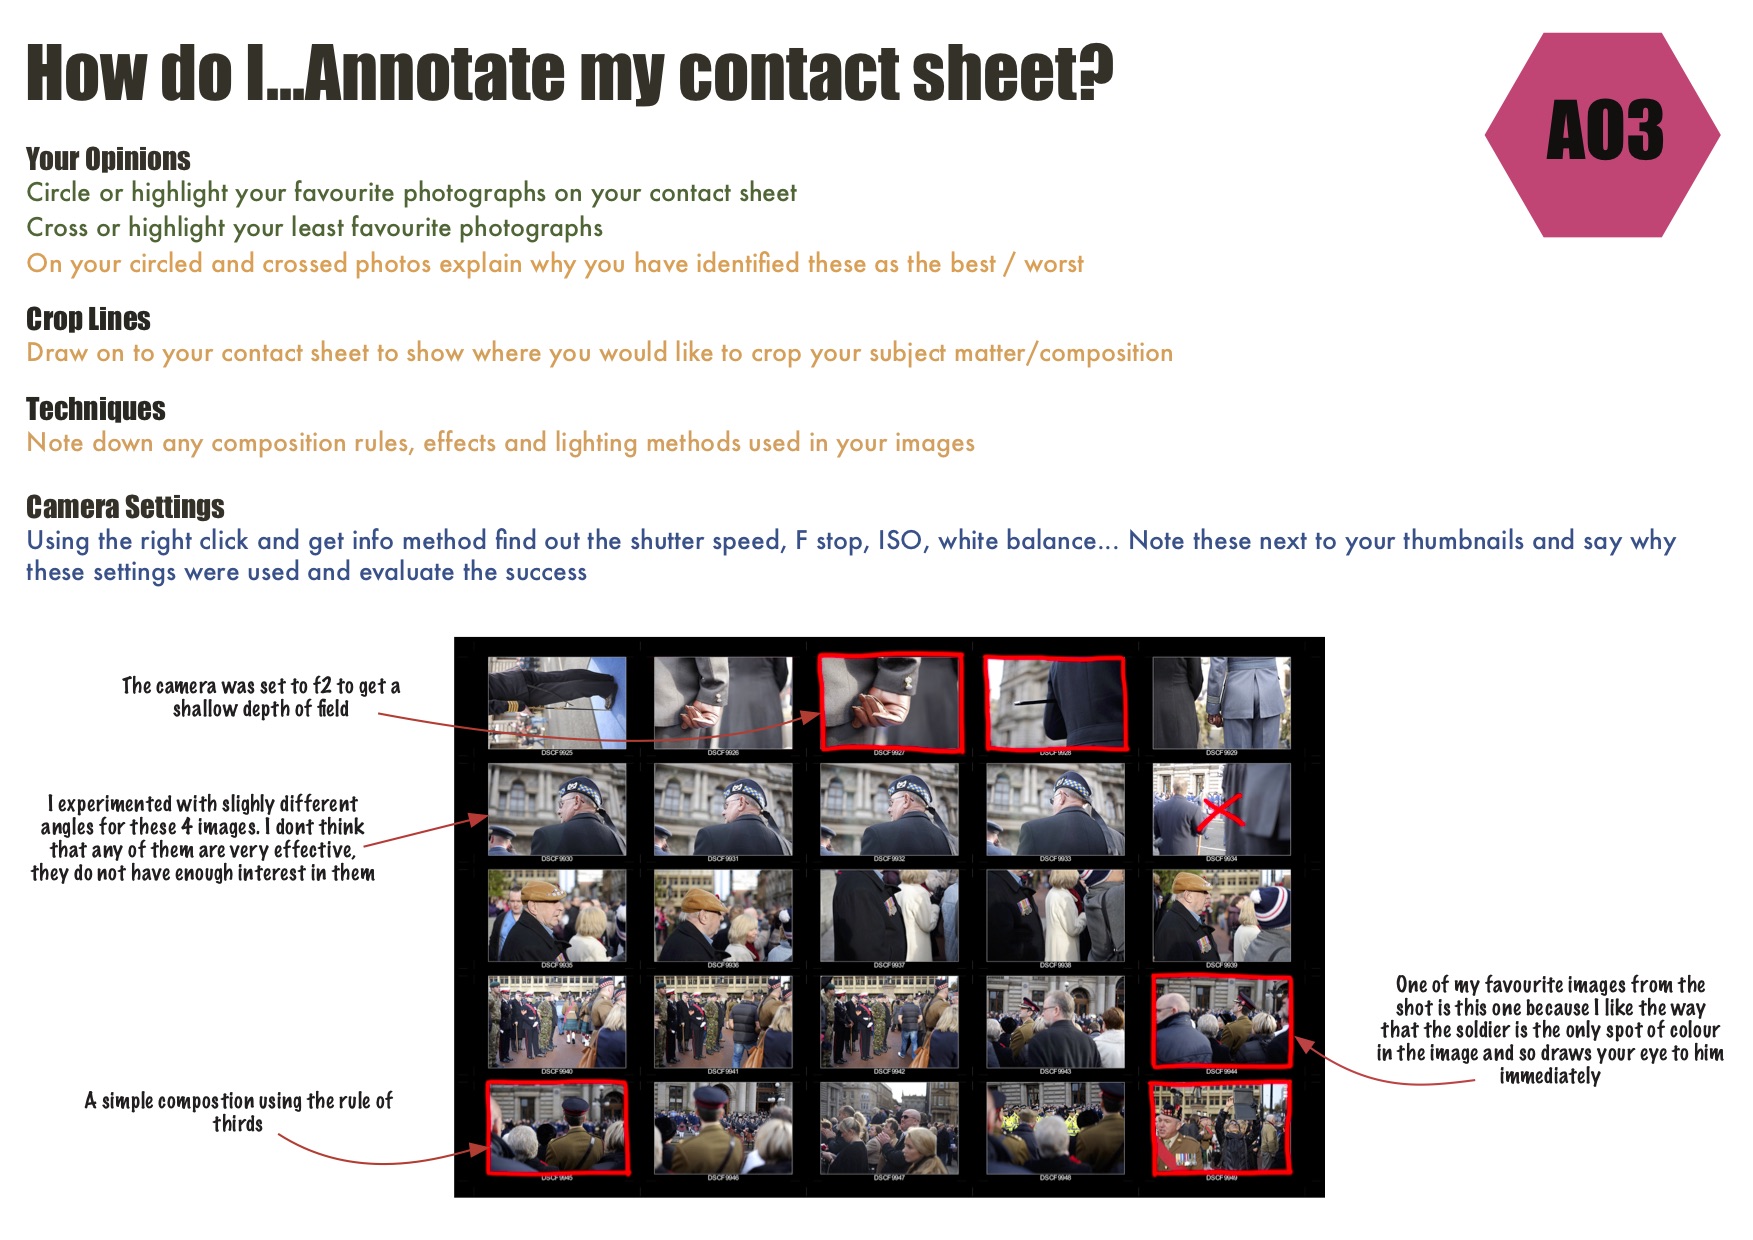
Do not copy its wording or make every thumbnail equally covered in notes. Use it as a guide to making your decision-making visible.
Plan a shoot as a controlled visual test
A purposeful shoot begins with a question, not a location. Return to the investigation question and visual intention you wrote in the first lesson. Then decide what one shoot can realistically test.
Use this planning statement in your sketchbook before you take photographs:
Shoot aim: I will photograph [specific natural subject] in [location] to investigate how [one or two formal choices] can communicate [intended idea or feeling].
Research connection: This develops my study of Ansel Adams because I am testing [for example, tonal contrast, leading lines, a high viewpoint, or precise detail], but applying it to [your own subject and viewpoint].
Success criteria: The strongest frame should make [subject] the clear focal point; use [specific visual method]; and communicate [idea] without distracting background details.
A precise aim might read:
I will photograph decaying leaves and seed heads in the school grounds to investigate how a dark background, close framing, and side lighting can reveal natural texture and suggest fragility. This develops my research into Ansel Adams’s tonal contrast, although my work will focus on small natural forms rather than a dramatic landscape.
That is manageable. It tells you what to photograph, what to vary, and how to judge the results.
Choose only one main variable
Do not try to test every camera control at once. If you alter viewpoint, focal length, background, aperture, lighting, exposure, and subject simultaneously, you will not know why one result is stronger.
Choose one main variable, then make deliberate variations within it.
| Main variable | What you could deliberately vary | What you are evaluating |
|---|---|---|
| Viewpoint | Low, eye-level, high, directly above, side-on | Does the angle make the subject appear vulnerable, monumental, distant, or immersive? |
| Framing and distance | Extreme close-up, medium frame, wider environmental image | Does the amount of surrounding space clarify or weaken the intended meaning? |
| Background | Dark foliage, pale sky, plain wall, shadow, ground | Does the background isolate the form or make the image visually confusing? |
| Light and tone | Front light, side light, backlight, shade, brighter exposure | Does light reveal texture and create useful contrast? |
| Depth of field | Wide aperture, narrower aperture, different distances from the subject | Does selective focus direct attention effectively? |
The sunflower comparison below shows why background is not a minor detail. The same plant form reads very differently against a dark and a light background. On the left, the flower’s edge and texture separate strongly; on the right, the lighter surroundings produce a softer, less isolated result. Neither is automatically “better.” The question is which version better serves your own intention.

Make compositional choices serve the idea
Before the shoot, decide what you want the viewer to notice first and what emotional or conceptual response you want to create. Composition is not a rule-following exercise; it is how you organise attention.
8 IMPORTANT Composition Tips for Better Photos
Watch “8 IMPORTANT Composition Tips for Better Photos” by Jamie Windsor for a concise guide to changing viewpoint, framing for meaning, and removing visual distractions.
Watch placement and viewpoint and notice how a small change in camera position can alter the entire image. Then watch concept and framing, focusing on how high or low angles, close framing, and environmental space can carry different meanings. Finish with simplifying the frame: apply the advice about backgrounds and frame edges while shooting.
For this project, use the following three checks before each new setup:
- Focal point: Can the viewer immediately tell what matters in the image?
- Visual balance: Where are the darkest areas, brightest highlights, strongest textures, and largest shapes? Do they support the focal point?
- Conceptual fit: Does this framing communicate your intention—such as fragility, resilience, hidden structure, isolation, decay, or the relationship between nature and human spaces?
The rule of thirds can help you begin, but it is not a reason by itself. A centred leaf may be right if you want formal symmetry; a small plant surrounded by empty space may be right if you want it to appear isolated. Your annotation must explain the effect, not merely name the rule.
Carry out the shoot efficiently
Use two Photography free periods if possible. This protects your Biology and Geography time while producing a substantial piece of coursework evidence.
Session 1: shoot and collect evidence
If the location is accessible during a free period, use this 55-minute structure:
| Time | Task |
|---|---|
| 0–5 minutes | Write the shoot aim, research connection, and three success criteria. |
| 5–10 minutes | Check battery, storage, weather, equipment, and initial background options. |
| 10–40 minutes | Photograph purposeful variations in small groups. |
| 40–48 minutes | Review images on the camera or phone; identify missing variations and reshoot them immediately. |
| 48–55 minutes | Record settings, conditions, location, and first impressions while they are fresh. |
Aim for roughly 20–35 frames, organised into mini-series rather than taken randomly. For example:
- Series A: six frames testing low, eye-level, and high viewpoints.
- Series B: six to ten frames testing a dark versus light background.
- Series C: six to ten frames testing close and wider framing, or shallow and deeper depth of field.
- Final check: three to five careful refinements of the most promising approach.
For a static natural subject, photograph more than one frame of the same promising composition. Slight changes in focus, wind, light, framing, or camera position may make a real difference. However, do not fill the contact sheet with near-identical accidental duplicates. Each group should answer a visual question.
Record the following while shooting, either in a notebook or as a note on your phone:
- subject and location;
- date, approximate time, and weather or lighting conditions;
- camera or phone used;
- lens or focal length where available;
- aperture, shutter speed, ISO, and white balance if your device records them;
- the variable tested in each mini-series;
- anything unexpected, such as wind-blurred leaves, harsh sun, a distracting fence, or a background that became more effective than planned.
If you use a phone, that is acceptable: use its metadata where available and be honest about the controls you could or could not set manually. The quality of your decision-making matters more than pretending to have used settings you did not control.
Turn the shoot into an annotated contact sheet
A contact sheet should show the breadth of the shoot. Do not include only polished final images. Keep the thumbnails in shooting order where possible, because sequence helps an assessor see how your approach developed.
Contact sheets in digital photography
Watch “Contact sheets in digital photography” by aows to see why digital contact sheets still matter and how variations reveal a photographer’s decision-making.
Begin with the purpose, which explains why a contact sheet can preserve creative reasoning. Then watch the examples, paying attention to the photographer’s changes in lens choice, viewpoint, framing, visual space, light, and cloud position. If you use Photoshop, watch the contact sheet method for the quick automated process; otherwise, arrange labelled thumbnails manually in a document or use Lightroom.
Build the sheet
Create one A4 or A3 contact sheet with:
- a title, such as Primary Shoot 1: Texture and Fragility in Decaying Leaves;
- your shoot aim in one sentence;
- 20–35 numbered thumbnails;
- enough space around the thumbnails for short annotations;
- a key showing how you have marked selected, rejected, and possible-development images.
A simple visual key works well:
- Circle the strongest frames.
- Cross frames that clearly fail.
- Box one or two images with potential for a crop or later development.
- Use a star for the current best outcome.
Do not cross an image simply because it is imperfect. A technically flawed frame can still show an important discovery: perhaps the blurred movement made the leaves appear fragile, or an unexpected shadow created a useful abstract shape. If it could lead to a later experiment, write that.
Annotate in layers, not thumbnail by thumbnail
You do not need to write a paragraph beside every frame. Work efficiently:
- Add one short note beside each mini-series explaining what variable was tested.
- Annotate three to five strongest images in more detail.
- Annotate two or three rejected or weaker images to show critical reflection.
- Add one final selection statement at the bottom of the sheet.
Use evidence-based annotation. The reliable sentence pattern is:
Observation + visual effect + judgement against the aim + next decision
For example:
Frame 08: The low viewpoint places the seed head against the darker hedge, giving the pale fibres stronger tonal separation. The shallow depth of field removes distracting branches and makes the subject feel isolated. This meets my intention to communicate fragility, so I will reshoot this composition with more side light to reveal texture.
Or:
Frame 15: Although the centred leaf has a clear shape, the pale pavement behind it reduces contrast and makes the damaged edge difficult to see. The background distracts from the idea of decay. I will move closer and place the subject against shadowed foliage rather than crop heavily afterwards.
Avoid annotations such as “nice image,” “bad lighting,” or “good composition.” They make a judgement but provide no reasoning.
Use these explicit criteria
Give each selected or rejected frame a score of , , or against the criteria below: means it does not meet the criterion, means it partly meets it, and means it meets it convincingly. The score makes selection transparent, but your written explanation matters more than the total.
| Criterion | What to look for | AO link |
|---|---|---|
| Clear focal point | The viewer’s attention is directed to the intended natural form. | AO3, AO4 |
| Composition and visual balance | Framing, viewpoint, line, shape, and negative space are purposeful. | AO2, AO3 |
| Tone, colour, texture, or light | The chosen visual qualities reveal the subject and create the intended atmosphere. | AO2, AO3 |
| Technical control | Focus, exposure, depth of field, motion, and camera settings support rather than undermine the image. | AO2 |
| Conceptual communication | The image makes the intended idea visible, not just the subject. | AO1, AO4 |
| Personal connection to research | A researched influence is evident in a specific choice, without copying the artist. | AO1 |
| Development potential | The image suggests a practical next experiment or reshoot. | AO2, AO3 |
At the bottom of the contact sheet, write a short selection statement of about 80–120 words. It should name your best current image, explain why it is strongest, and identify the precise next action.
A model structure is:
Selected outcome: Frame [number] is currently my strongest image because [specific visible evidence]. Its [composition, contrast, focus, texture, or background] most effectively communicates [intended idea]. It develops my research into [photographer or source] through [specific formal choice], while remaining personal because [your subject, location, or interpretation]. However, [limitation] prevents it from being fully resolved. My next step is to [one deliberate experiment or reshoot action].
What your completed evidence should contain
By the end of this outcome, you should have:
- a one-sentence shoot aim linked to your investigation and artist research;
- one purposeful primary shoot of approximately 20–35 images;
- a contact sheet containing the whole relevant series;
- camera or phone settings and shooting conditions;
- visible selections, rejections, and possible crop or development notes;
- annotations that use both visual and conceptual criteria;
- a short justified choice of your current strongest outcome;
- one clear technical or conceptual action for the next experiment.
This is not meant to be your final response yet. Its value is in showing a visible chain of investigation: research informed a decision; the decision shaped a shoot; the shoot produced evidence; and the evidence now tells you what to test next.
Key takeaways
- A purposeful shoot tests a focused visual question rather than collecting random images.
- Limit yourself to one main variable—such as viewpoint, background, tonal contrast, framing, or depth of field—so you can evaluate results honestly.
- A contact sheet should include failures and near-misses as well as successful frames.
- Strong annotations explain visible evidence, its effect, its connection to your intention, and the next decision.
- Your contact sheet mainly demonstrates AO2 and AO3, while a research-led aim and a justified selection also support AO1 and AO4.
Next, you will choose one promising discovery from this contact sheet and develop it into a more focused technical or conceptual experiment.
Can't find a good explanation? Sign up and we'll make it for you
Sign up