
Hello, and welcome to the course. You are starting by building a reliable workspace for a 2D game that will eventually support Android controls and multiplayer. That may sound like setup rather than game development, but this foundation prevents a common problem: reaching the Android-testing stage later and discovering that the required toolchain or a recoverable project history was never set up.
By the end of this lesson, you will have:
- A current Unity LTS Editor installed through Unity Hub.
- The Android Build Support, SDK/NDK, and OpenJDK modules installed with it.
- A clean 2D Unity project stored in a Git repository and backed up to GitHub.
Plan for roughly 40 minutes of active work, plus any download time for Unity itself.
1. Install the right Unity Editor and Android tools
Choose the most recent LTS release shown in Unity Hub’s Official releases tab. LTS means Long Term Support: it is the stable choice for a project you expect to develop over several months. Avoid alpha, beta, and pre-release Editors for this course unless you have a specific reason to use one.
Before installing, pick a location with adequate free disk space and a path you will not casually move or rename later. It is also sensible to avoid folders that are aggressively synchronized by cloud-storage software while Unity is open.
Download and install the Unity Editor • Unity Hub • Unity Docs
Read Unity’s Hub documentation to see the basic Editor-installation flow and why the Official releases tab is the appropriate place to find LTS versions.
In the “Install the Editor” section, follow the numbered instructions from opening Unity Hub through starting the download. When you reach the Editor list, select an LTS release from Official releases, then continue to the module-selection screen rather than installing immediately.
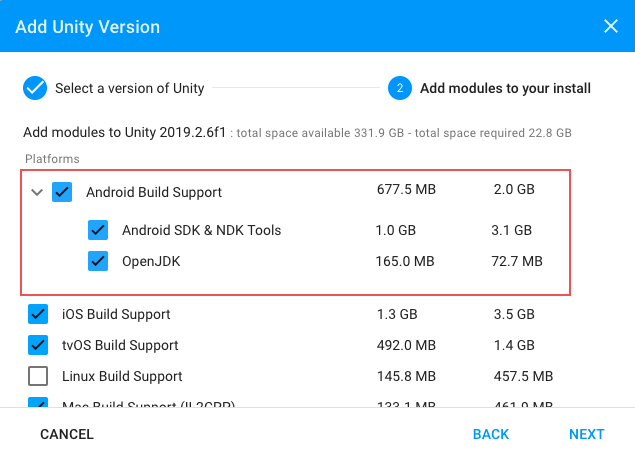
On the module-selection screen, select all three Android items:
- Android Build Support
- Android SDK & NDK Tools
- OpenJDK
The SDK supplies Android platform tools, the NDK supports native Android code used by Unity’s build pipeline, and OpenJDK provides Java tooling. Installing the versions bundled for your Unity Editor avoids a large class of version and path problems.
Unity - Manual: Android environment setup
Read Unity’s Android setup guidance to confirm the three modules that Unity manages through the Hub.
In “Installing dependencies,” read from Unity’s explanation of Hub-managed dependencies and the three-module list. For this project, use Unity’s bundled tools rather than downloading separate SDK, NDK, or Java installations.
How to EASILY Build to an Android Phone in Unity
Watch How to EASILY Build to an Android Phone in Unity by samyam for a quick visual check of the module process and tool-path verification.
Watch the setup check. Focus on the Installs panel, the Add modules option, and the fact that Unity should populate its Android tool paths automatically. You do not need to connect a phone or create an Android build yet.
If the Editor is already installed, you do not need to reinstall it. In Unity Hub, open Installs, find that Editor version, open its Manage menu, and choose Add modules. Select the same three Android items. Close and reopen Unity after the installation completes.
Verify the installation
Open the Editor once its download is complete. In Unity’s preferences, find External Tools, then the Android section. The options for the JDK, Android SDK tools, Android NDK, and Gradle should indicate that Unity-installed versions are in use.
Treat this as a verification step, not a place to customize settings. Custom paths are sometimes useful for experienced Android workflows, but they create another compatibility variable. The bundled paths are the dependable default.
2. Decide what “version-controlled” means for a Unity project
A Unity project is a folder containing source assets, configuration, and generated cache files. Git records meaningful changes in that folder as commits. GitHub is a remote service where those commits can be backed up and, later, shared with collaborators.
A commit is more than a copy of the latest project. It is a named checkpoint in the project’s history. If a change breaks the game, Git lets you inspect what changed and restore a known working state.
Unity projects make one Git rule especially important: commit Unity’s metadata files, including files ending in .meta. Unity uses them to preserve references between assets. If you commit a sprite but omit its .meta file, references to that sprite can break when the project is opened elsewhere.
Conversely, do not commit Unity’s generated folders. They can be regenerated and tend to be large or machine-specific.
| Project content | Git action | Reason |
|---|---|---|
Assets and .meta files | Commit | Your art, scenes, scripts, and their Unity identifiers |
Packages | Commit | Package dependencies and their versions |
ProjectSettings | Commit | Project configuration, including the Editor version |
Library, Temp, Logs, Obj | Ignore | Generated local caches and build artifacts |
UserSettings | Usually ignore | Individual workstation preferences |
A Unity .gitignore template encodes these rules for you. Do not try to recreate one manually during this first setup.
How to Setup Github with Unity the Right Way
Watch How to Setup Github with Unity the Right Way by Game Dev Garnet for the GitHub Desktop workflow used in this lesson.
Start with the rationale for commits, backups, and recoverable changes. Then watch repository setup, paying close attention to selecting the Unity .gitignore template. Finally, watch project placement for the idea of placing the Unity project files into the cloned repository folder.
3. Create the repository first
Use GitHub and GitHub Desktop for this course’s version-control workflow.
- Create or sign in to a GitHub account.
- On GitHub, create a new repository. Give it a clear name such as
arena-brawlerortop-down-arena. - Choose Private if you do not want the source visible to everyone.
- During repository creation, add a
.gitignoreand choose the Unity template. - Create the repository.
- Open GitHub Desktop, sign in, select Clone a repository, and clone it to a stable development folder, such as
Documents/GameDev/arena-brawler.
At this point the cloned repository contains a .gitignore, but it is not yet a Unity project.
Create the 2D project safely inside that repository
Because the cloned repository is not empty, use this deliberate two-stage setup:
- In Unity Hub, choose New project.
- Select Universal 2D if it is available. If your Hub presents 2D Core instead, choose that; either is appropriate for the 2D arena game in this course.
- Give the temporary project a name such as
arena-brawler-seed. - Create it in a temporary folder next to your cloned repository, not inside it.
- Let Unity finish creating and opening the project, then close Unity.
- In your file manager, copy these folders from the temporary project into the root of the cloned GitHub repository:
AssetsPackagesProjectSettings
- Delete the temporary project folder after confirming the copied folders exist in the repository.
- Back in Unity Hub, use Add to add the project located in the cloned repository’s root folder.
- Open that repository-based project.
This arrangement makes the repository folder the one true home of the game. Unity Hub may still show the old temporary project entry; remove that entry rather than reopening it by mistake.
When the project opens, Unity may spend a short time importing files and rebuilding its local Library cache. That is expected. The cache will not be committed because the Unity .gitignore excludes it.
4. Make the initial checkpoint
Return to GitHub Desktop. Its Changes panel should now show the Unity project files. Before committing, do a quick sanity check:
- You see
Assets,Packages, andProjectSettings. - You see many
.metafiles. - You do not see
Library,Temp, orLogslisted as changes. - The project opens from the repository location in Unity Hub.
Enter a commit summary such as:
Create 2D Unity project with Android toolchain
Commit the changes to main, then use Push origin to upload the commit to GitHub.
This first commit is a baseline. It records the exact Unity configuration with which the game began, including the Editor version stored in ProjectSettings. If you later upgrade Unity, the upgrade becomes a visible, reversible change rather than an untraceable accident.
From now on, use this small routine whenever you reach a meaningful working state:
- Save your Unity work.
- Inspect the changed files in GitHub Desktop.
- Write a short commit message describing why the change was made.
- Commit.
- Push when you want the remote backup updated.
Git does not replace saving in Unity. Save writes changes to your local project; a commit records those saved changes in history.
5. Completion checklist
Your setup is complete when all of the following are true:
- Unity Hub lists one installed LTS Editor.
- That Editor has Android Build Support, Android SDK & NDK Tools, and OpenJDK installed.
- Unity’s Android external-tool settings use the Unity-installed tools.
- Unity Hub opens a 2D project from your cloned repository folder.
- GitHub Desktop shows a clean working tree after the initial commit.
- The GitHub website displays that initial commit and the Unity project folders.
If Android modules fail to appear in Unity, close the Editor completely, confirm the modules are marked installed in Unity Hub, then reopen the same Editor version. If GitHub Desktop lists Library as a change, pause before committing and confirm that the repository contains the Unity .gitignore file at its root.
Key takeaways
You now have a stable LTS Unity workspace, the Android build dependencies needed later in the course, and a 2D project protected by Git history and a remote GitHub backup. The essential Unity files are committed; disposable generated files are ignored; .meta files are preserved.
Next, you will examine how scenes, GameObjects, components, assets, and C# scripts fit together inside the project you just created.
Can't find a good explanation? Sign up and we'll make it for you
Sign up