
Hello! Welcome to the final lesson in our "Modular and Reusable Workflows" module.
In our previous lessons, we've focused on making workflows powerful and interconnected. You learned to call sub-workflows, control your n8n instance with the n8n API node, and react to internal events with the n8n Trigger. Now that you have the skills to build complex, multi-part automation systems, it's time to address a critical aspect of software development: maintainability.
Just as writing "clean code" is essential for software projects, creating clean, well-documented workflows is vital for building automations that are scalable, easy to debug, and friendly to collaboration. This lesson is dedicated to the principles and practices that make your workflows understandable to your future self and your teammates.
By the end of this 60-minute lesson, you will be able to apply best practices for naming, annotating, and structuring workflows for clarity.
We will cover:
- Naming Conventions: How to name workflows and nodes for immediate clarity.
- In-Workflow Annotation: Using notes and descriptions to explain the "why" behind your logic.
- Structural Patterns: Specific node patterns that make your workflows inherently easier to read and manage.
- Workspace Organization: Using folders and tags to structure your entire n8n project library.
1. The Foundation: Naming Conventions
The simplest yet most impactful practice is giving things clear, descriptive names. In n8n, this applies at both the workflow level and the individual node level. Poor naming forces you to open and analyze a workflow to understand its purpose, wasting valuable time.
Let's explore some professional standards for naming.
n8n Workflow Documentation & Best Practices: A Complete ...
This article from Evalics, 'n8n Workflow Documentation & Best Practices', provides an excellent breakdown of naming conventions. It establishes why naming is so critical for clarity, maintainability, and collaboration.
Please read the section 'Naming Conventions for Readability'. Focus on the workflow-level patterns like [Trigger] Action – Target and the node-level formats. The 'Before and After Examples' section perfectly illustrates the impact of good naming.
As you can see from the reading, a workflow named PROD_Customer_Onboarding is instantly more informative than Workflow 23.
For nodes, the default names like Set1, HTTP Request2, or If are not descriptive. Renaming them is crucial.
35 Tips To Build Better Automations in n8n
In this clip, Mike Pekka emphasizes the importance of renaming nodes from their defaults to reflect their specific function.
Watch from 33:53 to 35:04. Notice how he transforms a generic 'Filter' node into a self-explanatory 'Remove nonrelevant articles' node, making the workflow's logic immediately apparent.
Think of this exactly as you would think about naming functions, classes, or variables in a codebase. The name should describe the intent and outcome.
2. Annotating Your Logic: Explaining the "Why"
While good names explain what a node does, annotations explain why it does it. Complex business logic, workarounds, or specific configurations are often not self-evident. n8n provides several ways to add this crucial context directly within the canvas.
n8n Workflow Documentation & Best Practices: A Complete ...
The Evalics guide also covers the different methods for inline documentation within n8n. These are your equivalent of code comments.
Please read the section 'Comments and Annotations in Workflow Definitions'. Pay attention to the three main tools: Sticky Notes, Node Descriptions, and Workflow-Level Descriptions. The core takeaway here is to 'Document the Why, Not Just the What'.
Let's summarize the key tools:
- Sticky Notes (Note node): Use these for high-level explanations of a group of nodes. They are perfect for describing a whole section of your workflow, like a data validation block or a complex branching path.
- Node Descriptions: Every node has a description field in its "Settings" tab. This is the ideal place to document node-specific details: API endpoint choices, assumptions about input data, or the reason for a particular setting.
- Workflow Descriptions: In the main workflow settings, you can add a description for the entire workflow. This is great for defining the overall business purpose, trigger conditions, and owner.
Documenting the "why" saves immense time during debugging and handovers. A note explaining why a peculiar data transformation exists can prevent someone from "fixing" what is actually intended behavior.
3. Structural Patterns for Clarity
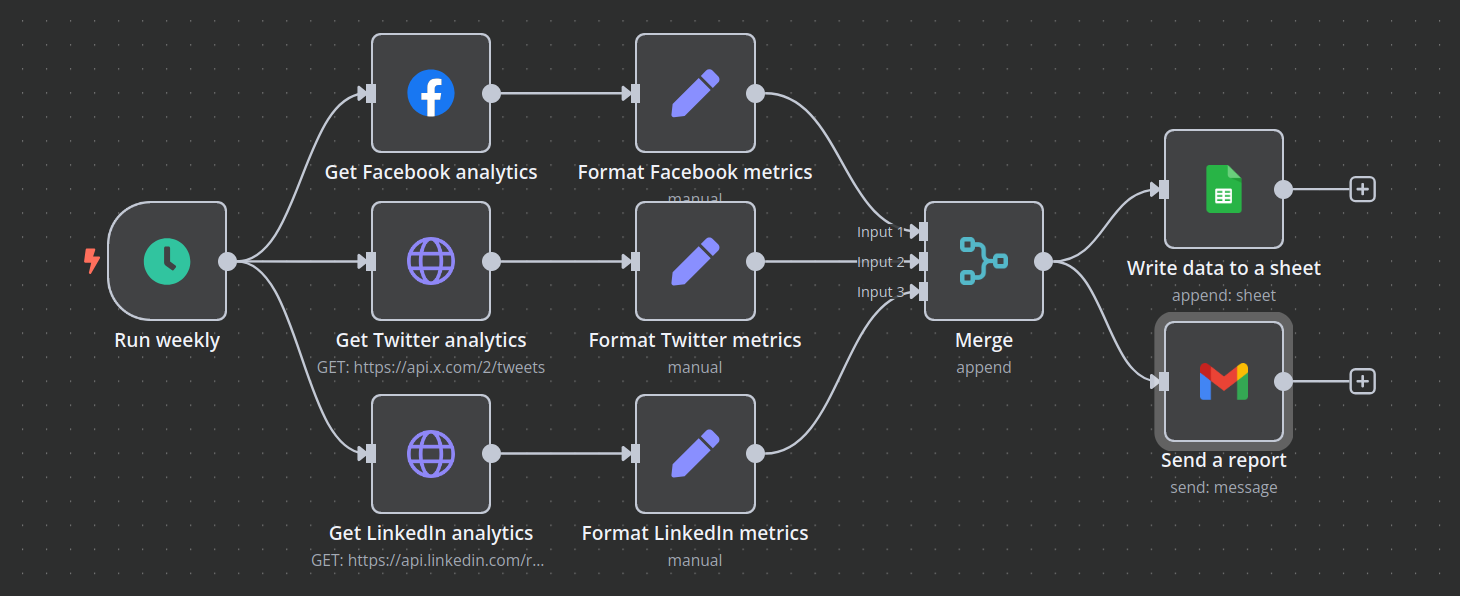
Beyond naming and commenting, the very structure of your workflow can enhance or obscure its clarity. Here are some architectural patterns that lead to cleaner, more maintainable workflows.
Visual Layout
A clean visual flow is the first step.
- Workflows should generally flow from left to right.
- Use the Tidy Up button in the bottom-left corner to automatically align nodes. As the video below shows, this is often more effective when you select a subset of nodes rather than the entire workflow.
35 Tips To Build Better Automations in n8n
This brief clip shows how to use the 'Tidy Up' feature effectively.
Watch from 02:49 to 03:20 to see how to reformat selected parts of your workflow for better organization.
- The Do Nothing node can be used as a simple passthrough to create clean, straight connection lines and to merge different logical paths into a single stream for the next processing step.
The Configuration Node Pattern
A powerful pattern for enhancing maintainability is to centralize your workflow's settings. Instead of hardcoding values like email addresses, API limits, or search queries across multiple nodes, you define them once in a Set node at the beginning of your workflow.
35 Tips To Build Better Automations in n8n
This video provides an excellent demonstration of the 'Configuration Node' pattern. This is one of the most valuable best practices for creating manageable workflows.
Watch from 30:24 to 33:01. The presenter extracts various settings (a post limit, an AI response format, a chat ID) from different nodes and centralizes them in a single Set node named 'config'. This makes future changes incredibly simple and safe.
This pattern has two main benefits:
- Easy Updates: To change a setting, you only need to edit one node.
- Reduced Errors: You eliminate the risk of forgetting to update a value in one of the places it's used.
Prefer Switch over If for Branching
When your workflow needs to take different paths based on a condition, you have two choices: the If node and the Switch node. For clarity, the Switch node is almost always superior.
35 Tips To Build Better Automations in n8n
Let's see why the Switch node is generally a better choice for conditional logic.
Watch from 03:20 to 04:48. The key advantage highlighted is that the Switch node allows you to name your output branches. An output named 'Spam' is far more descriptive than one simply named 'true'.
The Switch node's named outputs make the logic of your workflow self-documenting, allowing anyone to understand the purpose of each branch at a glance.
Test your understanding!
You are building a workflow to process customer support tickets. The workflow needs to send notifications to three different places: a Slack channel for 'Urgent' tickets, an email to the Level 2 support team for 'Technical' tickets, and a database for all other 'General' tickets.
Which node (If or Switch) would be more appropriate for routing these tickets, and why?
Show answer
The Switch node is more appropriate. You can configure it with three output paths and name them 'Urgent', 'Technical', and 'General' respectively. This makes the workflow's routing logic immediately clear. Using nested If nodes would be more cumbersome and much harder to read.
4. Organizing Your Workspace
As you build more workflows, keeping them organized becomes critical. n8n uses a flexible system of tags and folders to help you manage your library.
Workflows can be assigned multiple tags (e.g., prod, sales, daily). The n8n interface can then use these tags to display a virtual folder structure.
n8n Workflow Documentation & Best Practices / Managing n8n projects and folders
These two articles provide a great overview of how to think about structuring your entire n8n workspace.
First, read the section 'Organizing Shared Workflow Libraries' in the Evalics article. It presents different strategies for folder structures (by department, project, etc.) and using tags.
Managing n8n projects and folders
This second article from dev.to provides more technical detail on how folders and tags work together.
Skim the sections 'Folders: Visual Workflow Organization', 'Folder Management Best Practices', and 'Tags: Flexible Categorization System' to solidify your understanding of this tag-based hierarchy.
The key is to establish a consistent strategy that works for you or your team. A common and effective approach is a hierarchical structure:
- Top Level (Environment):
PROD,DEV,STAGING - Second Level (Department/Project):
Sales,Marketing,Customer Onboarding - Tags for Function/Status:
api,database,report,active,deprecated
This is analogous to organizing a large codebase into modules and packages.
5. Bonus: The README File
For particularly complex or mission-critical workflows, consider documenting them externally, just as you would a microservice or an important code library. A simple README.md file, stored alongside an exported JSON version of your workflow (e.g., in a Git repository), provides a comprehensive source of truth.
The Evalics article (resource_id: [LINK](https://evalics.com/blog/n8n-workflow-documentation-best-practices-complete-guide)) under the section "Creating README Files" provides an excellent template for this, covering purpose, triggers, dependencies, and testing procedures. While this is an advanced practice, it is invaluable for team collaboration and long-term maintenance.
Conclusion
You've now completed the "Modular and Reusable Workflows" module. By combining the power of sub-workflows, internal APIs, and event triggers with the discipline of clean architecture, you are well-equipped to build sophisticated and maintainable automation systems in n8n.
Key Takeaways:
- Name Everything Descriptively: Use consistent, clear naming conventions for both workflows and nodes to make their purpose obvious.
- Annotate the "Why": Use Sticky Notes and Node Descriptions to explain complex logic, assumptions, and business rules.
- Structure for Clarity: Employ patterns like the Configuration Node and prefer the
Switchnode overIfto make your workflows inherently readable. - Organize Your Workspace: Use a consistent folder and tag strategy to manage your growing library of workflows.
- Treat Workflows like Code: For complex automations, comprehensive documentation ensures they remain manageable over time.
Preview of the Next Lesson:
With a solid foundation in building robust and maintainable workflows, you are ready to explore one of n8n's most powerful capabilities: AI integration. In the first lesson of our next module, you will connect to the OpenAI API to build a text generation workflow, opening up a whole new world of automation possibilities.