
Hello! Welcome back to our module on containerizing microservices with Docker.
In our last lesson, we saw how to use Docker Compose to manage a multi-service local environment. A key feature we used was the healthcheck property in the docker-compose.yml file, which allowed us to control the startup order of our services by waiting for dependencies to become healthy.
Today, we're taking that concept a step further. Our goal is to implement health checks in a Docker container to ensure container reliability and inform the container runtime. Instead of defining the health check in an external tool like Docker Compose, we will embed it directly into our image using the Dockerfile. This makes our container image self-describing and more portable—a best practice for building production-ready services.
For a mid-senior interview, demonstrating that you build self-contained, reliable images shows a deep understanding of cloud-native principles that goes beyond simply writing code.
1. Why Container Health Checks Are Essential
First, let's clarify why a health check is so important. A container's process can be running, but the application inside it might be non-functional. It could be deadlocked, out of memory, or unable to connect to a critical dependency like a database.
Without a health check, the container runtime (like the Docker daemon or Kubernetes) has no way of knowing this. It sees a running process and assumes everything is fine.
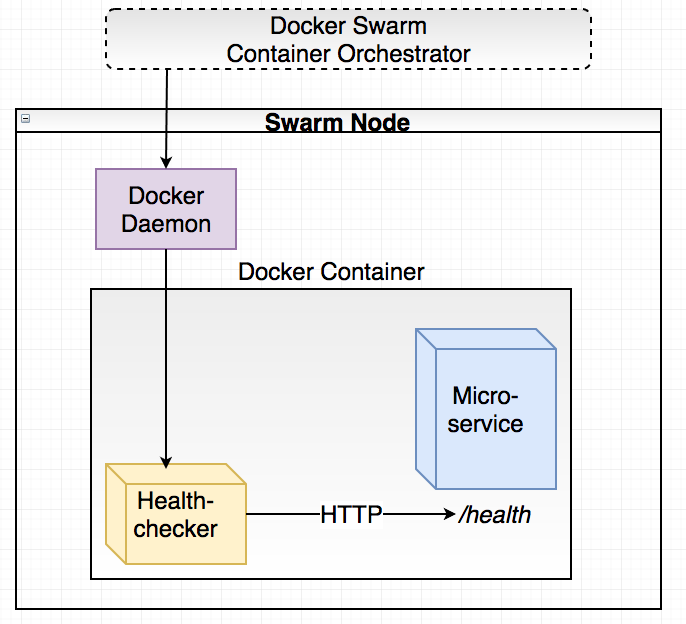
As the following reading explains, health checks are the foundation for automated monitoring and recovery.
Healthchecks for your containerized Spring Boot Application
To understand the motivation behind health checks, please read the section 'Explanation — Why do you need health checks?' from the article 'Healthchecks for your containerized Spring Boot Application'.
Focus on how health checks enable automation. The goal isn't to have a human constantly watching dashboards, but to build a system that can automatically detect and recover from failures.
By exposing a health status, we enable automated systems to:
- Restart an unhealthy container.
- Stop sending traffic to a container that is running but not ready to serve requests.
- Alert an on-call engineer about a persistent problem.
2. The HEALTHCHECK Dockerfile Instruction
The standard way to embed a health check into a Docker image is with the HEALTHCHECK instruction in your Dockerfile. This instruction tells Docker how to test a container to check that it is still working.
The following resource provides a clear example of how to use this instruction for a Spring Boot application.
Spring boot: Docker best practices | by Rohit Loke
Please read the 'Health check' section of the article 'Spring boot: Docker best practices'. It provides a concise and practical implementation.
Pay close attention to the syntax of the HEALTHCHECK command and the explanation of its parameters. We will dissect this command next.
Let's break down the example from the article:
HEALTHCHECK --interval=120s --timeout=3s --retries=3 \
  CMD wget -qO- http://localhost:8080/actuator/health | grep UP || exit 1
--interval=120s: The time to wait between running health checks.--timeout=3s: The maximum time to wait for the command to complete. If it exceeds this, the check is considered failed.--retries=3: The number of consecutive failures needed before the container is marked asunhealthy.CMD wget -qO- ...: This is the actual command to execute.wget -qO- http://localhost:8080/actuator/healthmakes a quiet (-q) HTTP request to the Spring Boot Actuator health endpoint and prints the response to standard output (-O-).| grep UPpipes the response togrep, which searches for the string "UP". If found,grepexits with a status code of0(success).|| exit 1is a shell command that says, "if the previous command failed (i.e.,grepdid not find 'UP'), then exit with a status code of1(unhealthy)."
The exit code of the CMD is what Docker uses to determine health:
0: Success. The container is healthy.1: Unhealthy. The container is not working correctly.2: Reserved. Do not use this code.
Important Note: To use wget or curl in your HEALTHCHECK, you must ensure it's installed in your final container image. Minimal base images like eclipse-temurin:17-jre-focal do not include these tools by default, so you must add a step to install them (e.g., RUN apt-get update && apt-get install -y curl).
3. Docker Health Checks vs. Kubernetes Probes
This is a critical distinction and a common topic in senior-level interviews. While a Docker HEALTHCHECK is a great practice, it's important to know that Kubernetes does not use it. Kubernetes has its own, more sophisticated health-checking mechanism called Probes.
There are three types of probes you must know:
Healthchecks for your containerized Spring Boot Application
Please read the section 'Kubernetes Healthchecks' from the 'Healthchecks for your containerized Spring Boot Application' article. It provides an excellent summary of the three probe types.
Focus on the distinct purpose of each probe: Startup, Readiness, and Liveness. Understanding the difference is key.
Here is a summary of the probes and how they relate to what we've learned:
-
Liveness Probe: "Is the application running?" This is the direct equivalent of Docker's
HEALTHCHECK. If a liveness probe fails, Kubernetes kills the container and attempts to restart it according to its restart policy. Its goal is to recover from deadlocks or unrecoverable states. -
Readiness Probe: "Is the application ready to serve traffic?" This is a crucial distinction. An application might be alive but temporarily unable to handle requests (e.g., warming up a cache, running a database migration). If the readiness probe fails, Kubernetes removes the container's IP from the service endpoints, effectively taking it out of the load balancer's rotation. It won't be killed, just isolated until it becomes ready again.
-
Startup Probe: "Has the application started yet?" This is for applications with slow startup times. It disables the liveness and readiness probes until it succeeds, preventing the app from being killed prematurely before it's even had a chance to fully initialize.
Interview Tip: If asked about the difference, explain that Docker HEALTHCHECK provides a binary "healthy/unhealthy" status to the Docker daemon, while Kubernetes Probes provide a more nuanced, three-part system (Liveness, Readiness, Startup) that gives the orchestrator finer-grained control over the container's lifecycle, including traffic routing and recovery strategies.
4. Customizing Health Information in Spring Boot
The /actuator/health endpoint is powerful because it's extensible. You can provide your own application-specific health checks by implementing Spring Boot's HealthIndicator interface. This allows your health check to verify not just that the app is running, but that its critical dependencies are also available.
Here is a simple example of a custom health indicator:
@Component
public class DownstreamServiceHealthIndicator implements HealthIndicator {

    // You would inject a WebClient or RestTemplate here
    // to call the downstream service.

    @Override
    public Health health() {
        // Here, you would perform the actual check, e.g., call a health
        // endpoint on another service.
        int errorCode = checkDownstreamService();

        if (errorCode != 0) {
            // If the check fails, return a 'down' status with details.
            return Health.down()
                         .withDetail("Error Code", errorCode)
                         .withDetail("Service", "inventory-service")
                         .build();
        }

        // If successful, return an 'up' status.
        return Health.up().build();
    }

    private int checkDownstreamService() {
        // Simulate a check. In a real app, this would involve a network call.
        // Return 0 for success, non-zero for failure.
        if (Math.random() > 0.1) { // 90% chance of success
            return 0;
        } else {
            return 503; // Service Unavailable
        }
    }
}
When this component is registered, the main /actuator/health endpoint will aggregate its status, and the container will only be reported as "UP" if this check and all other default checks (like database and disk space) pass. This makes your health check a much more accurate reflection of your service's true ability to function.
Test your understanding!
You have a Spring Boot application that takes about 45 seconds to start up because it needs to populate a large in-memory cache. During this time, it cannot serve traffic. Your current HEALTHCHECK is:
HEALTHCHECK --interval=10s --timeout=3s --retries=3 CMD curl -f http://localhost:8080/actuator/health || exit 1
What is the problem with this configuration, and how would you fix it using an additional HEALTHCHECK parameter?
Show answer
The Problem: The health check will start running immediately. With a 10-second interval, it will fail at least 4 times before the application is up at 45 seconds. Since --retries=3, Docker will mark the container as unhealthy after about 30 seconds and potentially kill it before it ever gets a chance to start successfully.
The Solution: You should add the --start-period parameter. This parameter defines a grace period during which failures won't count towards the retry limit.
A corrected health check would be:
HEALTHCHECK --interval=10s --timeout=3s --start-period=60s --retries=3 CMD curl -f http://localhost:8080/actuator/health || exit 1
Here, --start-period=60s gives the application a full minute to start up. Health checks will still run during this time, but any failures will be ignored. Once a check succeeds, the start period is over. If 60 seconds pass without a single successful check, the container will then be marked as unhealthy.
5. Graceful Shutdown: The Other Side of Reliability
A related and equally important concept is graceful shutdown. When a container is stopped (either because a health check failed or due to a deployment), it should be given time to finish its work, release connections, and shut down cleanly. Abruptly killing the process can lead to data corruption or orphaned resources.
Spring Boot makes this easy to configure in your application.properties:
# Enable graceful shutdown
server.shutdown=graceful

# Max time to wait for in-flight requests to complete
spring.lifecycle.timeout-per-shutdown-phase=20s
When graceful shutdown is enabled, Spring Boot will stop accepting new requests upon receiving a termination signal (SIGTERM) but will wait for existing requests to complete, up to the configured timeout. This works hand-in-hand with health checks and orchestrators to ensure zero-downtime deployments and reliable operation.
Conclusion
In this lesson, we embedded health-checking logic directly into our Docker image, making it a more robust and portable building block for a microservices architecture.
Key Takeaways:
- The
HEALTHCHECKinstruction in aDockerfiledefines how the Docker daemon can test if the application inside the container is functional. - This check should leverage an application-level endpoint, like Spring Boot Actuator's
/actuator/health, which provides a true reflection of the application's state. - Kubernetes uses its own system of Probes (Liveness, Readiness, Startup), which offers more granular control over a container's lifecycle than Docker's
HEALTHCHECK. - For reliable, production-grade services, health checks must be paired with a graceful shutdown strategy to prevent data loss and ensure clean termination.
In our next lesson, we will continue preparing our application for orchestrated environments by learning how to configure a Spring Boot application to correctly read environment variables and secrets passed by a container runtime. This is the standard way to inject configuration in systems like Docker Compose and Kubernetes.
Can't find a good explanation? Sign up and we'll make it for you
Sign up