
Hello! Welcome back to our module on Containerization with Docker.
In our last lesson, we established robust versioning for our Docker images using tagging strategies like Semantic Versioning and Git SHAs. This ensures every image we build is traceable and ready for a deployment pipeline. But a single microservice image is only one piece of the puzzle. A real application consists of multiple services and dependencies working together.
Today's lesson addresses exactly that. Our goal is to use Docker Compose to launch and network multiple microservices and their dependencies (e.g., database, broker) for local development. Manually starting, networking, and configuring several containers is tedious and error-prone. Docker Compose is the industry-standard tool for declaratively managing a multi-container environment on your local machine, allowing you to replicate a production-like setup with a single command.
For a mid-senior role interview, being able to articulate how you set up a realistic local development environment is a practical skill that demonstrates your efficiency and understanding of the development lifecycle.
1. The Challenge of a Multi-Service Environment
Imagine you have two Spring Boot microservices, service-a and service-b, and a PostgreSQL database. service-b calls an endpoint on service-a, and service-a reads from the database.
To run this locally using just Docker, you would need to:
- Create a Docker network so the containers can communicate.
- Start the PostgreSQL container, passing it configuration via environment variables and mapping a volume to persist its data.
- Start the
service-acontainer, linking it to the network and passing the database URL (using the database container's name). - Start the
service-bcontainer, linking it to the network and passing the URL forservice-a.
This is a lot of imperative docker commands to remember and execute in the correct order. Docker Compose replaces all of this with a single, declarative YAML file.
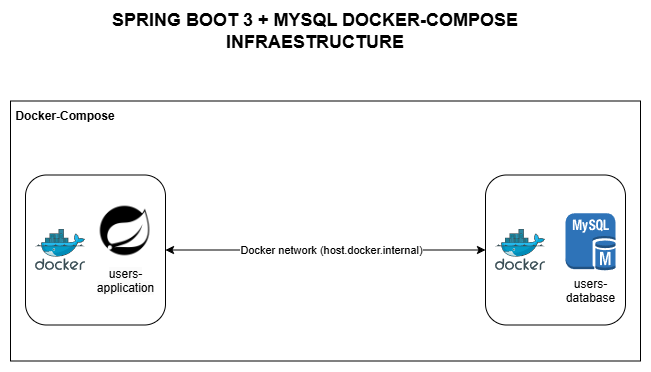
This diagram illustrates a typical setup where a Spring Boot application container needs to communicate with a database container. Docker Compose is designed to manage exactly this kind of relationship.
2. Introducing docker-compose.yml
Docker Compose uses a YAML file, typically named docker-compose.yml, to define a multi-service application. This file describes the services, networks, volumes, and configurations for your entire application stack.
The following article provides a fantastic, production-grade example of a docker-compose.yml file for a multi-service Spring Boot application. We will use it as our primary reference for this lesson.
Building & Running Multiple Services with Docker Compose
Please read the article 'Building & Running Multiple Services with Docker Compose.' It walks through setting up a project with two Spring Boot services and a database, which is a perfect real-world scenario.
Focus on the 'Project Structure' and especially the 'Step 3: The docker-compose.yml' sections. As you study the YAML file, try to identify how it defines the services, manages networking, and handles dependencies. We will break this file down in detail next.
3. Anatomy of a Production-Grade docker-compose.yml
Let's dissect the key components from the docker-compose.yml file in the article you just read. This structure contains patterns you'll be expected to know in an interview.
version: "3.9"
networks:
  app-net:
    driver: bridge

volumes:
  db-data:

services:
  service-a:
    build:
      context: ./service-a
    container_name: service-a-container
    ports:
      - "8081:8080"
    networks:
      - app-net
    environment:
      DB_URL: jdbc:postgresql://db:5432/${POSTGRES_DB}
      # ... other env vars
    depends_on:
      db:
        condition: service_healthy
    healthcheck:
      test: ["CMD", "curl", "-f", "http://localhost:8080/actuator/health"]
      # ... other healthcheck properties

  db:
    image: postgres:15-alpine
    container_name: postgres-container
    environment:
      POSTGRES_USER: ${POSTGRES_USER}
      # ... other env vars
    volumes:
      - db-data:/var/lib/postgresql/data
      - ./database/init.sql:/docker-entrypoint-initdb.d/init.sql
    networks:
      - app-net
    healthcheck:
      test: ["CMD-SHELL", "pg_isready -U ${POSTGRES_USER}"]
      # ... other healthcheck properties
Let's break down the most important sections:
services
This is the heart of the file. Each child element under services (service-a, db) defines one container in your application stack.
-
buildvs.image:- Use
build: { context: ./service-a }when you have the source code and aDockerfilefor a service. Docker Compose will build the image for you. - Use
image: postgres:15-alpinewhen you want to use a pre-built image from a registry like Docker Hub. This is typical for databases, message brokers (like RabbitMQ or Kafka), and other third-party software.
- Use
-
ports: This maps ports from the host machine to the container (HOST:CONTAINER). In the example,8081:8080exposesservice-a's internal port8080on your local machine's port8081. -
environment: This is how you pass configuration, like database credentials or connection URLs, to your application. The${VAR}syntax is powerful; it tells Compose to substitute the value from a.envfile in the same directory or from your shell's environment variables. This keeps secrets out of your version-controlleddocker-compose.yml.
networks
By default, Compose creates a single network for your app. Defining a custom network like app-net is a good practice for clarity.
The most crucial feature here is service discovery. Once containers are attached to the same network, they can find each other using their service name as a DNS hostname.
Look at the DB_URL for service-a: jdbc:postgresql://db:5432/.... service-a can connect to the PostgreSQL database simply by using the service name db. Docker's internal DNS resolves db to the correct container's IP address. You never need to hardcode IP addresses.
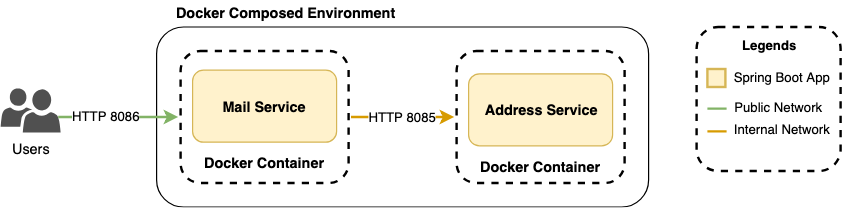
This image shows exactly this concept: services on an internal network communicating via their container/service names.
volumes
Containers are ephemeral, meaning any data written inside them is lost when the container is removed. Volumes are used for data persistence.
- Named Volume (
db-data:/var/lib/postgresql/data): This creates a Docker-managed volume nameddb-dataand mounts it to the PostgreSQL data directory inside the container. This ensures your database data survives container restarts and removals. - Bind Mount (
./database/init.sql:...): This mounts a file or directory from your host machine into the container. It's perfect for providing configuration files or initialization scripts, as seen here with the.sqlfile to set up the database schema on first run.
depends_on and healthcheck: Controlling Startup Order
This is a critical topic for interviews. A common mistake is assuming that depends_on alone is enough to ensure a dependency is ready.
- Simple
depends_on:depends_on: [db]just ensures thedbcontainer is started beforeservice-a. It does not wait for the PostgreSQL application inside the container to be ready to accept connections. Your Spring Boot app might crash if it tries to connect too early. - The Correct Way (
condition: service_healthy): The example correctly usesdepends_on: { db: { condition: service_healthy } }. This tells Compose to wait until thedbcontainer is not just running, but healthy, before startingservice-a. healthcheck: This defines how to determine if a service is healthy.- For
service-a, it usescurlto hit the Spring Boot Actuator/actuator/healthendpoint. - For
db, it uses thepg_isreadycommand-line utility.
This combination ofhealthcheckanddepends_onwith a health condition is the robust, production-ready pattern for managing dependencies.
- For
4. Managing Your Application Stack
With the docker-compose.yml file in place, managing your entire stack becomes incredibly simple. From the directory containing the file, you use a few key commands:
- Start everything:
# --build: Rebuilds images if their Dockerfiles have changed. # -d: Runs containers in detached mode (in the background). docker compose up --build -d - View logs:
# Tail the logs for all services docker compose logs -f # Tail the logs for a specific service docker compose logs -f service-a - Stop and remove everything:
# Stops and removes containers, networks, and default volumes.
docker compose down
Test your understanding!
You are tasked with adding a Redis cache to your application stack. service-b needs to connect to it. Based on the docker-compose.yml example, describe the changes you would make to the file.
What three key sections would you need to add or modify?
Show answer
You would need to make changes in three main places:
-
Add a new
redisservice:
You'd add a new service definition under theservices:block. Since Redis is a standard application, you'd use a pre-built image from Docker Hub. You would also need to add it to theapp-netnetwork.redis: image: "redis:7-alpine" container_name: redis-cache networks: - app-net healthcheck: test: ["CMD", "redis-cli", "ping"] interval: 5s timeout: 2s retries: 5 -
Update
service-b's dependencies:
You'd modify thedepends_onsection forservice-bto ensure it waits for Redis to be healthy before starting.# Inside the service-b definition depends_on: service-a: condition: service_healthy redis: condition: service_healthy -
Provide the Redis URL to
service-b:
You'd add a new environment variable toservice-bso it knows how to connect to Redis, using the service nameredisfor the host.# Inside the service-b environment section environment: # ... existing variables SPRING_DATA_REDIS_HOST: redis SPRING_DATA_REDIS_PORT: 6379
Conclusion
You now have the practical knowledge to define, launch, and manage a complete microservices stack on your local machine using Docker Compose. This tool dramatically improves developer workflow by providing a simple, repeatable way to create a production-like environment.
Key Takeaways:
- Declarative over Imperative: Docker Compose allows you to declare your entire application stack in a single YAML file, rather than running many manual
dockercommands. - Service Discovery is Key: Containers on the same Docker Compose network can communicate using their service names as hostnames, eliminating the need for hardcoded IPs.
- Manage Dependencies Correctly: Always use
healthcheckin combination withdepends_onandcondition: service_healthyto ensure services start in the correct order and dependencies are actually ready. - Separate Configuration: Use
.envfiles to keep configuration and secrets out of yourdocker-compose.yml, which is version controlled.
In our next lesson, we will dive deeper into one of the concepts we used today. We will learn how to implement health checks in a Docker container by adding the HEALTHCHECK instruction directly into a Dockerfile. This will give you full control over how your container reports its health status to the container runtime, whether it's Docker Compose or Kubernetes.
Can't find a good explanation? Sign up and we'll make it for you
Sign up