
Welcome back! In our previous lesson, we established the conceptual foundations of UML sequence diagrams, learning how to identify participants and map out the chronological flow of messages in a given scenario. We focused on the "what" and "why" behind these diagrams.
Today, we transition from concept to practice. Our objective is to take that understanding and translate it into working Mermaid syntax. We will focus specifically on representing the most common types of interactions you'll encounter when modeling APIs or other runtime processes: synchronous calls, asynchronous messages, and the return of data. We'll also learn how to visually represent when a component is actively processing a request using activation periods. By the end of this lesson, you'll be able to write the code for the kinds of diagrams we analyzed conceptually last time.
From Concepts to Code: Basic Message Syntax
In the last lesson, we broke down a "Profile Refresh" scenario into a list of participants and the messages they exchanged. Let's start building the corresponding Mermaid diagram.
First, we declare the diagram type (sequenceDiagram) and list our participants. The order of declaration typically determines their left-to-right order in the diagram.
Here, we've used the as keyword to create short aliases (FE, GW, etc.) for our participants. This is a common practice to keep the message definitions clean and readable, especially in complex diagrams.
With our participants defined, the next step is to draw the messages between them. The core of a Mermaid sequence diagram is the message syntax: [Sender][Arrow][Receiver]: Message Text. The type of arrow you use is critical, as it defines the nature of the interaction.
Let's review the fundamental message types. The following resource provides a concise introduction to the syntax.
Mermaid.js Tutorial: Flowcharts, Sequence Diagrams & Syntax Guide (2026)
This section of the "Mermaid.js Tutorial" by Starmorph introduces the basic syntax for participants and message types.
Please read the first two subsections, Participants and actors and Message types. Focus on the different arrow styles and their meanings (synchronous, asynchronous, return).
Based on that reading, we can distinguish three key interaction patterns:
-
Synchronous Call (
->>): This represents a blocking call. The sender makes a request and waits, unable to proceed until it receives a response. This is the standard model for many function calls or backend-to-backend API requests where one service depends on another's output.- Example:
GW->>US: getUserData(userId)
- Example:
-
Return Message (
-->>): This is used to show the response to a synchronous call. It's typically a dotted line with an arrowhead, indicating the flow of data back to the original caller.- Example:
US-->>GW: User Data JSON
- Example:
-
Asynchronous Message (
-)): This represents a non-blocking or "fire-and-forget" message. The sender dispatches the message and immediately continues with its own processing, without waiting for a response. This is common for event notifications, logging, or queuing tasks for background processing.- Example:
FE-)Analytics: log 'ProfileRefresh' event
- Example:
Notice that the official Mermaid documentation provides an even more extensive list of arrow types. For now, we will focus on ->> (synchronous), -) (asynchronous), and -->> (return), as they cover the vast majority of use cases.
Showing a Participant is "Busy": Activations
In the diagrams from our last lesson, you saw thin rectangles on the lifelines. These are called activation bars (or focus of control), and they are crucial for showing the period during which a participant is active—that is, processing a request or performing a task. A participant's activation begins when it receives a message and ends when it has finished its work (and, in a synchronous flow, returned a value).
Mermaid provides two ways to control these activations. You can use dedicated activate and deactivate commands on separate lines, or you can use a convenient shorthand by appending + (to activate the receiver) and - (to deactivate the sender) to a message arrow. The shorthand is far more common and keeps the diagram source concise.
The official Mermaid documentation explains both the dedicated commands and the shorthand syntax for controlling activations.
Please read the section on Activations. Pay close attention to the +/- suffix notation, as we will be using it in our examples.
Let's see this in action. The following code shows a client making a request to a server, which in turn queries a database.
Let's break down the +/- usage:
Client->>+Server: The+activates theServerwhen it receives thePOST /loginrequest.Server->>+DB: The+activates theDatabasewhen it receives theSELECTquery.DB-->>-Server: The-before the arrow is a recent syntax addition that deactivates the source before sending the message. So, theDatabasedeactivates as it sends the record back. (Alternatively, a-on theServer's return message to theClientwould deactivate theServerafter its work is done).- The final return
Server-->>-Clientdoes not have a-, but once the server has returned the200 OK, its activation bar from the initial client request also ends.
This shorthand cleanly visualizes the call stack, showing which components are waiting on others.
Putting It All Together: The Profile Refresh Flow
Now we have all the pieces to write the full Mermaid code for the "Profile Refresh" scenario from our previous lesson.
Scenario Recap: The Frontend Client requests the user's profile from the API Gateway. The Gateway synchronously calls the User Service, waits for the data, then synchronously calls the Preferences Service, waits for that data, and finally aggregates and returns the complete profile to the Client.
Here is the implementation in Mermaid:
Let's examine the flow:
FE->>+GW: TheFrontendmakes a synchronous call to theAPI Gatewayand activates it. TheFrontendnow waits.GW->>+US: While active, theGatewaymakes its own synchronous call to theUser Service, activating it. TheGatewaynow waits.US-->>-GW: TheUser Servicereturns its data and deactivates itself. TheGatewayis no longer waiting onUS.GW->>+PS: TheGatewayimmediately makes another synchronous call, this time to thePreferences Service, activating it. TheGatewaywaits again.PS-->>-GW: ThePreferences Servicereturns its data and deactivates.GW-->>-FE: Now that theGatewayhas all the information it needs, it formats the final response and returns it to theFrontend. This message completes the initial request, and the activation bars on bothGWandFEwould end.
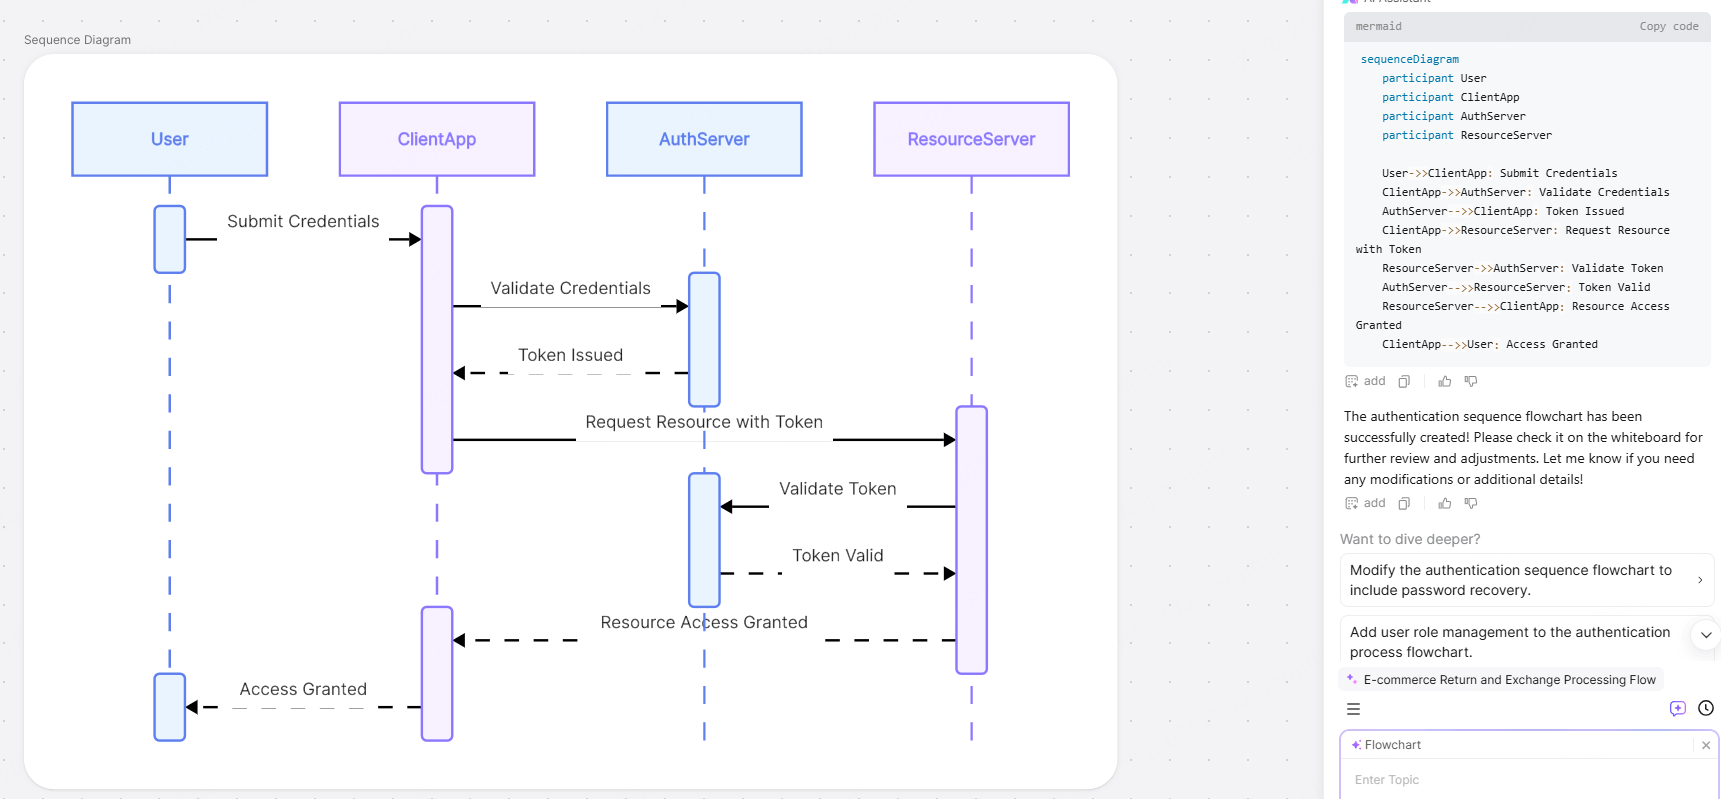
The image below shows a similar example for an authentication flow, along with its corresponding Mermaid code. This provides a great visual confirmation of how the syntax we've just learned translates directly into a rendered diagram.
Your Turn: A Small Modification
To solidify your understanding, try modifying the "Profile Refresh" code block above. Add one more participant called Analytics. After the Frontend Client receives the final 200 OK response, it should send a fire-and-forget asynchronous message to the Analytics service to log that the profile was successfully refreshed.
How would you add this participant and the final asynchronous message? (Don't worry about activations for this new message).
Click to see the solution
We added participant Analytics and used the -) arrow for the asynchronous message from FE to Analytics.
Conclusion
In this lesson, we bridged the gap between the theory of sequence diagrams and their practical implementation in Mermaid. You learned the essential syntax for modeling the dynamic behavior of systems, focusing on the interactions common in modern software and API design.
Here are our key takeaways:
- Message Syntax: The arrow type is key:
->>for synchronous (blocking) calls,--)for asynchronous (non-blocking) messages, and-->>for return values. - Activations: The
+and-shorthand on message arrows is a concise and powerful way to visualize when a participant is active, making the call stack and dependencies clear. - Practical Application: We successfully translated a multi-step API orchestration scenario into a complete and accurate Mermaid diagram.
In our next lesson, we will enhance our diagrams by adding logic. We will explore how to use alt and loop fragments to model conditional paths (like handling a success or error response) and repeated interactions (like polling an endpoint).
Can't find a good explanation? Sign up and we'll make it for you
Sign up