Hello! Welcome to the first lesson of our new module, "Multimodal and Cross-Domain AI."
In the previous module, you built sophisticated agentic systems capable of planning, using tools, and even reflecting on their own actions to improve. However, those agents were largely confined to the world of text. To create truly capable AI, we need to give them senses—the ability to perceive and understand the world through different modalities, like vision and sound.
Today, we take the first and most crucial step in that direction. Your learning outcome is to implement a Vision Transformer (ViT) for image classification. We'll bridge the gap between the Transformer architecture, which you've seen handle language, and the domain of computer vision. This will lay the groundwork for giving our future agents the power of sight.
A Quick Recap and a Look Ahead
Remember the Transformer encoder from our "Sequence Modeling" module? It's a powerful architecture for finding relationships within a sequence. The core challenge we'll solve today is how to represent a 2D image as a 1D sequence that the Transformer can understand.
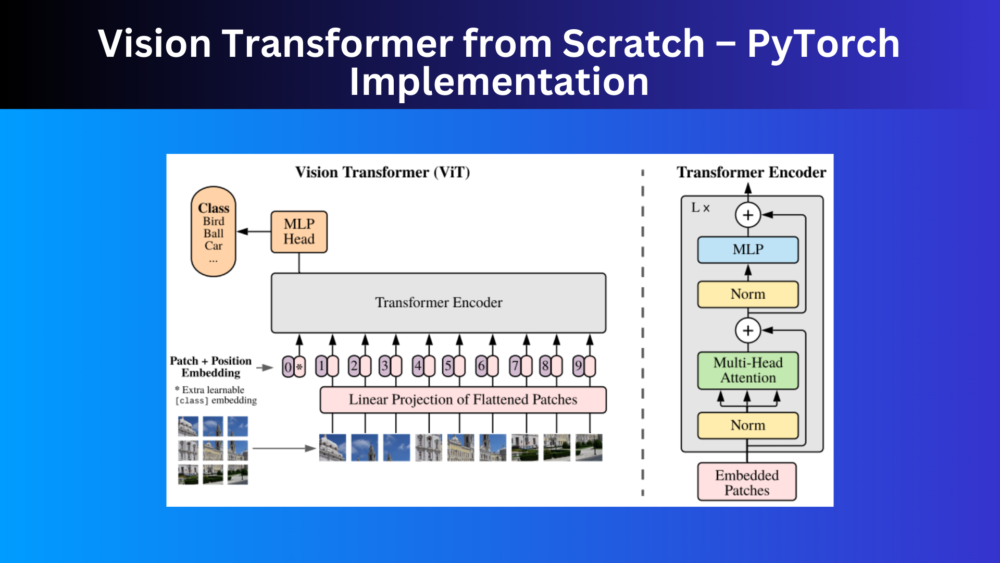
This is the architecture we will build:
Let's begin.
1. The Core Idea: Turning Images into Sequences
A standard Transformer encoder expects a sequence of token embeddings, like words in a sentence. An image, however, is a 2D grid of pixels. How can we reconcile this?
A naive approach might be to treat every pixel as a token. However, this is computationally infeasible.
Vision Transformers (ViT) Explained + Fine-tuning in Python
Let's first understand why we can't just feed pixels into a Transformer. This video provides an excellent explanation of the computational problem and introduces the elegant solution that ViT proposes: image patching.
Watch from the beginning to 07:01. Focus on the explanation of why attention is too computationally expensive for raw pixels and how splitting the image into patches makes the problem manageable. Pay close attention to the analogy between image patches and word tokens.
As you saw, the key innovation of ViT is to treat an image not as a grid of pixels, but as a sequence of smaller image patches. The full process, which directly mirrors how we prepared text for a language model, is as follows:
- Split Image into Patches: A high-resolution image (e.g., 224x224) is divided into a grid of smaller, non-overlapping patches (e.g., 16x16 pixels each). This transforms the image into a sequence of
Npatches. - Flatten and Project: Each 2D patch is flattened into a long 1D vector. A linear projection layer (a simple fully-connected layer) then maps this vector into the model's embedding dimension (e.g., 768). We now have a sequence of
Npatch embeddings. - Prepend a
[CLS]Token: Just like in BERT, a special, learnable "classification" ([CLS]) token embedding is added to the beginning of the sequence. The final output corresponding to this token will be used to represent the entire image for the classification task. - Add Positional Embeddings: Since the Transformer architecture is permutation-invariant, we must explicitly provide positional information. A set of learnable positional embeddings is added to the patch embeddings to give the model information about the original location of each patch.
Build Vision Transformer ViT From Scratch - Intuition and coding
The following clip from the original ViT paper's diagram provides a clear visual walkthrough of this preprocessing pipeline.
Watch from 12:29 to 18:20. This section breaks down the famous diagram from the ViT paper, illustrating the steps of patching, linear projection, adding the class token, and adding positional embeddings. This will solidify your mental model of how the input is prepared.
2. Implementing the Vision Transformer from Scratch
Now, we'll implement a complete ViT in PyTorch. Your background in Python and software engineering will be very helpful here, as we'll build the model in a modular, class-based way.
We will follow a comprehensive video tutorial that codes a ViT from the ground up to classify images from the MNIST dataset. You should code along with the video to get the most out of this lesson.
Build Vision Transformer ViT From Scratch - Intuition and coding
This video will be our primary guide. The instructor builds a ViT from scratch, explaining each component and the corresponding PyTorch code. We will tackle it in sections. First, let's get the project set up.
Watch from 24:44 to 47:39. This segment covers: Setting up the environment and importing libraries. Loading and transforming the MNIST dataset. Defining key hyperparameters like patch_size, embedding_dim, and num_patches. Have your coding environment ready and follow along to prepare the data and configuration.
2.1 The Patch Embedding Layer
This is the most novel component of the ViT. A clever trick to implement the "split, flatten, and project" step efficiently is to use a 2D convolution layer (nn.Conv2d) with a kernel size and stride equal to the patch size. This performs the patching and linear projection in one elegant operation.
Build Vision Transformer ViT From Scratch - Intuition and coding
Let's implement the PatchEmbedding class. Pay close attention to how nn.Conv2d is used not for its traditional feature-learning purpose, but as a tool for patching.
Watch from 47:39 to 1:08:17. The instructor will guide you through creating the PatchEmbedding class. Critically, understand: How kernel_size and stride in nn.Conv2d create non-overlapping patches. How out_channels corresponds to the embedding_dim. The sequence of flatten and transpose operations needed to get the final tensor shape of (batch_size, num_patches, embedding_dim).
For a supplementary text-based explanation of the shape transformations, you can refer to the "Embedding Layer" section of the article "Implementing a Vision Transformer for Image Classification", which lays out the tensor dimension changes very clearly.
2.2 The Transformer Encoder Block
With our sequence of patch embeddings ready, the rest is familiar territory. We feed this sequence into a standard Transformer encoder, identical in principle to the one we studied for NLP. The encoder block consists of multi-head self-attention and a feed-forward MLP, with residual connections and layer normalization. This implementation uses a "Pre-LN" (Pre-Layer Normalization) structure, which is a common and stable variant.
Build Vision Transformer ViT From Scratch - Intuition and coding
Now, let's build the TransformerEncoder block. This should feel like a practical review of concepts from Module 10.
Watch from 1:08:17 to 1:20:11. Implement the TransformerEncoder class. Note the use of PyTorch's built-in nn.MultiheadAttention and the sequence of operations: LayerNorm -> Attention -> Residual -> LayerNorm -> MLP -> Residual.
2.3 Assembling the Full ViT Model
We now have all the building blocks. The final VisionTransformer class will orchestrate them:
- Initialize the patch embedding layer, a stack of Transformer encoders, and the final MLP classification head.
- Initialize the
cls_tokenandpos_embeddingas learnablenn.Parameters. - Define the
forwardpass:- Apply patch embedding to the input image batch.
- Prepend the
cls_tokento each sequence in the batch. - Add the positional embeddings.
- Process the full sequence through the Transformer encoder stack.
- Isolate the output of the
cls_tokenand pass it to the MLP head for the final prediction.
Build Vision Transformer ViT From Scratch - Intuition and coding
Let's assemble the complete VisionTransformer class. This part integrates all the components you've just built.
Watch from 1:20:11 to 1:39:44. Follow the implementation of the final model. Pay special attention to the forward method, where the full data flow is defined. Notice how the cls_token is expanded to the batch size and concatenated, and how only its final output is used for classification.
2.4 Training the Model
With the model defined, the final step is to set up the training loop, optimizer, and loss function, and then start training.
Build Vision Transformer ViT From Scratch - Intuition and coding
Finally, let's train our ViT. This section also reveals a critical implementation detail that often trips people up.
Watch from 1:39:44 to 1:50:26. Implement the training loop. Most importantly, understand the bug and the fix: the necessity of adding batch_first=True to nn.MultiheadAttention. This is a fantastic real-world example of how a small argument can make the difference between a model that learns and one that doesn't.
Test your understanding!
In the VisionTransformer's forward pass, why do we take only the output corresponding to the [CLS] token (i.e., x[:, 0, :]) to feed into the final MLP head, instead of, say, averaging all the patch embeddings?
Show answer
The [CLS] token is designed to act as an aggregate representation of the entire image sequence. Because it participates in the self-attention mechanism across all layers, it iteratively builds up a summary of the entire image. The model is trained specifically to pool all the necessary information for classification into this single token's final embedding. While averaging patch embeddings is a possible strategy (and was explored in the original paper), using a dedicated [CLS] token proved to be more effective and is analogous to its successful use in text classification with models like BERT.
3. Inductive Bias: ViT vs. CNN
After training, you should see impressive accuracy on MNIST. However, the original ViT paper noted that Transformers struggle on smaller datasets like CIFAR-10 compared to Convolutional Neural Networks (CNNs) unless they are pre-trained on massive datasets (like ImageNet). Why is that?
The answer lies in inductive bias.
- CNNs have strong inductive biases built into their architecture. Convolutions assume locality (nearby pixels are related) and translation invariance (an object is the same wherever it appears in the image). This makes them highly data-efficient.
- ViTs have much weaker inductive biases. By treating the image as a sequence of patches, the model initially has no idea which patches are neighbors. It must learn these spatial relationships from the data itself.
This flexibility is a double-edged sword:
- On small datasets (like CIFAR-10), there isn't enough data to learn these fundamental spatial rules, so CNNs often outperform ViTs trained from scratch.
- On massive datasets (like ImageNet), the ViT has enough data to learn these rules and can even discover more complex, long-range relationships between patches that a CNN might miss, leading to state-of-the-art performance.
Tutorial 11: Vision Transformers
This concept is crucial for understanding when to use which architecture. The following tutorial explains this phenomenon by comparing the training curves of a ViT and a ResNet on CIFAR10.
Read the final section of the tutorial, starting from the heading that begins with 'The Vision Transformer achieves a validation and test performance...'. Focus on the explanation of the performance gap and how it relates to the concept of inductive biases.
Conclusion
Congratulations! You have successfully implemented a Vision Transformer from scratch, one of the most important architectures in modern AI. You've not only built it but also understood the deep concepts that make it work.
Key Takeaways:
- Images as Sequences: ViT's core innovation is to divide an image into patches and treat them as a sequence of tokens, making them suitable for a standard Transformer encoder.
- Key Components: The full architecture requires a patch embedding layer, a learnable
[CLS]token, learnable positional embeddings, a stack of Transformer encoders, and a final MLP head for classification. - Implementation from Scratch: You can build a functional ViT using core PyTorch modules like
nn.Conv2d(for patching),nn.MultiheadAttention, andnn.Linear. - Inductive Bias Matters: ViTs have fewer built-in assumptions about image structure than CNNs, making them more flexible but less data-efficient. This is why large-scale pre-training is critical for ViTs to achieve top performance.
Preview of the Next Lesson:
Now that you have a model that understands images (ViT) and models that understand text (like the BERT or GPT-style Transformers you've studied), what if we could make them talk to each other? In the next lesson, you will implement CLIP for joint vision-language representation learning. You'll discover how to train a ViT and a text Transformer together to create a powerful, shared embedding space where an image of a dog and the text "a photo of a dog" are located right next to each other. This is the foundation for almost all modern multimodal systems, from DALL-E to GPT-4V.