Hello! Welcome back to our module on Multimodal and Cross-Domain AI.
In our last lesson, you implemented a Vision Transformer (ViT) from scratch, successfully teaching a model to "see" and classify images. You now have an encoder for vision. From our earlier modules, you're also deeply familiar with Transformer-based encoders for text. Today, we will unite these two worlds.
Your learning outcome is to implement CLIP for joint vision-language representation learning. CLIP (Contrastive Language-Image Pre-training) is a seminal model from OpenAI that learns a rich, shared space where images and text can be compared directly. Understanding and implementing CLIP is a critical step toward building today's most advanced multimodal systems, from text-to-image generators to vision-capable language models.
1. The Big Picture: How CLIP Works
At its core, CLIP consists of two main components:
- An Image Encoder (e.g., a ViT like you built, or a CNN like ResNet).
- A Text Encoder (e.g., a BERT-style Transformer).
The goal is to train these two encoders so that they map corresponding image-text pairs to nearby points in a shared, high-dimensional vector space.
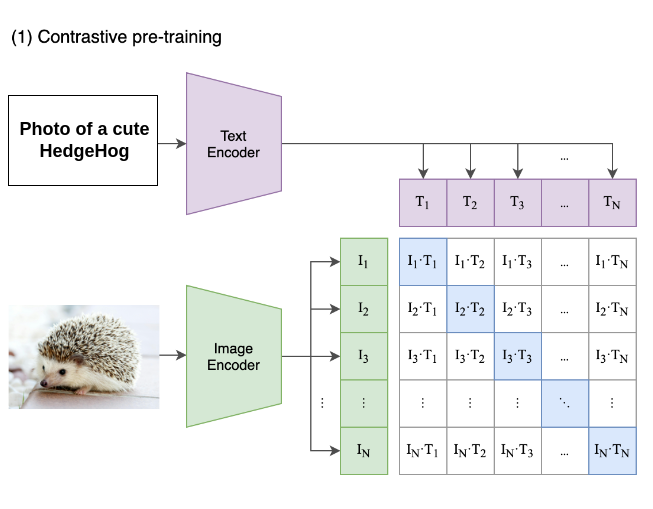
The training process is entirely self-supervised. Given a large dataset of images and their associated captions scraped from the internet, the model learns by trying to match the correct captions to the correct images within a batch. This simple yet powerful objective is called contrastive learning.
OpenAI's CLIP Explained and Implementation | Contrastive Learning | Self-Supervised Learning
To start, let's get a high-level overview of the architecture and the contrastive learning objective. This video provides a clear conceptual breakdown.
Watch from 03:23 to 12:07. The video explains: The two-tower architecture (image and text encoders) and the role of the projection head in creating a shared embedding space. The core idea of the similarity matrix and how the model learns by maximizing the similarity of positive pairs (correct image-text matches) and minimizing it for negative pairs.
2. CLIP in Practice: A High-Level Code Walkthrough
Before we build CLIP from scratch, let's see how to use a pre-trained version. This will give you a concrete sense of the inputs, outputs, and the model's capabilities. Your experience with Python and ML libraries will make this very familiar.
OpenAI CLIP | Machine Learning Coding Series
The following video walks through a Jupyter notebook using OpenAI's official CLIP implementation. It demonstrates the entire process from data preprocessing to calculating image-text similarity.
Watch the first part of the video from 00:00 to 12:48. Focus on the following steps: Loading a pre-trained CLIP model (which includes both the ViT and text Transformer). Preprocessing an image (resize, crop, normalize). Tokenizing text captions using Byte-Pair Encoding (BPE). Passing the image and text through their respective encoders to get [batch_size, embedding_dim] embeddings (in this case, [8, 512]). Calculating the similarity between them.
3. Building CLIP from Scratch
Now, let's implement the model ourselves. We will use a fantastic, clean PyTorch implementation as our guide. Since you've already built a ViT and are familiar with Transformer encoders, you'll see many familiar patterns here.
Our implementation will have four main Python classes:
ImageEncoder: Takes an image and produces a feature vector.TextEncoder: Takes tokenized text and produces a feature vector.ProjectionHead: Maps the feature vectors from both encoders into the shared, lower-dimensional embedding space.CLIPModel: The main module that combines everything and computes the contrastive loss.
Simple implementation of OpenAI's CLIP
First, let's study the building blocks: the encoders and the projection head. This resource provides a minimal, well-documented implementation.
In the GitHub repository, study the Python classes under the headings 'Image Encoder', 'Text Encoder', and 'Projection Head'. Notice that: The ImageEncoder uses a ResNet50 from the timm library. This is interchangeable with the ViT you built. The TextEncoder uses DistilBertModel from HuggingFace. It extracts the final hidden state of the [CLS] token as the sentence representation. The ProjectionHead is a small MLP that takes the encoder outputs (which have different dimensions, e.g., 2048 for ResNet and 768 for DistilBERT) and projects them into a common dimension (e.g., 256).
The Core Logic: The CLIPModel and Contrastive Loss
This is where all the components come together. The CLIPModel's forward pass is where the magic of contrastive learning happens.
The process is as follows:
- Get image and text features from their respective encoders.
- Pass these features through their projection heads to get
image_embeddingsandtext_embeddingsin the shared space. - Normalize the embeddings to unit length. This makes the dot product equivalent to cosine similarity.
- Calculate the logits matrix:
logits = text_embeddings @ image_embeddings.T. This gives a(batch_size, batch_size)matrix of all-to-all similarity scores. - Define the target. For a batch of corresponding pairs, the similarity should be high only on the diagonal (image
iwith texti). The target is therefore an identity matrix. - Calculate the loss. A symmetric cross-entropy loss is computed. We calculate the loss for the images (predicting the correct text) and for the text (predicting the correct image) and average them.
Simple implementation of OpenAI's CLIP
Now, let's dive into the main CLIPModel class and the loss function. Pay close attention to the forward method and the explanation of the loss calculation.
Read the section under the 'CLIP' heading carefully. The author provides a detailed breakdown of: The forward pass, showing how embeddings are generated and the logits matrix is computed. The logic behind the contrastive loss function and why the dot product serves as a measure of similarity. A custom cross_entropy implementation. The author also explains why a simple nn.CrossEntropyLoss()(logits, torch.arange(batch_size)) might be insufficient for datasets with duplicate images, a nuance your software engineering background will appreciate.
Test your understanding!
In the CLIPModel's forward method, the embeddings are normalized before the dot product is calculated:image_embeddings = F.normalize(image_embeddings, p=2, dim=-1)text_embeddings = F.normalize(text_embeddings, p=2, dim=-1)
Why is this normalization step crucial for the contrastive learning objective?
Show answer
This L2 normalization scales the embedding vectors to have a magnitude (length) of 1. When you take the dot product of two unit vectors, the result is mathematically equivalent to their cosine similarity, which ranges from -1 (opposite) to 1 (identical).
This is crucial because we want the model to learn to orient the embeddings correctly in the shared space, not just make them larger to achieve a higher dot product score. Normalization forces the model to focus purely on the angle (i.e., the semantic similarity) between the image and text vectors, which is the core of the contrastive objective.
4. The Emergent Superpower: Zero-Shot Classification
The true power of CLIP isn't just that it learns to match images and text, but that the resulting model can classify images from categories it has never seen during training. This is called zero-shot classification.
The process is ingenious:
- Encode your input image to get its embedding, .
- For your set of possible classes (e.g., "dog", "cat", "car"), create descriptive text prompts: "a photo of a dog", "a photo of a cat", "a photo of a car".
- Encode each of these text prompts to get a set of text embeddings: .
- Calculate the cosine similarity between and each text embedding.
- The class corresponding to the text prompt with the highest similarity is the model's prediction.
The model transfers its general understanding of language and vision to a specific classification task without any task-specific training.
OpenAI CLIP | Machine Learning Coding Series
Let's return to the code walkthrough to see a practical demonstration of zero-shot classification on the CIFAR-100 dataset.
Watch from 19:52 to 26:05. This section shows how to: Take the 100 class names from CIFAR-100. Turn them into text prompts (e.g., "a photo of a(n) apple"). Encode all 100 prompts to create a classification 'head' on the fly. Use this to classify images from a different dataset, demonstrating CLIP's powerful generalization.
The video also touches on "prompt engineering" (e.g., using multiple templates like "a photo of a...", "a bad photo of a..."). This shows that the quality of the text prompt can significantly influence performance, a theme we will explore more deeply in later modules.
Conclusion
Fantastic work today. You have dissected and understood the implementation of CLIP, a cornerstone of modern multimodal AI. By training separate image and text encoders with a simple contrastive objective, CLIP learns a powerful, flexible joint embedding space.
Key Takeaways:
- Joint Embedding Space: CLIP's goal is to create a shared space where semantic similarity between images and text can be measured as proximity.
- Contrastive Learning: The model is trained by maximizing the cosine similarity of correct (image, text) pairs and minimizing it for incorrect pairs within a batch.
- Architecture: It combines a standard image encoder (like ViT or ResNet) and a text encoder (like a Transformer) with projection heads that map their outputs to a common dimension.
- Zero-Shot Transfer: The learned joint space enables remarkable zero-shot classification capabilities, allowing the model to classify images into arbitrary categories defined by natural language prompts.
Preview of the Next Lesson:
We have successfully trained a model that can associate an image with its description. The next logical step is to generate a description from an image. In our next lesson, you will build an image captioning model using an encoder-decoder architecture. You'll combine a vision encoder (like the one from CLIP) with a language decoder (like GPT) to create a model that can look at an image and write a caption for it from scratch.