
Hello! Welcome back to our course on front-end development.
In the last lesson, we explored the three ways to connect CSS to your HTML: inline, internal, and external stylesheets. We established that using an external stylesheet is the best practice, much like using a shared style library in a design system. We also saw that a basic CSS rule consists of a selector and a declaration block (e.g., selector { property: value; }).
Today, we'll focus entirely on that first part: the selector. This lesson is all about how to precisely target the HTML elements you want to style. Just as in Figma you need to select a specific layer, group, or component to apply a style, in CSS you use selectors to "select" elements on your webpage.
By the end of this lesson, you will be able to select HTML elements using four fundamental types of selectors: type, class, ID, and descendant selectors. Mastering these is a critical step toward translating your design vision into a functional web page.
1. The Basic Toolkit: Type, Class, and ID Selectors
Let's start with the three most basic selectors. They form the foundation of how we target elements.
- Type Selector: Targets all elements of a specific type (e.g., all
<p>tags). - Class Selector: Targets all elements that have a specific
classattribute. This is the most flexible and commonly used selector. - ID Selector: Targets the one element that has a specific
idattribute.
These concepts are best understood with an analogy.
CSS Tutorial — Selectors, Element, Class and ID (3/13)
The video "CSS Tutorial — Selectors, Element, Class and ID" from the ColorCode channel provides a great conceptual overview. The Brangelina analogy is a memorable way to think about what selectors do.
Watch the entire video. Pay close attention to: The difference between styling all paragraphs (type selector) vs. specific ones (class/ID selectors). The concept of reusability with classes, which is very similar to using styles or components in your design work. The uniqueness of IDs.
As the video explained, you have different tools for different levels of specificity.
- Type selectors (
p,h1,div) are broad. They're useful for setting up base styles, like a default font for all paragraphs, but they lack the precision for detailed design work. - ID selectors (
#main-header) are for unique, one-off elements. Since an ID must be unique on a page, you'd use it for a major landmark like the main site header or a specific contact form that appears only once. - Class selectors (
.button,.card,.highlight) are your primary tool. They are reusable and can be applied to any element, and an element can have multiple classes. This is the direct parallel to creating and applying component styles in Figma. You can create a.button-primaryclass for your main call-to-action buttons and apply it wherever needed.
For a more detailed written reference on these selectors, the Mozilla Developer Network (MDN) is the industry standard.
The MDN article "Basic CSS selectors" offers a comprehensive and authoritative guide. It's a great resource to bookmark for future reference.
Read the sections titled 'Type selectors', 'Class selectors', and 'ID selectors'. You can skim the interactive examples for now. Focus on the syntax (e.g., ., #) and the core rules, especially the uniqueness of IDs versus the reusability of classes.
2. Combining Selectors for More Power
So far, we've selected elements one way at a time. The real power of CSS comes from combining selectors to create more specific and efficient rules.
Chaining Selectors (AND Logic)
What if you want to style an h2 with a class of highlight differently from a p with the same class? You can chain a type selector and a class selector together.
h2.highlight { ... }
This rule will only apply to <h2> elements that also have the class highlight. There is no space between the selectors. This is like an "AND" condition.
Selector Lists (OR Logic)
What if you want to apply the exact same style to all your headings and also to any element with a class of .special? Instead of writing separate rules, you can group the selectors with a comma.
h1, h2, h3, .special { ... }
The comma acts like an "OR" condition, applying the styles to any element that matches any selector in the list. This helps keep your code DRY (Don't Repeat Yourself).
The following video demonstrates these combinations clearly.
Learn Every CSS Selector In 20 Minutes
Let's watch a segment from Web Dev Simplified's "Learn Every CSS Selector In 20 Minutes". This part focuses specifically on combining selectors.
Watch from 3:57 to 5:54. The video explains how to chain selectors together without spaces (AND) and how to use commas to create a list of selectors (OR).
3. Hierarchical Selectors: The Descendant Selector
Web pages have a structure, a hierarchy of elements nested inside other elements. CSS allows you to target elements based on this relationship. This is crucial for scoping your styles, ensuring that a rule only applies within a specific section of your page.
The most common hierarchical selector is the descendant selector, which is represented by a space.
For example, the selector article p will target any <p> element that is a descendant of (i.e., located anywhere inside) an <article> element.
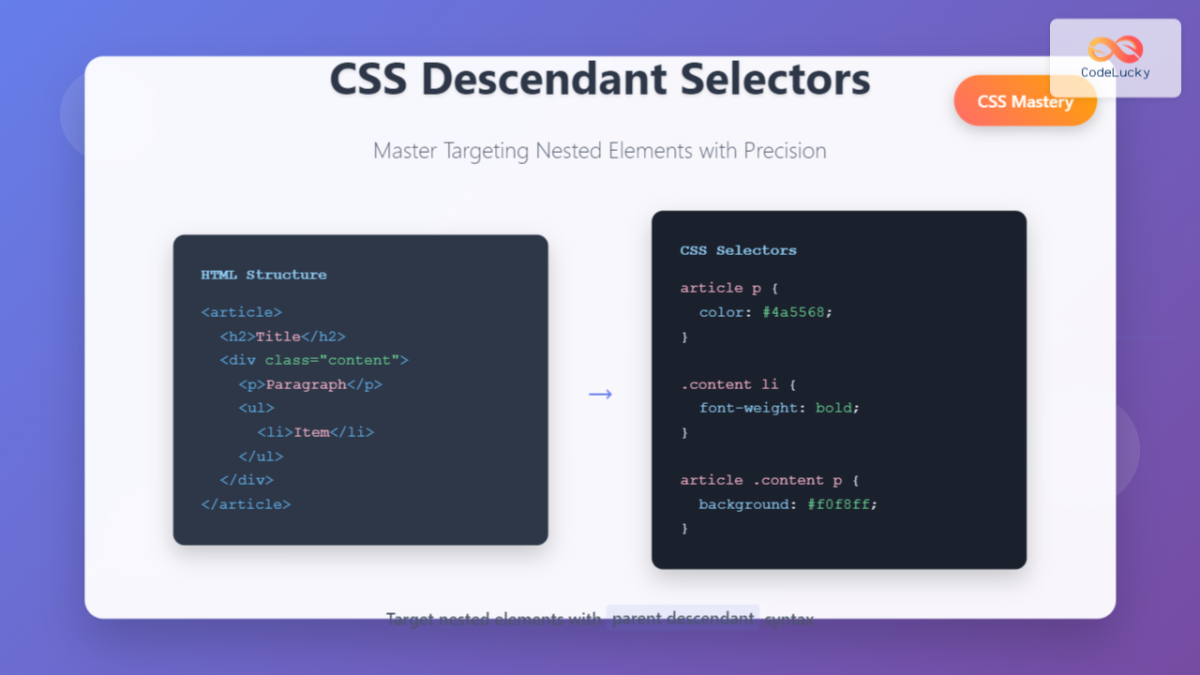
This is incredibly useful. Imagine you want all links inside your main navigation to be white, but all links in the footer to be gray. You could use descendant selectors:
/* Selects any <a> inside the element with the ID 'main-nav' */
#main-nav a {
  color: white;
}

/* Selects any <a> inside the <footer> element */
footer a {
  color: gray;
}
Let's see this in action.
Learn Every CSS Selector In 20 Minutes
We'll return to the Web Dev Simplified video to learn about descendant selectors.
Watch from 6:04 to 8:12. This section explains the descendant selector (using a space) and contrasts it with the direct child selector (using >). For this lesson, focus on understanding the descendant selector. The distinction is useful to know, but the descendant selector is our main goal today.
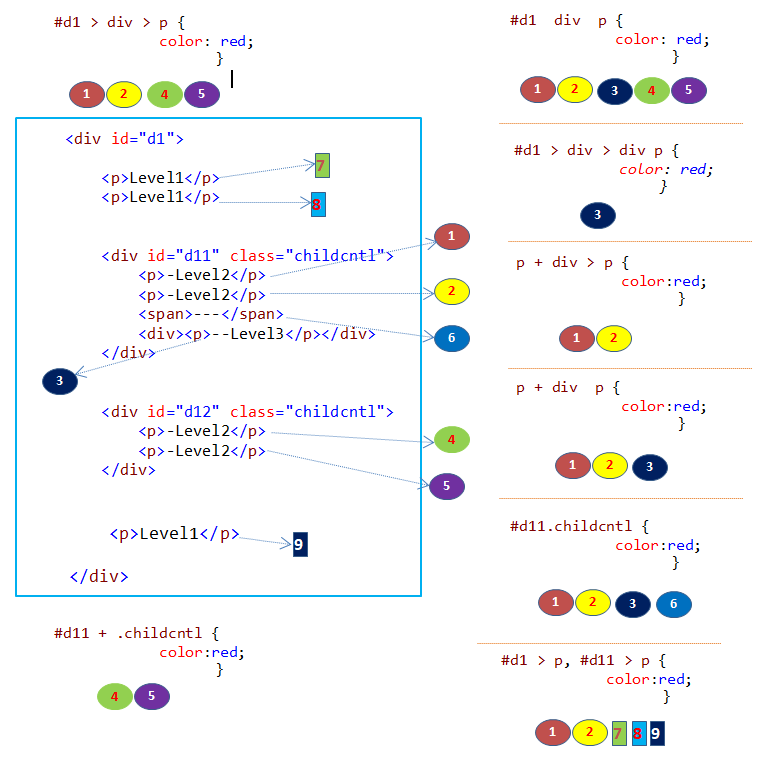
As the video mentions, the descendant selector (ul li) targets children at any level of nesting. The direct child selector (ul > li) is more strict, targeting only immediate children. We will focus on the descendant selector for now as it is more broadly used.
This final image provides a great summary, showing several of the selectors we've discussed today and how they target elements in a sample HTML structure.
Conclusion
You've now learned the fundamental tools for selecting elements on a web page. This is a huge step in gaining control over the visual presentation of your content.
Key Takeaways:
- Type Selectors (
p): Broadly target all elements of a certain type. Good for base styles. - Class Selectors (
.card): Your go-to tool. They are reusable and flexible, perfect for styling components. - ID Selectors (
#main-nav): Use them for single, unique elements on a page. - Descendant Selectors (
.card p): Target elements based on their container, allowing you to scope styles to specific sections of your site. - You can combine selectors to create precise styling rules using chaining (AND logic) and lists (OR logic).
In our next lesson, we'll shift our focus back to the other half of the CSS rule: the declaration block. You'll learn how to use common CSS properties to style text, including font-family, font-size, color, and text-align.
Can't find a good explanation? Sign up and we'll make it for you
Sign up